


Amundsen Setup refers to installing and configuring Amundsen, an open-source platform for data discovery and metadata management.
See How Atlan Simplifies Data Governance – Start Product Tour
It helps organizations centralize metadata, making data assets more accessible and searchable.
The setup involves deploying Amundsen using tools like Docker Compose and configuring metadata ingestion pipelines.
By connecting to data sources and integrating with platforms like Apache Airflow, Amundsen enables seamless collaboration.
Proper setup enhances data governance, streamlines data discovery, and ensures scalability for growing organizational needs.
Quick answer:
Crunched for time? We’ve got you covered with a quick summary of the highlights of this article:
- The article takes a comprehensive look at Amundsen’s architecture and setup process.
- We also offer a hosted demo environment to give you a fair sense of Amundsen.
- Like Amundsen? You’ll love Atlan. Atlan has been recognized as a leader in enterprise data catalogs. Book a demo or take a guided product tour.
In this guide, we’ll walk through all the requisite steps to set up Amundsen - one of the most popular open-source data cataloging tools.
For ease of understanding, the setup process has been sequentially divided into the following steps:
- Taking stock of requirements to install Amundsen
- Understanding Amundsen architecture
- Cloning the Amundsen repository
- Loading sample data
- Using standalone python scripts
- Enabling Elasticsearch and Atlas
- Anticipating common installation issues
Amundsen Data Catalog Demo
Permalink to “Amundsen Data Catalog Demo”Here’s a hosted demo environment that should give you a fair sense of the Lyft Amundsen data catalog platform:
Requirements to install Amundsen
Permalink to “Requirements to install Amundsen”To install Amundsen, you would need the following:
- A local instance or a cloud VM (for instance, on AWS, Google Cloud, or Azure) running Docker and Docker Compose.
- Python ≥ 3.6, Node v10 or v12, npm ≥ 6.x.x, and Elasticsearch 6.x - all of these will be installed using Docker Compose.
Amundsen architecture
Permalink to “Amundsen architecture”Amundsen is a composite of five different components serving different purposes by interacting with each other:
- Frontend - uses React and Flask to provide an interface for you to use other components of Amundsen. The front end is accessible at localhost:5000.
- Search - uses Elasticsearch to index metadata and enables the users accessing the Frontend to search the metadata. The search service is accessible at localhost:9200, but there’s no UI for it.
- Metadata - can choose to store and retrieve data from a host of database backends, including neo4j, MySQL on RDS, Apache Atlas, etc. The metadata service is accessible at localhost:21000.
- Databuilder - helps you extract metadata from different data sources and load them into the metadata backend. You can use this library with standalone Python scripts or an orchestrator like Airflow.
- Common - holds the code that is used across all the microservices mentioned above.
You can read more about the original implementation at Lyft on their engineering blog.
Is Open Source really free? Estimate the cost of deploying an open-source data catalog 👉 Download Free Calculator
How to set up Amundsen?
Permalink to “How to set up Amundsen?”Follow the following steps:
- Step 1- Clone the Amundsen repository from GitHub
- Step 2- Load sample data using sample data loader scripts
- Step 3- Clean existing docker
- Step 4- Increase docker-engine memory to more than the default
Let’s look at each step in detail.
Step 1: Cloning the Amundsen repository from GitHub
Permalink to “Step 1: Cloning the Amundsen repository from GitHub”Although you can install the microservices mentioned above in a standalone fashion and configure them to talk to each other, the easiest way to set up Amundsen is by using Docker Compose to do all that work for you. Let’s first clone the Amundsen repository on your local instance or the newly created VM.
git clone --recursive https://github.com/amundsen-io/amundsen.git
You’ll find several docker-amundsen-*.yml files in the root directory of the repository. The only major difference in the different YAML files is the different backend used for the metadata service.
As mentioned earlier, you can choose a host of databases to store and retrieve your metadata. The original and default option is neo4j, but it only allows for pull-based metadata collection.
On the other hand, Apache Atlas allows for both push-based (via Atlas Hive Hook) and pull-based metadata collection. Atlas has many other benefits as it is a full-fledged data governance service that allows you to view and edit your metadata using the Atlas UI.
Read more about Apache Atlas here.
For the reasons mentioned above, we’ll use Apache Atlas as the backend. Let’s install Amundsen using the following command:
docker-compose -f docker-amundsen-atlas.yml up
Following the command, you will see a screen similar to the one shown below, where all the microservices are deployed:
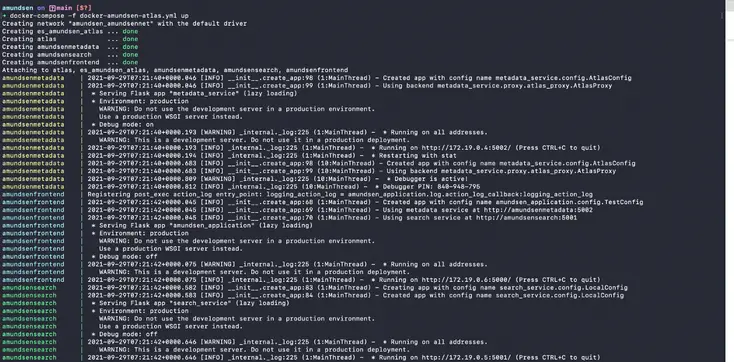
Install Amundsen using Docker Compose - Source: Amundsen.
The installation process will take a while to complete. You can check the status of the individual services by running the docker ps command as shown below:

Check the status of Docker containers for all the microservices - Source: Amundsen.
Although the services will be available pretty quickly, as shown by the docker ps command, you won’t see anything if you visit Amundsen UI because Atlas takes a while to get started for the first time. You’ll see the following screen when Atlas is being started:
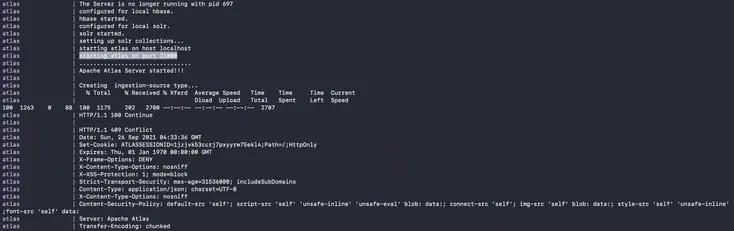
The last leg of the installation — Apache Atlas takes some time to start - Source: Amundsen.
Step 2: Loading sample data
Permalink to “Step 2: Loading sample data”Before logging into the Amundsen UI, you must load some sample data into the backend.
Pro tip: Although the documentation says you don’t need to load sample data if you’re installing Amundsen with Atlas backend, it doesn’t quite work. You might end up with an empty Amundsen screen with no data loaded. To rectify this installation glitch, you can use one of the pre-built scripts to load sample data in any given backend.
Using standalone python scripts
Permalink to “Using standalone python scripts”You can use the databuilder library with standalone Python scripts and orchestration tools like Airflow to keep the metadata updated based on a schedule. Think of it as a library to support an ETL job that just extracts, transforms, and loads metadata from a data source. For simplicity’s sake, let’s just use one of the sample data loader scripts available to load the sample data into the metadata database. For loading data into Atlas, use the sample_data_loader_atlas.py file as follows:
cd amundsen/databuilder
python3 -m venv venv
source venv/bin/activate
pip3 install --upgrade pip
pip3 install -r requirements.txt
python3 setup.py install
python3 example/scripts/sample_data_loader_atlas.py
Elasticsearch and Atlas
Permalink to “Elasticsearch and Atlas”The script mentioned above will not only load data into Atlas, but it will also create the three default indexes on the Elasticsearch instance —table_search_index, user_search_index, and dashboard_search_index. This script will take a few minutes to execute.
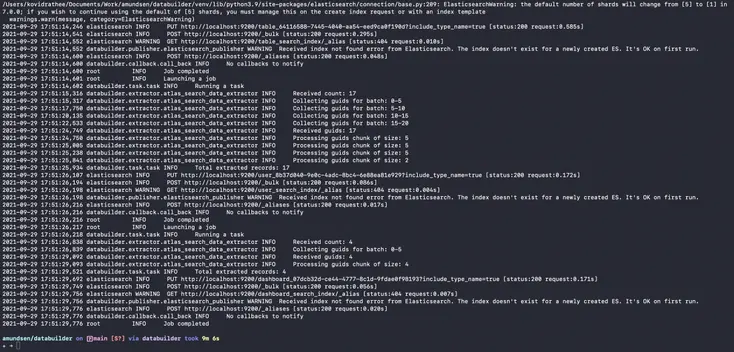
Populate Elasticsearch indexes - Source: Amundsen.
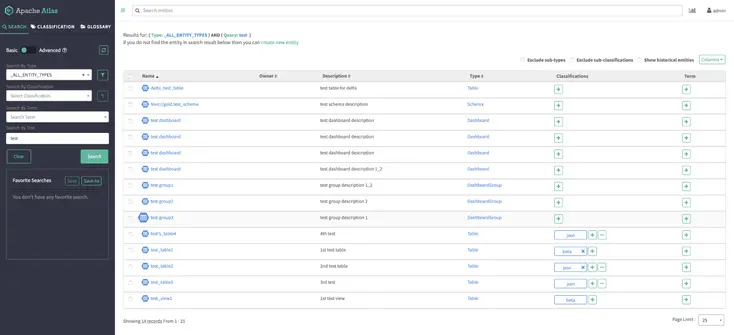
Once this script completes successfully, you can be rest assured that data has been pushed to both Elasticsearch and Atlas and is ready to be queried from both the Atlas and Amundsen frontends. You can access the data via the Amundsen UI on localhost:5000 as shown below:
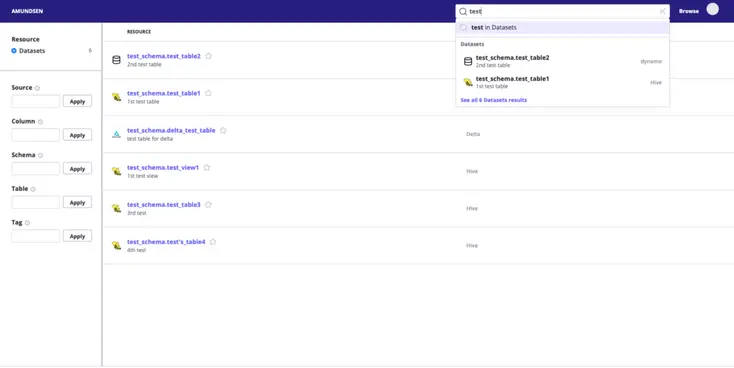
Amundsen Table Navigation - Source: Amundsen.
Alternatively, you can also access your metadata using the Atlas UI at localhost:21000, as shown below:
Apache Atlas with the legacy frontend- Source: Amundsen.
Common installation issues
Permalink to “Common installation issues”Aside from the installation issues mentioned in the official documentation, a few issues might come up depending on where you are trying to install Amundsen. We’ll look at some of those issues and their resolutions.
Step 3: Clean existing docker
Permalink to “Step 3: Clean existing docker”To avoid random preventable errors such as, ERROR: readlink /var/lib/docker/overlay2: invalid argument make sure that you remove all the unused containers using docker system prune. This will remove all unused containers, networks, and images and reclaim the freed-up space from those entities. By default, the volumes aren’t removed to prevent you from deleting important data accidentally. If you don’t have any important data, you can run docker volume prune to clean up all the volumes. Your Docker will be fresh as a daisy now.
Step 4: Increase Docker engine memory
Permalink to “Step 4: Increase Docker engine memory”If you’re installing this on your local machine (for instance, a Mac), you might want to reset your Docker Engine Memory from the default 2GB to a bit more because Docker Compose might run out of memory.
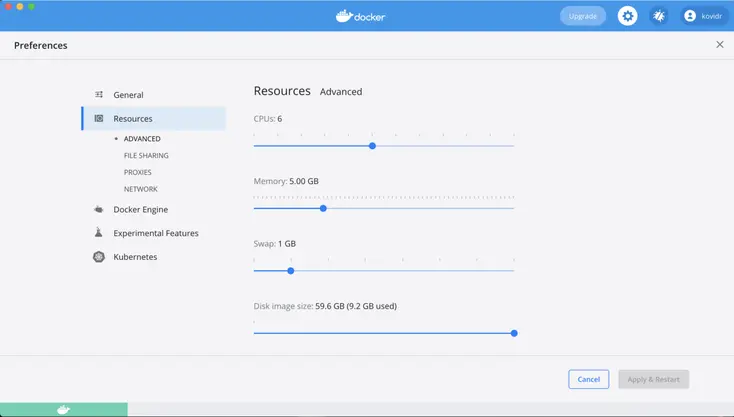
Adjust memory allocation settings in Docker Preferences to prevent memory issues with Docker Compose - Source: Amundsen.
Amundsen demo: Explore and get a feel for Amundsen with a pre-configured sandbox environment
Permalink to “Amundsen demo: Explore and get a feel for Amundsen with a pre-configured sandbox environment”Now that you have set up Amundsen, you can explore the features with the loaded sample data. To get a better sense of the product and see some real data, you’ll need to connect one or more of your data sources. Amundsen also allows you to preview the data stored in the tables while searching through the metadata database.
In case you don’t want to go through this entire process and want to quickly browse through the Amundsen experience, we’ve setup a sample demo environment for you, feel free to explore:
How organizations making the most out of their data using Atlan
Permalink to “How organizations making the most out of their data using Atlan”The recently published Forrester Wave report compared all the major enterprise data catalogs and positioned Atlan as the market leader ahead of all others. The comparison was based on 24 different aspects of cataloging, broadly across the following three criteria:
- Automatic cataloging of the entire technology, data, and AI ecosystem
- Enabling the data ecosystem AI and automation first
- Prioritizing data democratization and self-service
These criteria made Atlan the ideal choice for a major audio content platform, where the data ecosystem was centered around Snowflake. The platform sought a “one-stop shop for governance and discovery,” and Atlan played a crucial role in ensuring their data was “understandable, reliable, high-quality, and discoverable.”
For another organization, Aliaxis, which also uses Snowflake as their core data platform, Atlan served as “a bridge” between various tools and technologies across the data ecosystem. With its organization-wide business glossary, Atlan became the go-to platform for finding, accessing, and using data. It also significantly reduced the time spent by data engineers and analysts on pipeline debugging and troubleshooting.
A key goal of Atlan is to help organizations maximize the use of their data for AI use cases. As generative AI capabilities have advanced in recent years, organizations can now do more with both structured and unstructured data—provided it is discoverable and trustworthy, or in other words, AI-ready.
Tide’s Story of GDPR Compliance: Embedding Privacy into Automated Processes
Permalink to “Tide’s Story of GDPR Compliance: Embedding Privacy into Automated Processes”- Tide, a UK-based digital bank with nearly 500,000 small business customers, sought to improve their compliance with GDPR’s Right to Erasure, commonly known as the “Right to be forgotten”.
- After adopting Atlan as their metadata platform, Tide’s data and legal teams collaborated to define personally identifiable information in order to propagate those definitions and tags across their data estate.
- Tide used Atlan Playbooks (rule-based bulk automations) to automatically identify, tag, and secure personal data, turning a 50-day manual process into mere hours of work.
Book your personalized demo today to find out how Atlan can help your organization in establishing and scaling data governance programs.
FAQs about Amundsen setup
Permalink to “FAQs about Amundsen setup”1. What is Amundsen Setup?
Permalink to “1. What is Amundsen Setup?”Amundsen Setup refers to the process of installing and configuring Amundsen, an open-source data discovery and metadata platform. It helps users and organizations improve data discovery, governance, and collaboration by centralizing metadata.
2. How do I configure Amundsen for data discovery?
Permalink to “2. How do I configure Amundsen for data discovery?”To configure Amundsen for data discovery, you’ll need to follow a structured setup process. This includes preparing your environment, using Docker Compose for installation, and connecting Amundsen to your data sources and pipelines for metadata indexing.
3. What are the key steps in setting up Amundsen?
Permalink to “3. What are the key steps in setting up Amundsen?”Setting up Amundsen involves several steps: Installing prerequisites like Docker, configuring Docker Compose with Amundsen services, setting up metadata ingestion pipelines, and verifying that all components—frontend, backend, and search—are working properly.
4. How does Amundsen integrate with existing data pipelines?
Permalink to “4. How does Amundsen integrate with existing data pipelines?”Amundsen integrates seamlessly with data pipelines such as Apache Airflow and Kafka. It can automatically ingest metadata from these pipelines, enabling real-time metadata updates and improving data discovery across your organization.
5. Can Amundsen Setup be automated?
Permalink to “5. Can Amundsen Setup be automated?”Yes, Amundsen Setup can be automated using scripting and orchestration tools. You can use configuration files and automated deployment pipelines to streamline the installation process, ensuring consistency and reducing manual errors.
6. What are the best practices for optimizing Amundsen Setup?
Permalink to “6. What are the best practices for optimizing Amundsen Setup?”To optimize Amundsen Setup: Ensure that metadata ingestion pipelines are properly configured, regularly update the configuration for evolving data sources, implement security measures to protect sensitive metadata, and monitor system performance to scale infrastructure as needed.
Share this article