


A Step-By-Step Guide to Install and Configure Okta OIDC on Amundsen
Permalink to “A Step-By-Step Guide to Install and Configure Okta OIDC on Amundsen”This step-by-step guide will take you through the process of setting up OIDC authentication in Amundsen. To enable OIDC authentication in Amundsen, you need to create an OIDC app with identity providers such as Auth0, Okta, Google, etc. For this guide, we’ll be using Okta.
OIDC is one of the most common authentication methods used by applications. It uses OAuth2 and HTTP flows. OIDC works on access tokens and ID tokens (which are signed JSON Web Tokens). This mechanism makes the authentication procedure for any given application more standardized and secure.
Essential steps in setting up OIDC authentication in Amundsen with Okta:
- Step 1: Prerequisites for setting up OIDC in Amundsen
- Step 2: Creating an Okta OIDC App
- Step 3: Building the front-end service
- Step 4: Verifying the Okta OIDC + Amundsen Integration
Is Open Source really free? Estimate the cost of deploying an open-source data catalog 👉 Download Free Calculator
Step 1: Check for Prerequisites
Permalink to “Step 1: Check for Prerequisites”- GitHub repositories — you can use either of the two following repos Amundsen Frontend Library or Amundsen Monorepo. In this guide, we’ll use the former.
- Node.js ≥ 14 and ≤ 16 (for Amundsen Frontend Library), Node.js ≥ 14 for Amundsen Monorepo, and Python ≥ 3.6.
- FlaskOIDC - a thin wrapper over Flask to enable easy integration with any OIDC-based web app.
- Okta Account - this will be used as the identity provider.
Please note that all the secrets, keys, and accounts used in this guide were temporarily created and deleted.
Step 2: Create an Okta OIDC App
Permalink to “Step 2: Create an Okta OIDC App”Install Okta CLI
Permalink to “Install Okta CLI”If you’re on a Mac, run the following command to install Okta CLI:
$ brew install --cask oktadeveloper/tap/okta
Register a New Organization in Okta
Permalink to “Register a New Organization in Okta”If you are on any other platform, please follow the instructions provided by Okta. Once you’re done installing the Okta CLI, run the following command to register a new organization:
$ okta register
You’ll be prompted to enter basic details, such as first name, email address, and company name. Once you fill out the details, you’ll receive a verification code on your email, which you’ll have to provide while registering the organization. Once you’re done with the verification, you’ll see a one-time link to your Okta domain that will lead you to a password reset page. You can see the registration process in the image below:
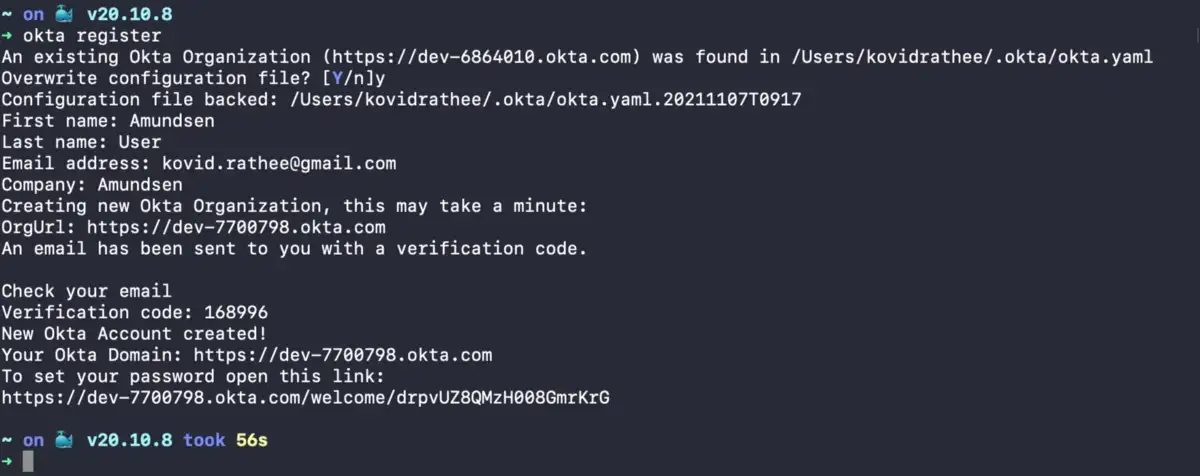
Create a new Okta organization using Okta CLI.
Create an OIDC Web Application
Permalink to “Create an OIDC Web Application”Once you reset the password, you’ll be able to log into your Okta domain. Head over to the left panel, click on Applications and choose the following option: Create a new app integration. You’ll see the following card:
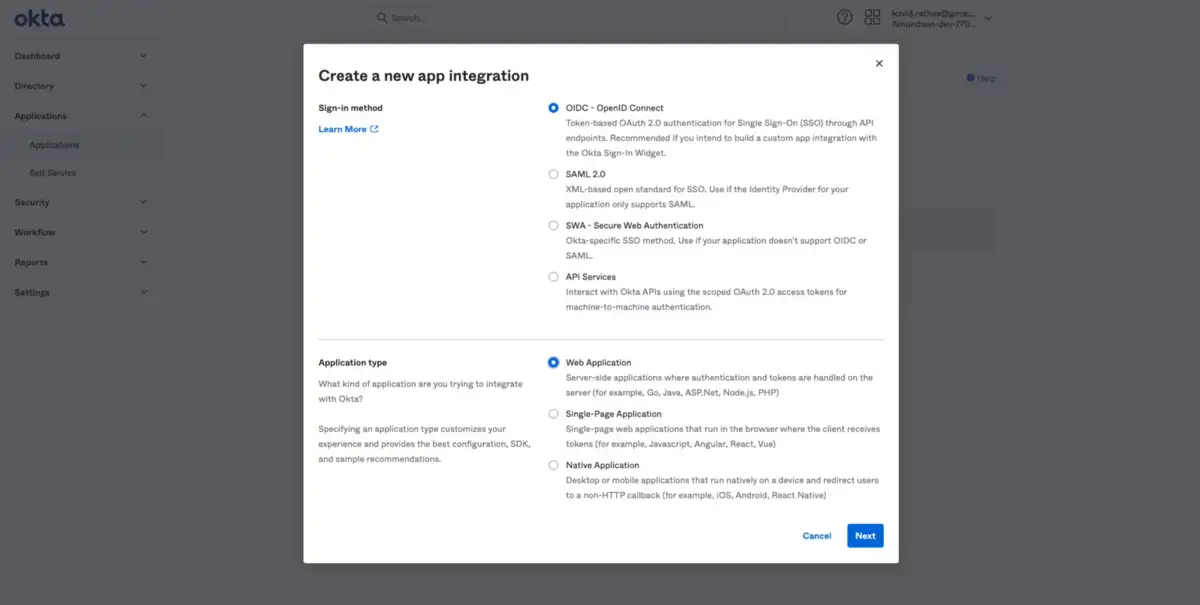
Create an OIDC Web application using Okta.
Proceed to fill in the details for your new web app integration. The form will ask you for the following details:
Sign-in redirect URIs
http://<AMUNDSEN-HOST-IP>:<AMUNDSEN-PORT>/authorization-code/callback
Signout redirect URIs
http://<AMUNDSEN-HOST-IP>:<AMUNDSEN-PORT>/
An example of Amundsen running on localhost:5000 is shown below:
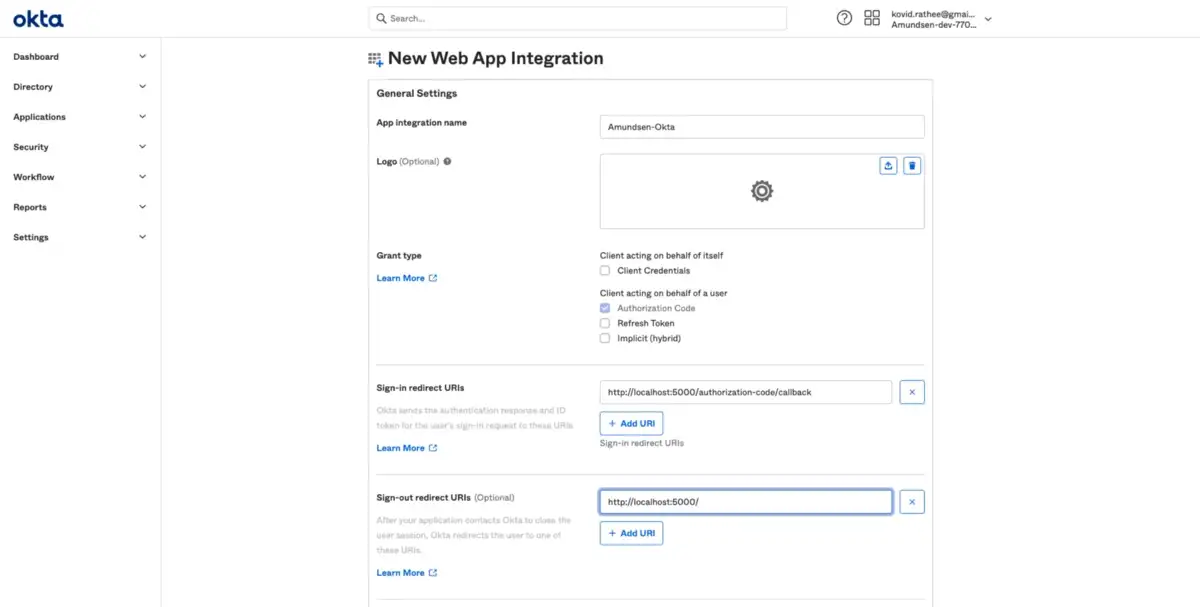
Configure your Okta OIDC Web Application.
After completing the configuration, you’ll be able to get the Client ID and Client secret for linking the Okta web app with your Amundsen deployment.
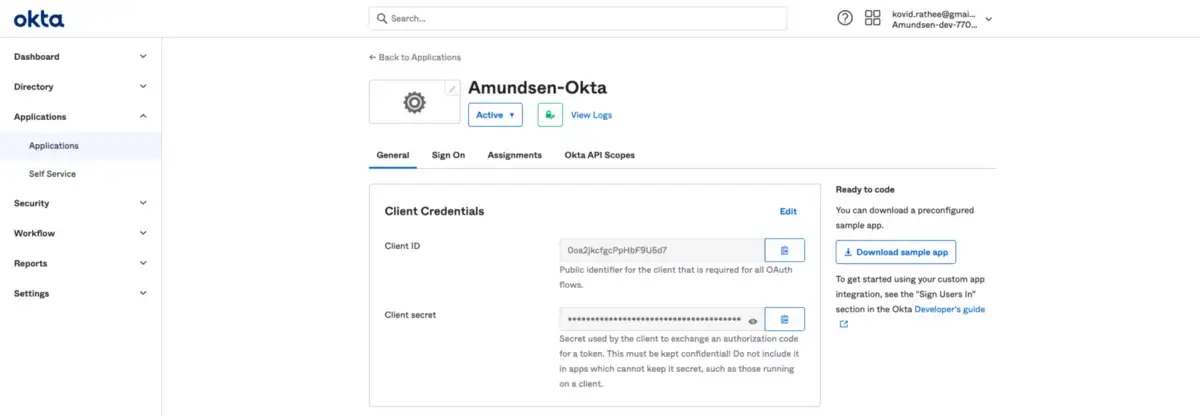
Get Client ID and Client Secret from Okta.
Now, you’re ready to start integrating Okta with Amundsen. For information on setting up OIDC integration with other identity providers, you can read this blog post by Nirav Langaliya.
Step 3: Build the Frontend
Permalink to “Step 3: Build the Frontend”Amundsen is a collection of microservices. To integrate Okta fully with Amundsen, you’ll need to configure Okta for metadata, search, and frontend separately. For the scope of this tutorial, we’ll be integrating our Okta OIDC app with Amundsen’s frontend service. Before we do that, let’s clone the GitHub repository we need.
Clone the GitHub Repository
Permalink to “Clone the GitHub Repository”$ git clone [email protected]:amundsen-io/amundsenfrontendlibrary.git
Set the Environment Variables
Permalink to “Set the Environment Variables”Set relevant environment variables to achieve the following things:
- Force Amundsen to use Okta authentication via Flask OIDC
- Provide Amundsen with Okta web app credentials
- Route Amundsen to Okta OIDC web app when someone tries to log in
FRONTEND_SVC_CONFIG_MODULE_CLASS to invoke OidcConfig module ./amundsen_application/wsgi.py
export FRONTEND_SVC_CONFIG_MODULE_CLASS='amundsen_application.oidc_config.OidcConfig'

## Point the app to flaskoidc for ./amundsen_application/__init__.py
export APP_WRAPPER=flaskoidc
export APP_WRAPPER_CLASS=FlaskOIDC
export SQLALCHEMY_DATABASE_URI='sqlite:///sessions.db'
export SESSION_TYPE='sqlalchemy'

# Provide Okta OIDC App settings here
export FLASK_APP_MODULE_NAME=flaskoidc
export FLASK_APP_CLASS_NAME=FlaskOIDC
export FLASK_OIDC_PROVIDER_NAME='okta'
export FLASK_OIDC_CONFIG_URL='https://dev-7700798-admin.okta.com/.well-known/openid-configuration'
export FLASK_OIDC_USER_ID_FIELD='email'
export FLASK_OIDC_CLIENT_ID='0oa2jkcfgcPpHbF9U5d7'
export FLASK_OIDC_CLIENT_SECRET='Ab_nJ9ywW5Vx1F5g6OoaJ_xSE4SETfExgslRanwi'
export FLASK_OIDC_REDIRECT_URI='/authorization-code/callback'
export FLASK_OIDC_SECRET_KEY='base-flask-oidc-secret-key'
export FLASK_OIDC_WHITELISTED_ENDPOINTS="status,healthcheck,health"
export FLASK_OIDC_LOG_DATE_FORMAT='%Y-%m-%dT%H:%M:%S%z'
export FLASK_OIDC_LOG_LEVEL='INFO'

export OIDC_CLIENT_SECRETS='./client_secrets.json'
export OVERWRITE_REDIRECT_URI='http://localhost:5000/authorization-code/callback'
export OIDC_CALLBACK_ROUTE='/authorization-code/callback'
export OIDC_DEBUG=True
Create a Secrets File
Permalink to “Create a Secrets File” This is a redundancy. If you don’t want to save some values as environment variables, you can create a client_secrets.json file and point Amundsen to use it. Here’s an example of the file:
{
  "web": {
    "issuer": "https://dev-7700798-admin.okta.com/oauth2/default",
    "auth_uri": "https://dev-7700798-admin.okta.com/oauth2/default/v1/authorize",
    "client_id": "0oa2jkcfgcPpHbF9U5d7",
    "client_secret": "Ab_nJ9ywW5Vx1F5g6OoaJ_xSE4SETfExgslRanwi",
    "token_uri": "https://dev-7700798-admin.okta.com/oauth2/default/v1/token",
    "token_introspection_uri": "https://dev-7700798-admin.okta.com/oauth2/default/v1/introspect",
    "userinfo_uri": "https://dev-7700798-admin.okta.com/oauth2/default/v1/userinfo",
    "redirect_uris": ["http://localhost:5000/authorization-code/callback"]
  }
}
Build the Frontend Service
Permalink to “Build the Frontend Service”Now that you have completed the configuration, you’re ready to build the frontend service. Head over to the cloned GitHub repository for Amundsen’s frontend.
Note: Make sure that you are using the right version of node required by Amundsen. I was running Node.js v17. I had to downgrade my Node.js version to 14 to get this running. This repo is an older version of the frontend. The newer version as moved to the monorepo mentioned in the prerequisites.
You can use the following set of commands to ensure you have the right version of Node.js installed:
$ brew search node
$ brew unlink node
$ sudo npm install -g n
$ sudo n stable
$ sudo n <desired Node.js version>
Once you’re done resolving the versions, use the following commands to install and build the service from the source.
$ cd amundsenfrontendlibrary/amundsen_application/static
$ npm install
$ npm run build
The output of the above-listed commands should look like the following image:
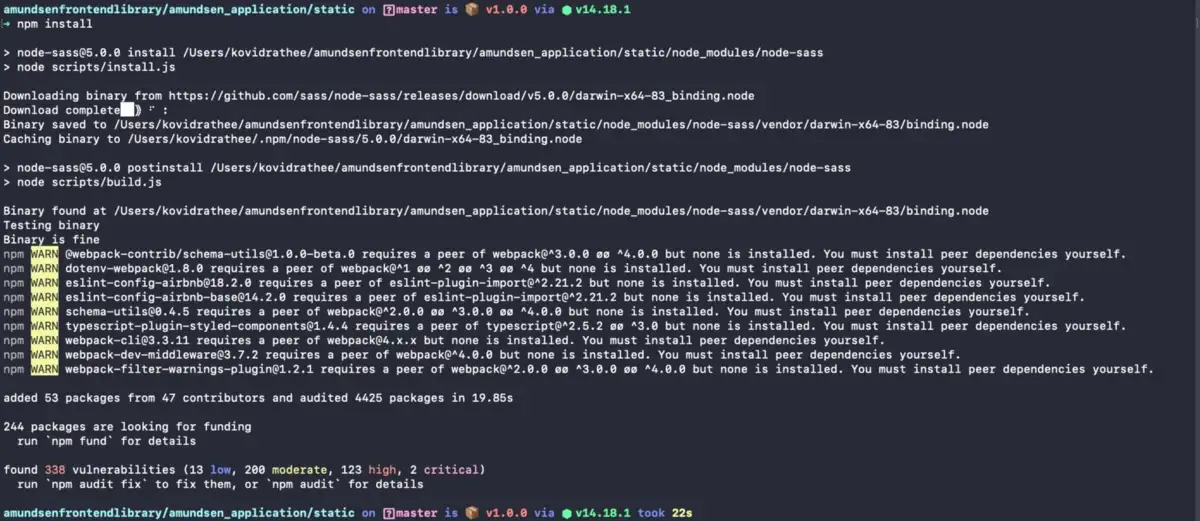
Build the Amundsen frontend service.
Create a Virtual Environment & Install Python Resources
Permalink to “Create a Virtual Environment & Install Python Resources”Come back to the root directory of the service, i.e., ./amundsenfrontendlibrary to install Python resources. To ensure that your existing Python installations don’t conflict with the requirements, create a venv and install all the Python resources required by the frontend service. Make sure that you explicitly install FlaskOIDC or add it to the Python requirements file before running the following commands:
$ cd ../../
$ python3 -m venv venv
$ source venv/bin/activate
$ pip3 install -e ".[all]" .
Once you see the following screen, you’ll be done with the resource installation:
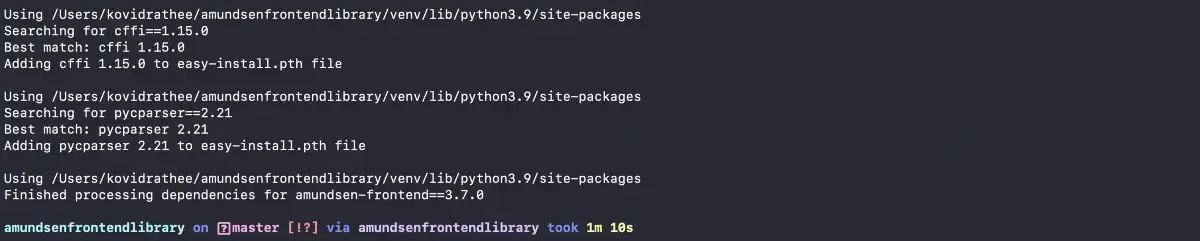
Python resource installation for Amundsen’s Frontend service completed.
The Ultimate Guide to Evaluating a Data Catalog
Download EbookStep 4: Verify the Okta OIDC + Amundsen Integration
Permalink to “Step 4: Verify the Okta OIDC + Amundsen Integration”Log into Amundsen
Permalink to “Log into Amundsen”Once the installation is complete, your Amundsen frontend is integrated with your Okta OIDC web app. You can now run your Amundsen frontend using the following command and visit localhost:5000:
$ python3 amundsen_application/wsgi.py
With any luck, you’ll be directed to your Okta domain page. In your application console logs, you’ll see the following output (notice how the console throws a LoginRequiredError — this is before logging into Okta):
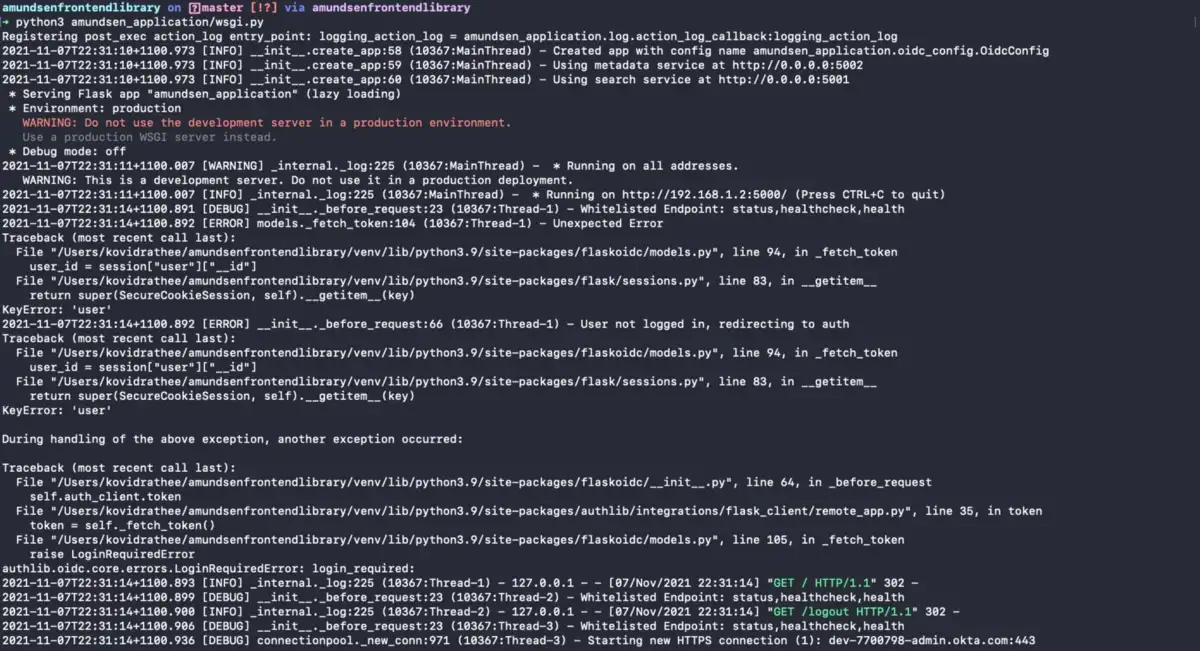
Okta Login Required.
Enter Credentials in the Okta OIDC Web App
Permalink to “Enter Credentials in the Okta OIDC Web App”As mentioned in the previous section, you’ll see a console message saying LoginRequiredError until you sign into Okta on the following page (this is your Okta OIDC Web App):
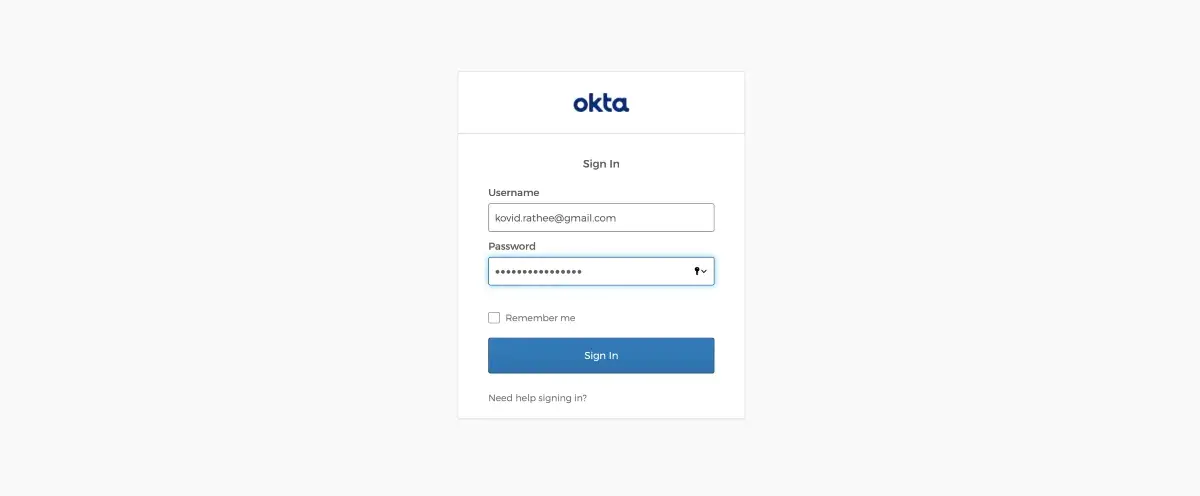
Okta OIDC Web App Login.
Once successfully logging into Okta, you’ll be redirected to your Amundsen page. On the console screen, you’ll see the following messages (Notice the token and user information that Amundsen gets from Okta):
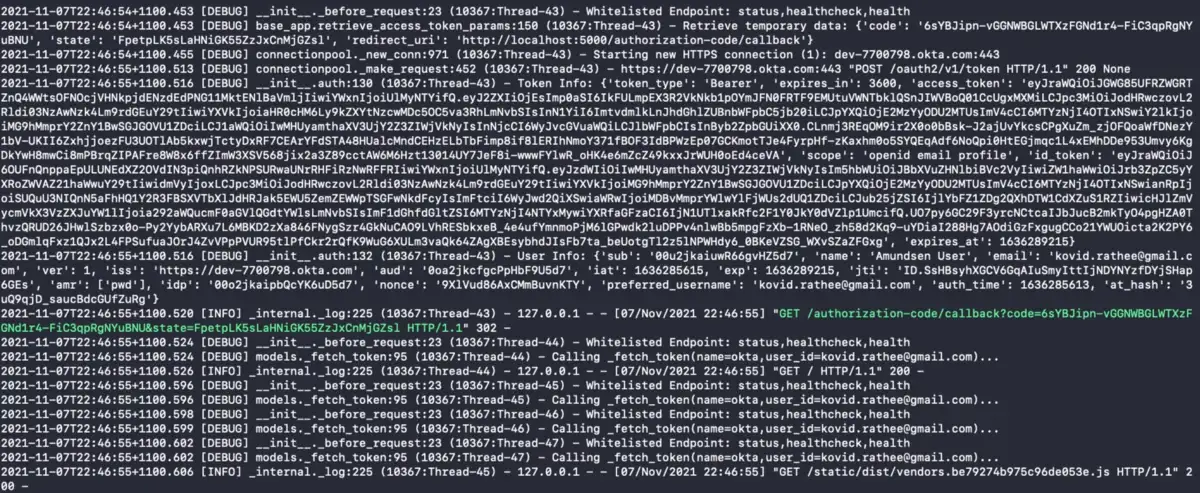
Successfully logged into Amundsen using Okta OIDC Web App.
Next Up
Permalink to “Next Up”If Okta isn’t your identity provider, try following the general flow of this guide to integrate with your identity provider. We will soon be posting about integrating Amundsen with other identity providers like Auth0 and Google. Next up, we’ll look into some of the more advanced security and privacy features in Amundsen. Stay tuned!
This blog is part of a series of blogs where we are discussing steps to setup Amundsen as a data catalog for your team. In case you don’t want to go through this entire process and want to quickly browse through the Amundsen experience, we’ve setup a sample demo environment for you, feel free to explore:
