


Amundsen data lineage provides a clear view of data movement across systems. It allows organizations to understand data origins and transformations.
Watch Context Studio Demo
With dbt integration, users can extract and visualize metadata seamlessly. This capability supports better data governance and compliance efforts.
Amundsen data lineage
Permalink to “Amundsen data lineage”Amundsen is an open source metadata management platform that was initially developed by Lyft engineering in response to their data discovery challenges. However, you can also use it to explore the data lineage of different data sources. There are several tools to capture data lineage from a data source, such as dbt and OpenLineage. This guide will help you set up data lineage for your data sources using Amundsen.
Is Open Source really free? Estimate the cost of deploying an open-source data catalog 👉 Download Free Calculator
How does dbt help in setting up lineage in Amundsen?
Permalink to “How does dbt help in setting up lineage in Amundsen?”dbt allows you to build, modularize and templatize your models and create more efficient transformation pipelines for your data warehouses and analytics systems.
One of the added advantages of dbt is that it captures the flow of data based both on the models and the database metadata. To make use of the data flow metadata, you can use Amundsen’s data lineage capabilities.
Why is data lineage in Amundsen important?
Permalink to “Why is data lineage in Amundsen important?”A good data lineage gives you the easiest and earliest route to backtrack to the origins of data. It gives you a clear picture of how the data was created and how it has evolved through its lifecycle. Be it open source tools like Amundsen or commercial tools, it’s important to look for best-of-breed data lineage capabilities to ensure easy spotting of data quality errors, quick root-cause analysis, impact analysis, policy propagation through lineage etc.
Prerequisites for setting up data lineage in Amundsen
Permalink to “Prerequisites for setting up data lineage in Amundsen”- Amundsen GitHub repository
- Sample dbt data as metadata and lineage source - GitHub gists for catalog and manifest files
- Configuration file to enable table and column lineage in Amundsen - GitHub gist
- Docker and Docker Compose to build and run Amundsen’s images locally after the changes
Set up Amundsen
Permalink to “Set up Amundsen”Clone the GitHub repository
Permalink to “Clone the GitHub repository”Clone the official Amundsen Git repository. The easiest way to deploy Amundsen is to use the docker-amundsen.yml file, which deploys the Amundsen with the default neo4j backend with the pre-built images fetched from Docker Hub. This integration with dbt requires some minor code changes, so you’d have to build the code, create your own Docker images, and deploy. To do that, you should use the docker-amundsen-local.yml file. This is the ideal setup for developers.
git [email protected]:amundsen-io/amundsen.git
For a detailed understanding, please read our set-up guide
Enable lineage in Amundsen
Permalink to “Enable lineage in Amundsen”Go to the cloned directory and then to the following subdirectory:
cd /frontend/amundsen_application/static/js/config/
This is where the frontend configuration resides. Out of the several configuration files, you need to replace config-default.ts with the file stored on this link. Alternatively, you can make the change yourself by toggling inAppListEnabled and inAppPageEnabled from false to true for both tableLineage and columnLineage.
Build and deploy
Permalink to “Build and deploy”Now that you have enabled data lineage in Amundsen, you’ll need to build the frontend again. Although you can build the frontend individually, building it with the docker-amundsen-local.yml is a much cleaner method, as it builds everything that you need to deploy Amundsen:
docker-compose -f docker-amundsen-local.yml build
Once the build is done, you’re ready to run Amundsen using the following command:
docker-compose -f docker-amundsen-local.yml up -d
Give it a minute or so to fire up and check the status of all the containers using the docker ps command. If everything’s good, move to the next step.
Set up dbt
Permalink to “Set up dbt”When you set up and run dbt with a source system, dbt creates a manifest.json file in the target directory. It also creates a catalog.json file in the same directory after you run the dbt docs generate command. These files contain all the metadata and lineage information Amundsen needs.
Amundsen comes with a dbt extractor, using which you can extract data from dbt after ingestion (loading) into Amundsen. Now, you can either install dbt, connect a source, create models, etc. to generate the lineage data, or you can use the following sample dbt files in the Amundsen examples to set up basic data lineage in Amundsen:
Alternatively, you can install dbt initialize a new dbt project, as follows:
python3 -m venv dbt-env
dbt-env/bin/activate
pip3 install dbt
dbt init sample_dbt_project
Once you do that, you’ll need to configure a source in your profiles.yml file. When your dbt models, seeds, and so on are ready, you can finally run the dbt run command to create the entities in the source and populate the manifest.json file. Run the dbt docs generate file to create a catalog.json file. You can access both these files on the following path - sample_dbt_project/target/.
Extract and load metadata into Amundsen
Permalink to “Extract and load metadata into Amundsen”To load your custom generated data or the dbt sample data into Amundsen, you’ll utilize the sample dbt loader script provided in the Amundsen examples. This script does the following things:
- Uses Amundsen’s dbt extractor to get the metadata from the
manifest.jsonandcatalog.jsonfiles - Populate the table search index in Elasticsearch based on the newly ingested data
Assuming that you’ve already either pointed Amundsen to the correct JSON files or copied them to the default sample data location, you can run the sample_dbt_loader.py script to load the metadata into Amundsen, as shown in the image below:
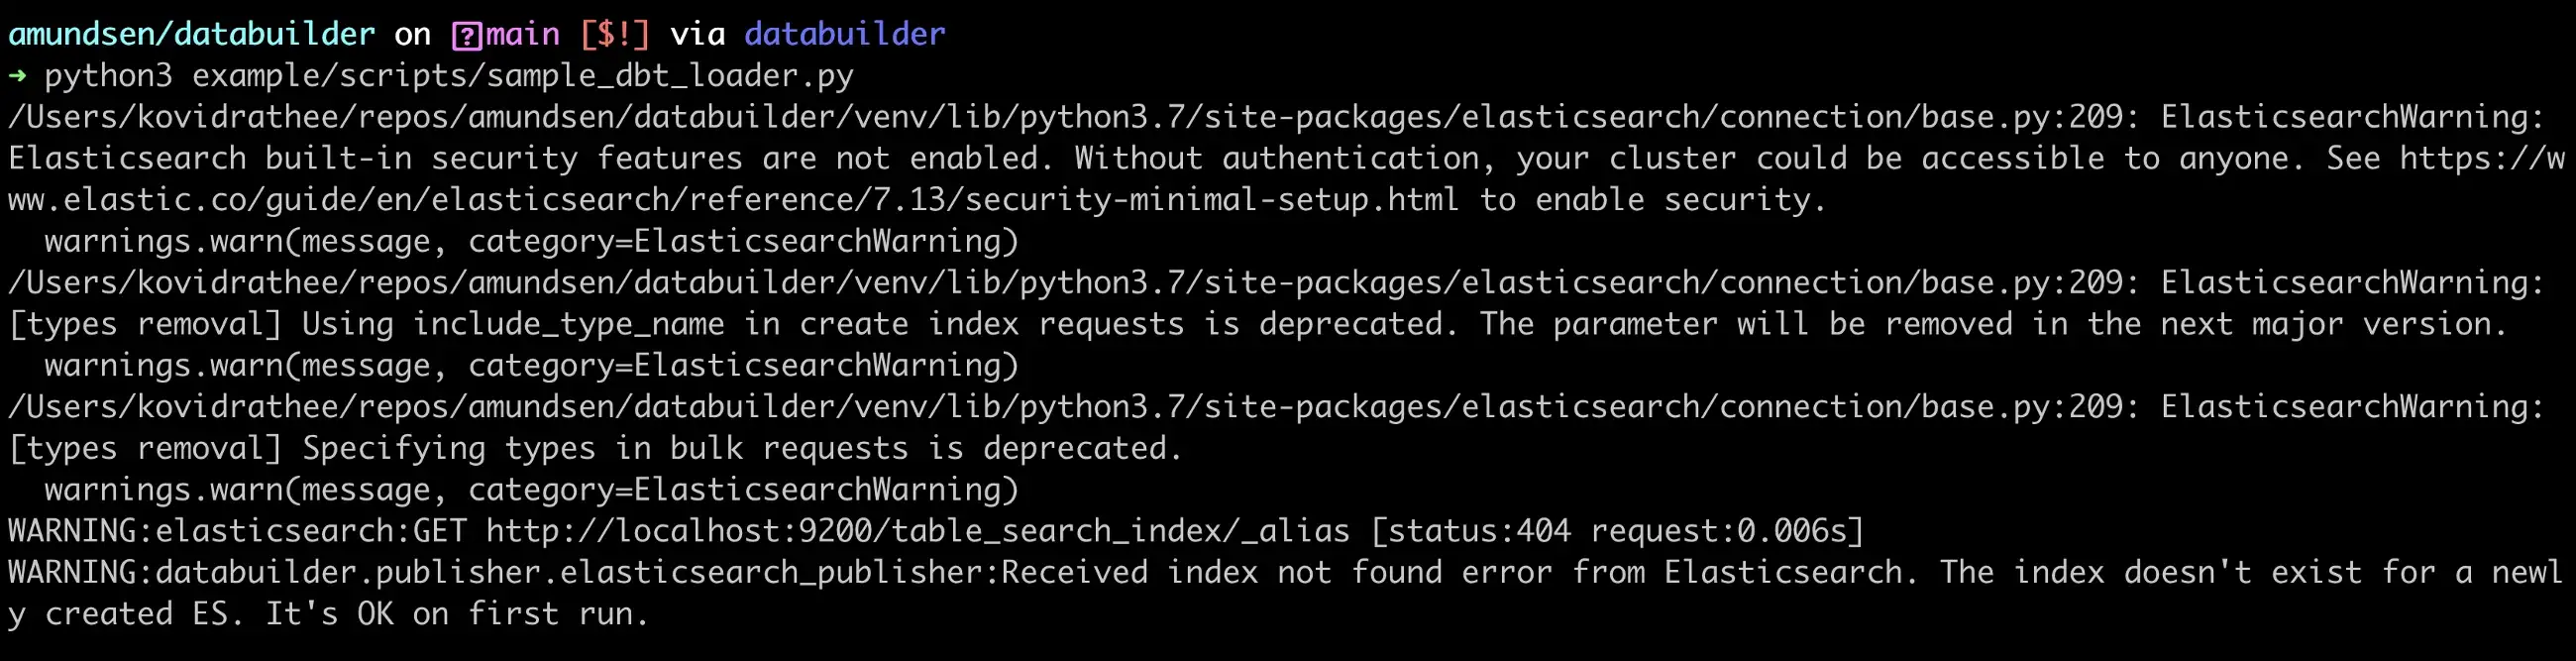
Load data using Sample dbt Loader from the databuilder library - Source: dbt.
You can ignore the Elasticsearch warnings. If you go to the UI, you’ll be able to see your dbt tables in Amundsen.
Navigating the Amundsen Lineage UI
Permalink to “Navigating the Amundsen Lineage UI”After enabling lineage for Amundsen, notice how an Upstream column and a Lineage tab has appeared in the UI. Search for your latest uploaded metadata and navigate to one of the tables. Depending on the placement of your table in the data flow, you’ll either see an Upstream column, a Downstream column, or both. In the following example, fact_third_party_performance, there’s one Upstream table:
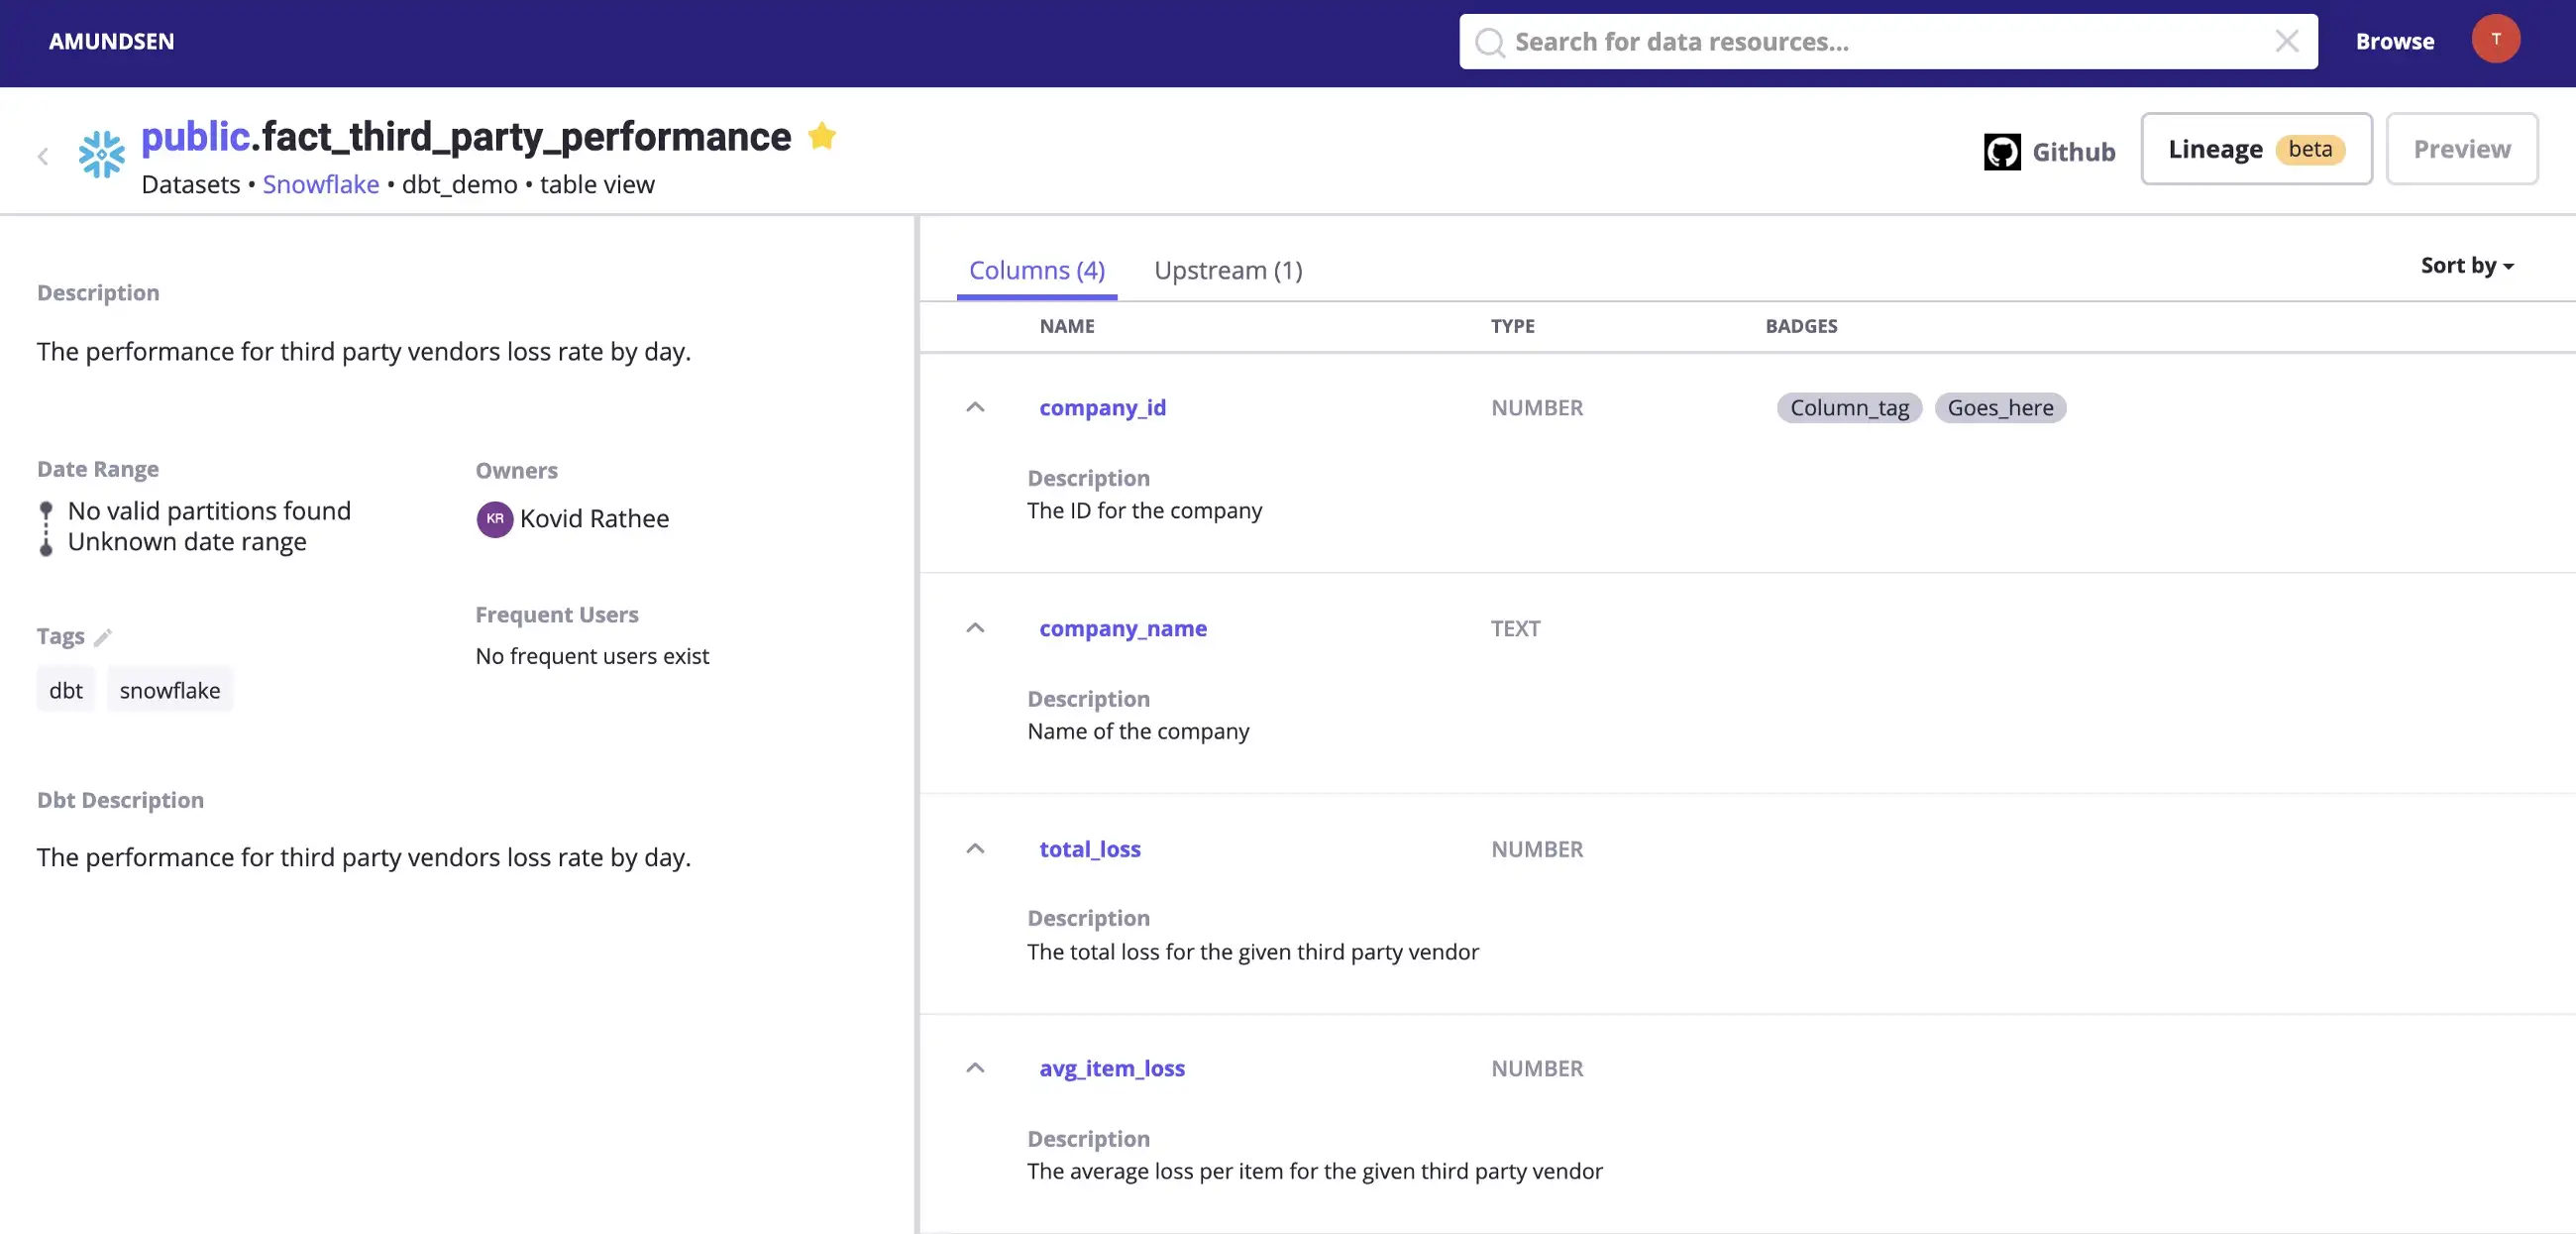
Metadata for a table fetched using dbt. - Source: dbt.
Navigate to the Upstream tab to find out that fact_catalog_returns is the upstream table for fact_third_party_performance, which means to say that fact_third_party_performance depends on fact_catalog_returns, as shown in the image below:
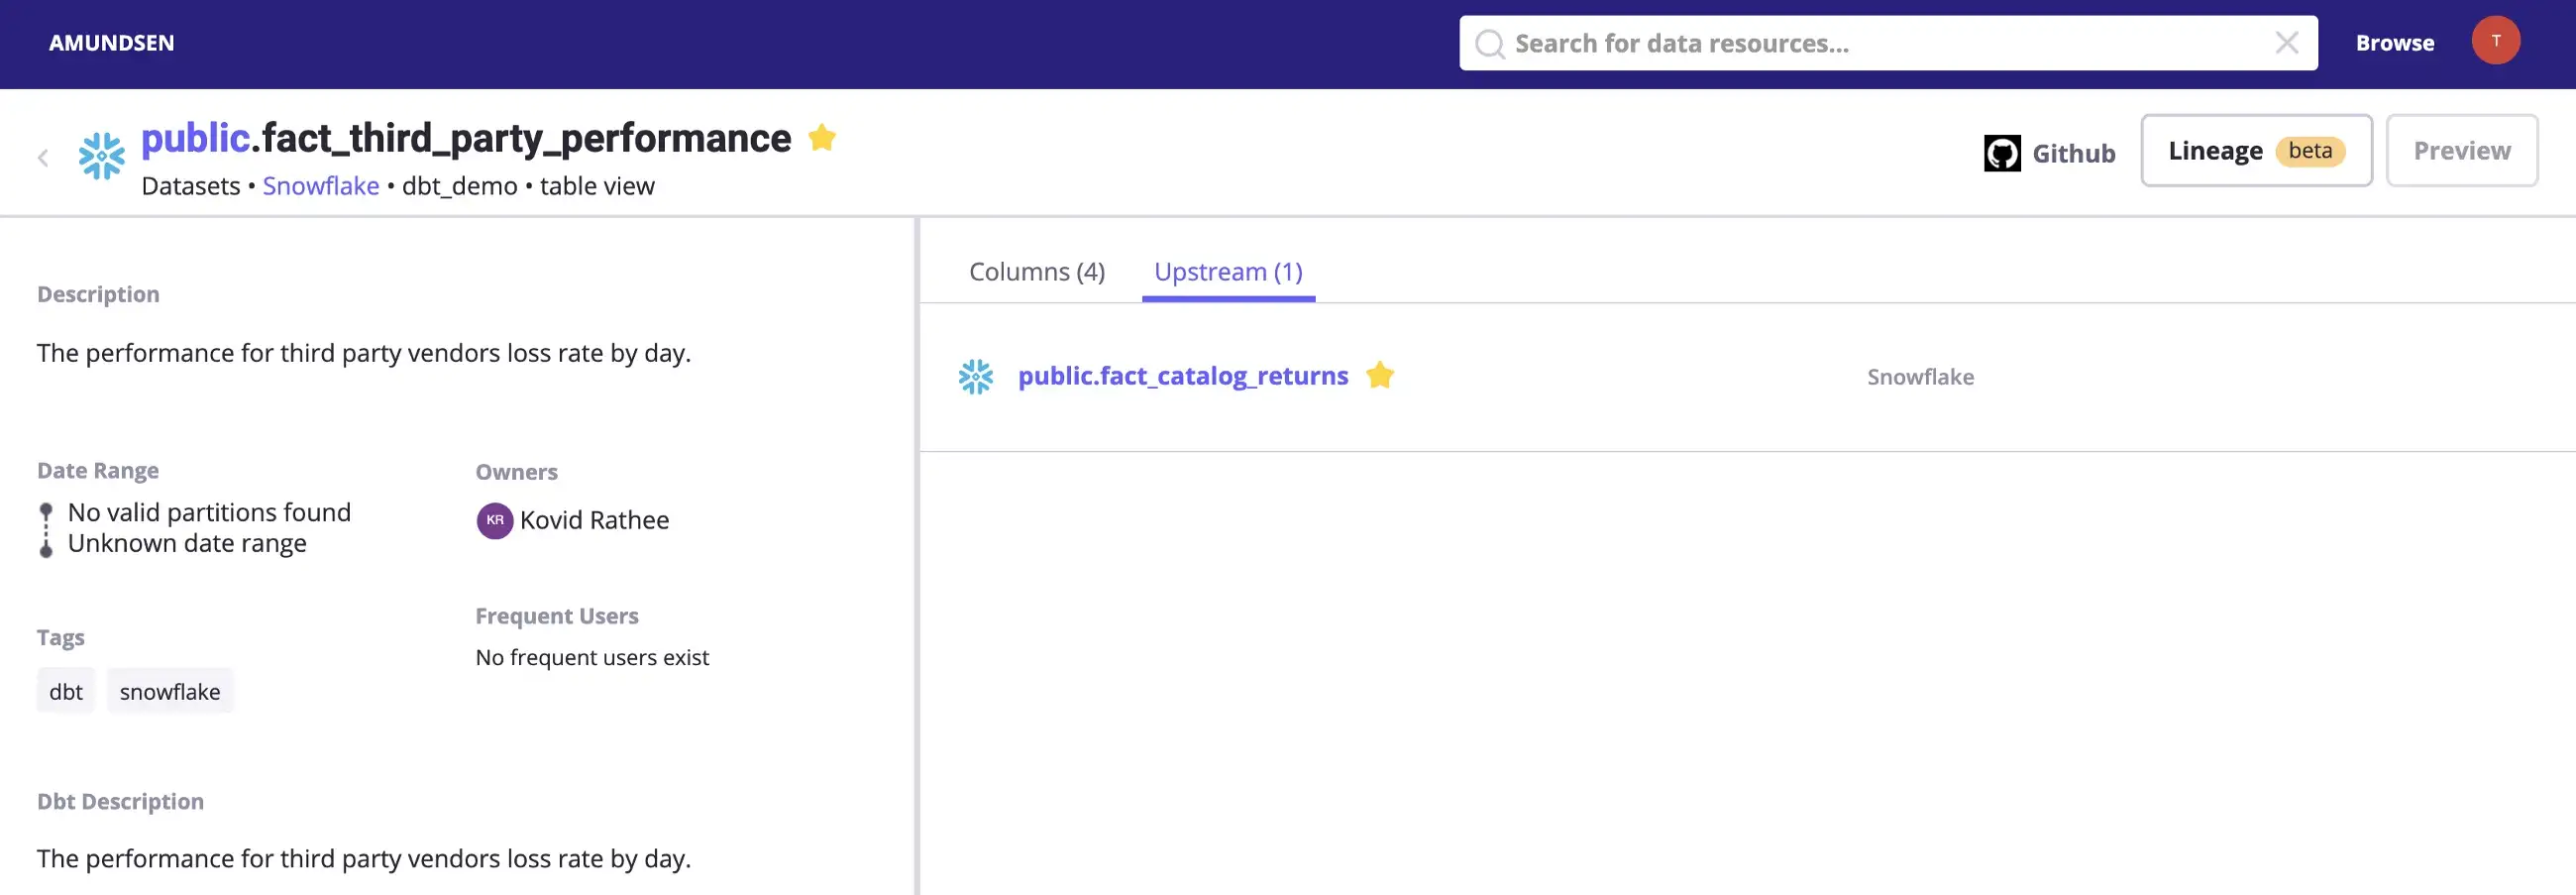
Example of an upstream table from the dbt Snowflake data source. - Source: Snowflake.
Clicking on the Lineage tab on the top-right corner will take you to the following screen, where you will see a visual representation of the lineage, as shown in the image below:
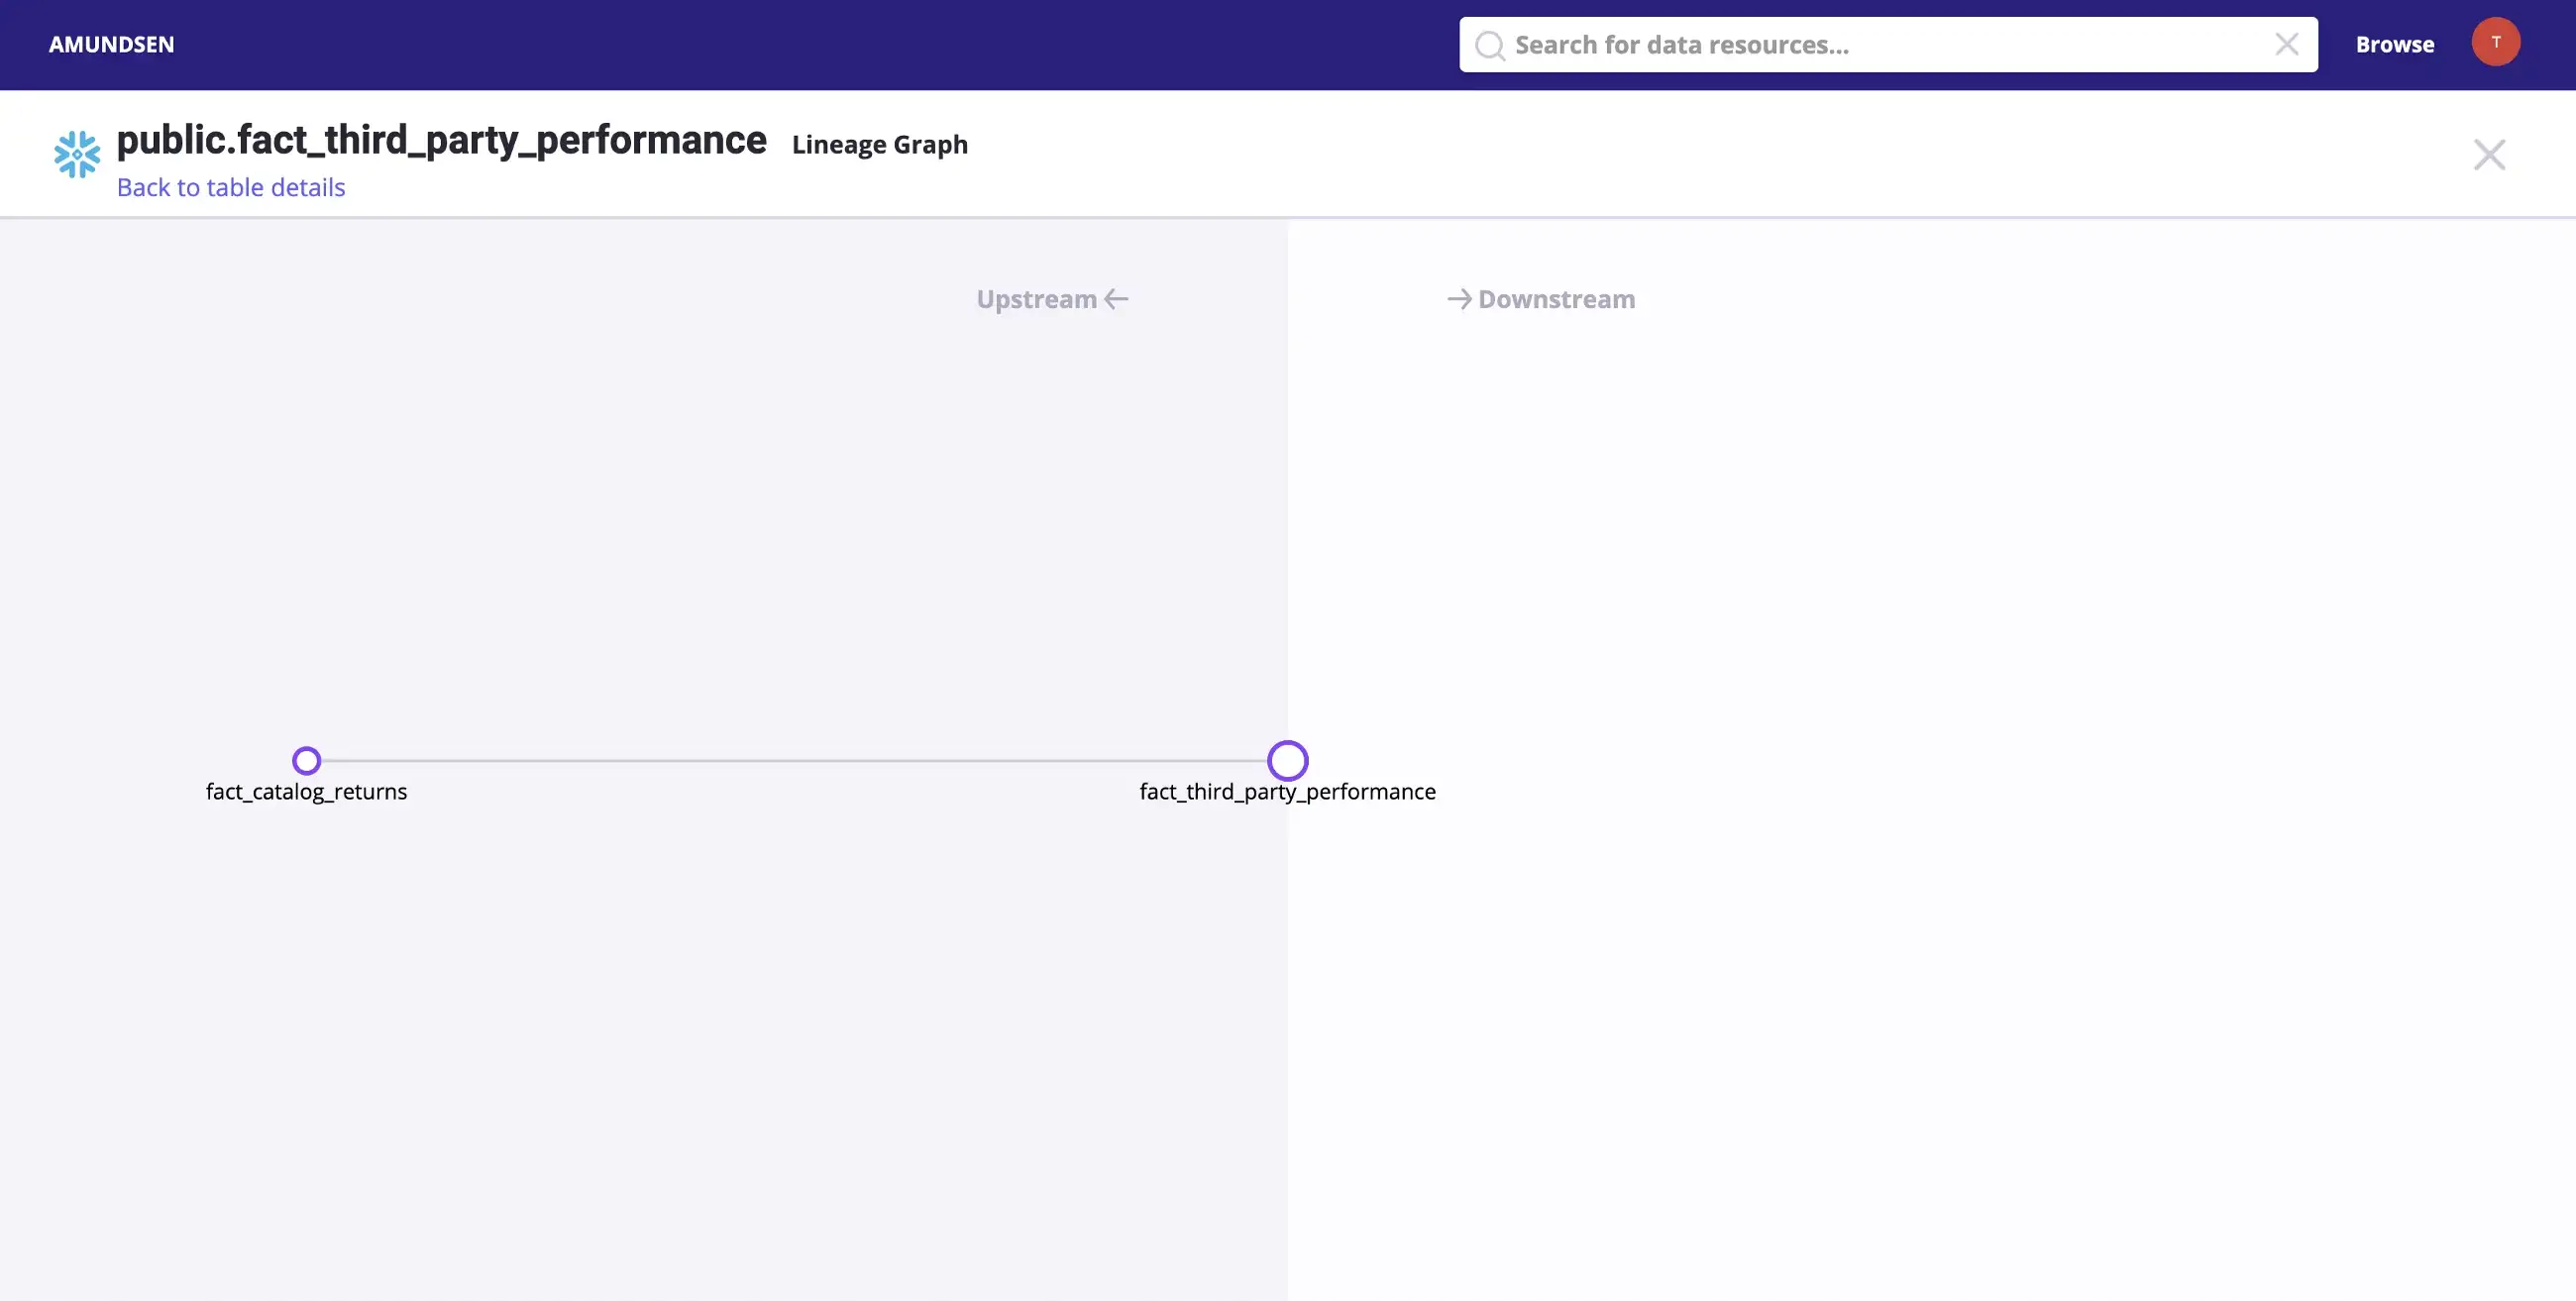
Simple demonstration of a lineage graph with two tables for the dbt Snowflake source - Source: Snowflake.
Real-life data sources will have much more complicated lineage graphs. The lineage graph above is the simplest example of data lineage.
Further exploration
Permalink to “Further exploration”In April 2021, Amundsen announced improvements to data lineage with native support for table and column level ingestion and storage. In the August community meeting, you can find more about Alvin, which integrates with Amundsen to provide a more comprehensive data lineage solution.
How organizations making the most out of their data using Atlan
Permalink to “How organizations making the most out of their data using Atlan”The recently published Forrester Wave report compared all the major enterprise data catalogs and positioned Atlan as the market leader ahead of all others. The comparison was based on 24 different aspects of cataloging, broadly across the following three criteria:
- Automatic cataloging of the entire technology, data, and AI ecosystem
- Enabling the data ecosystem AI and automation first
- Prioritizing data democratization and self-service
These criteria made Atlan the ideal choice for a major audio content platform, where the data ecosystem was centered around Snowflake. The platform sought a “one-stop shop for governance and discovery,” and Atlan played a crucial role in ensuring their data was “understandable, reliable, high-quality, and discoverable.”
For another organization, Aliaxis, which also uses Snowflake as their core data platform, Atlan served as “a bridge” between various tools and technologies across the data ecosystem. With its organization-wide business glossary, Atlan became the go-to platform for finding, accessing, and using data. It also significantly reduced the time spent by data engineers and analysts on pipeline debugging and troubleshooting.
A key goal of Atlan is to help organizations maximize the use of their data for AI use cases. As generative AI capabilities have advanced in recent years, organizations can now do more with both structured and unstructured data—provided it is discoverable and trustworthy, or in other words, AI-ready.
Tide’s Story of GDPR Compliance: Embedding Privacy into Automated Processes
Permalink to “Tide’s Story of GDPR Compliance: Embedding Privacy into Automated Processes”- Tide, a UK-based digital bank with nearly 500,000 small business customers, sought to improve their compliance with GDPR’s Right to Erasure, commonly known as the “Right to be forgotten”.
- After adopting Atlan as their metadata platform, Tide’s data and legal teams collaborated to define personally identifiable information in order to propagate those definitions and tags across their data estate.
- Tide used Atlan Playbooks (rule-based bulk automations) to automatically identify, tag, and secure personal data, turning a 50-day manual process into mere hours of work.
Book your personalized demo today to find out how Atlan can help your organization in establishing and scaling data governance programs.
FAQs about Amundsen Data Lineage
Permalink to “FAQs about Amundsen Data Lineage”1. What is Amundsen data lineage and how does it work?
Permalink to “1. What is Amundsen data lineage and how does it work?”Amundsen data lineage is a feature of the Amundsen metadata management platform that tracks the flow of data from its source to its destination. It captures metadata from various sources, including dbt, to provide a visual representation of data transformations and dependencies.
2. How can Amundsen data lineage improve data governance in my organization?
Permalink to “2. How can Amundsen data lineage improve data governance in my organization?”By providing clear visibility into data flow and transformations, Amundsen data lineage enhances data governance. It allows organizations to trace data origins, identify quality issues, and ensure compliance with regulatory requirements.
3. What are the key features of Amundsen data lineage that enhance data discovery?
Permalink to “3. What are the key features of Amundsen data lineage that enhance data discovery?”Key features include the ability to visualize data flow, track upstream and downstream dependencies, and integrate with tools like dbt for metadata extraction. These features facilitate better data discovery and understanding of data relationships.
4. How does Amundsen data lineage integrate with existing data platforms?
Permalink to “4. How does Amundsen data lineage integrate with existing data platforms?”Amundsen data lineage integrates with various data platforms through connectors and APIs. It can extract metadata from tools like dbt and OpenLineage, allowing organizations to build a comprehensive view of their data landscape.
5. What are the benefits of using Amundsen for tracking data lineage?
Permalink to “5. What are the benefits of using Amundsen for tracking data lineage?”Benefits include improved data governance, enhanced data quality, better compliance with regulations, and increased efficiency in data management. Amundsen provides a user-friendly interface for visualizing and understanding data lineage.
6. How can I visualize data lineage using Amundsen?
Permalink to “6. How can I visualize data lineage using Amundsen?”Users can visualize data lineage in Amundsen through its user interface, which displays upstream and downstream relationships. This visualization helps users understand data dependencies and the impact of changes in the data pipeline.
