


Installing DataHub is a straightforward process that enhances your data management capabilities.
Watch Context Studio Demo
To begin, ensure you meet the system requirements, including Docker and Python.
This guide will walk you through each step, from installation to configuration, ensuring a smooth setup.
Quick answer:
Here’s a quick summary of what to expect from this article:
- This article provides a step-by-step guide on how to set up DataHub. We’ll explore the DataHub UI.
- We’ve also set up a sample demo environment for you to explore the nuances of using DataHub.
- Like DataHub? Then you’ll love Atlan! Atlan is recognized as a leader in enterprise data catalogs by Forrester. Book a demo or watch the Context Studio demo.
Table of content
Permalink to “Table of content”- Guide to setting up DataHub
- DataHub background
- Prerequisites for installing DataHub
- Setting up DataHub
- Navigating the DataHub UI
- DataHub set up: Next steps
- How organizations making the most out of their data using Atlan
- FAQs about How to Install DataHub
- Resources to get started on LinkedIn DataHub
- Related reads
Guide to setting up DataHub
Permalink to “Guide to setting up DataHub”In this guide, we’ll go step-by-step on what exactly is the process of installing DataHub. For ease of understanding the setup process has been divided into the following sections:
- Taking stock of pre-requisites
- Overview of DataHub architecture
- Installing DataHub CLI
- Adding a metadata source
- Navigating the UI
- Next steps
Is Open Source really free? Estimate the cost of deploying an open-source data catalog 👉 Download Free Calculator
DataHub background
Permalink to “DataHub background”Back in 2016, LinkedIn open-sourced their first internal metadata search and discovery engine called WhereHows, now defunct.
Learning from their first product and the subsequent products created by other companies, LinkedIn decided to give metadata search and discovery another shot. This time, with many of the core product principles modified, LinkedIn created DataHub, a generalized, push-based metadata integration layer connected via a single metadata graph.
Most of the metadata search and discovery engines are built on top of several microservices for different components of the application. Many of these services like neo4j, Elasticsearch, etc., are common. Still, the real difference is how these services interact, how flexible they are in supporting different metadata sources, and how extensible they are in integrating and talking to other data engineering services. In this guide, you’ll learn about LinkedIn’s DataHub and how you can get started using it.
Prerequisites for installing DataHub
Permalink to “Prerequisites for installing DataHub”To install DataHub, you would need the following:
- An instance with Docker and Docker Compose installed with 2 CPUs, 8GB RAM, and at least 2GB swap area.
- Python ≥ 3.6, EmberJS, Elasticsearch, MySQL, neo4j, Zookeeper, Kafka, etc. — all the build dependencies are listed in this Gradle Build file.
- Acryl DataHub CLI. Ensure that you have Python ≥ 3.6 installed on your local machine.
- MySQL Server on a non-default port — this sample database. In this guide, we’ll use 3309 as the port.
Data catalogs are going through a paradigm shift. Here’s all you need to know about a 3rd Generation Data Catalog
Download EbookSetting up DataHub
Permalink to “Setting up DataHub”DataHub architecture
Permalink to “DataHub architecture”One of the many features that distinguish DataHub from other metadata search and discovery engines is the Generalised Metadata Architecture (GMA) that DataHub is built upon. The core idea behind GMA is to serve requests for various metadata search and access patterns, such as full-text search, graph traversal, predicate-heavy SQL-like query, and key-value and document lookups.
To enable this, DataHub uses several storage layers that are kept in sync with ultralow latencies. DataHub supports a host of metadata sources, which can be ingested using one of the several sink methods, the main ones being a REST API and a Kafka pub-sub system. Once the data gets ingested into the system, GMA ensures that the data gets pushed to MySQL, neo4j, and Elasticsearch. The React frontend is fed data from either of these data stores based on the access pattern.
The syncing of metadata changes across the services takes place using MXEs or metadata events, of which there are two kinds — Metadata Change Events (MCEs) and Metadata Audit Events (MAEs). DataHub, essentially, comprises four different components:
- Generalized Metadata Service (GMS) — is the storage backend backed by Generalized Metadata Architecture (GMA) for storage. “Generalized” because it doesn’t just support a specific kind of query. It supports many different types of queries.
- Metadata Audit Event (MAE) — is an event fired whenever a metadata change event is persisted to storage. The audit events created by consumption on one of the storage types help update the other by publishing them on a Kafka stream.
- Metadata Change Event (MCE) — capture a change in the metadata and generate an MAE event pushed via Kafka to other storage systems within DataHub. This enables near real-time graph and search index updates in the system.
- React Frontend — is the user interface where data analysts, data scientists, and other business users can interact with the search and discovery engine fed by a generalized storage layer and near real-time metadata updates.
To know more about DataHub architecture, head over to LinkedIn’s engineering blog.
Install DataHub CLI
Permalink to “Install DataHub CLI”Running DataHub is easier than ever before. Assuming that Docker and Docker Compose are already installed on your system, one way to get started is by cloning four separate GitHub repositories or downloading four separate Docker images from the Docker registry.
Acryl DataHub CLI’s quickstart feature has simplified this process. You have to make sure that you have Python ≥ 3.6 installed on your system.
python3 -m pip install --upgrade pip wheel setuptools
python3 -m pip install --upgrade acryl-datahub
datahub version
Once you’ve confirmed that the CLI is installed, you can run the following command to install DataHub on your instance:
datahub docker quickstart
This command runs a shell script, which triggers Docker Compose to pick up this YAML file, pull the Docker images from the Docker registry, and deploy DataHub on your instance as shown in the image below:
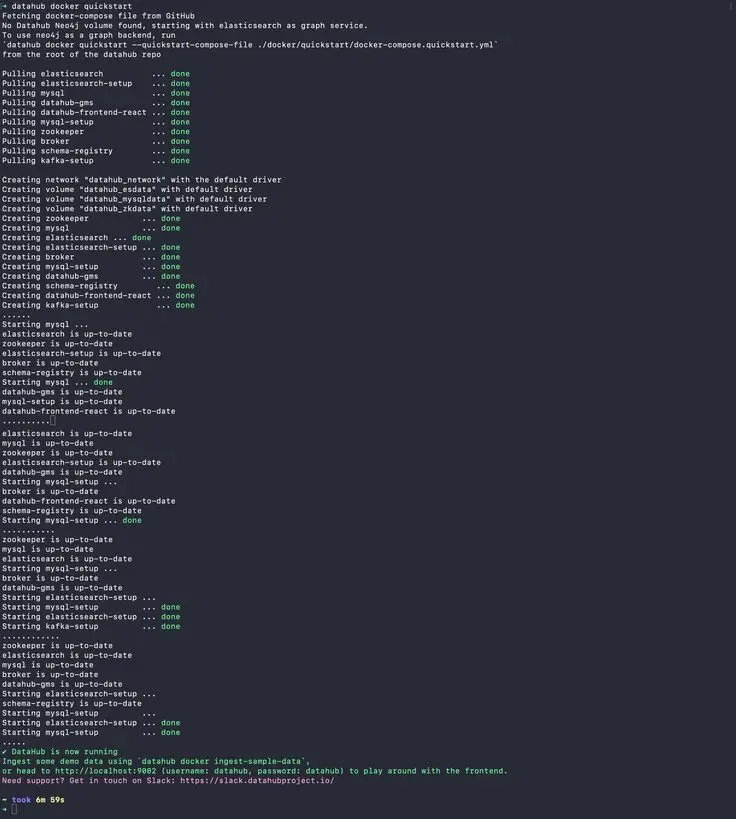
Install DataHub using the Acryl DataHub CLI Quickstart option.
Ingest sample data
Permalink to “Ingest sample data”Before we log into DataHub for the first time, let’s ingest some out of the box sample data using the following command:
datahub docker ingest-sample-data
You can find more about the sample ingestion Docker Compose and ingestion config file here. Sample data is good, but it would make more sense to add a metadata source of your choice and play around with that. So, let’s do that.
Add a metadata source
Permalink to “Add a metadata source”DataHub supports a wide array of data sources ranging from relational databases to BI tools. The idea behind integrating all these sources is to gather as much context around your data and business metrics built on top of that data and make it available to the rest of the business to enable better communication between business verticals and also to prevent re-work on the same business metrics, reports, and dashboards.
In this guide, we’ll ingest the metadata from a sample schema for Mediawiki in a MySQL database. To get started, you will have to spin off a MySQL instance on port 3309 (non-default port) using the following command:
/usr/local/opt/mysql/bin/mysqld_safe --datadir=/usr/local/var/mysql --port=3309
Alternatively, you can use Docker to install MySQL in a container. CLI-based ingestion in DataHub is done using the datahub ingest -c command. DataHub takes a plugin-based approach for integrating new metadata sources and sink methods. To add MySQL as an ingestion source, you’ll need to install the MySQL plugin along with a sink plugin. You can do that by running the following command:
pip install 'acryl-datahub[mysql,datahub-rest]'
You have to configure your sink plugin along with the metadata source with your database location and credentials using a YAML file. For the scope of this guide, let’s use the following MySQL metadata source configuration file with the name mysql-datahub.yml:
source:
  type: "mysql"
  config:
    env: "DEV"
    username: datahub
    password: datahub
    database: mediawiki
    host_port: localhost:3309
    schema_pattern:
      ignoreCase: True
    table_pattern:
      ignoreCase: True
    include_tables: True
    include_views: False

sink:
  type: "datahub-rest"
  config:
    server: "http://localhost:8080"
Now that you have a source and a sink configured, there’s one final step before you can start consuming metadata from MySQL. You’ll need to create a MySQL user with the username and password specified in the configuration file. You’ll also need to grant USAGE and SELECT privileges to this user so that DataHub can access the table structure and comments to replicate the information at its end. You can use the following command to create the user and grant it relevant privileges:
CREATE USER 'datahub'@'%' IDENTIFIED BY PASSWORD 'datahub';
GRANT USAGE ON *.* TO 'datahub'@'%';
GRANT SELECT ON 'mediawiki'.* TO 'datahub'@'%';
Now, you’re ready to ingest data from MediaWiki into DataHub. You can do that by running the following command:
datahub ingest -c mysql-datahub.yml
You’ll see the following output of the metadata ingestion for every entity. Once that’s finished, you’ll also see a summary of scanned tables, errors from the metadata source, and successes and failures at the sink layer. The output an instance of this ingestion is shown below:
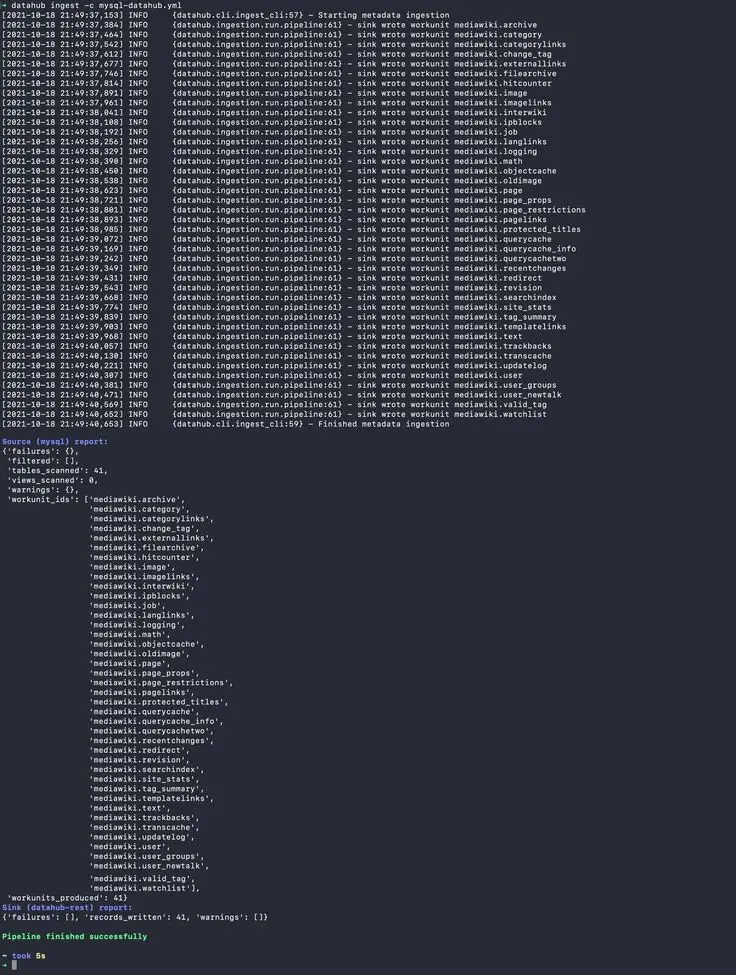
Ingest Data from MySQL using Acryl DataHub CLI.
A Guide to Building a Business Case for a Data Catalog
Download EbookNavigating the DataHub UI
Permalink to “Navigating the DataHub UI”Log into DataHub
Permalink to “Log into DataHub”You’re now ready to log into DataHub. You can use datahub as the username and password to log into the console for the first time. Once you log in, you’ll be able to search your metadata using the search interface or you can just browse using the various sections under the Explore your data heading as shown below:
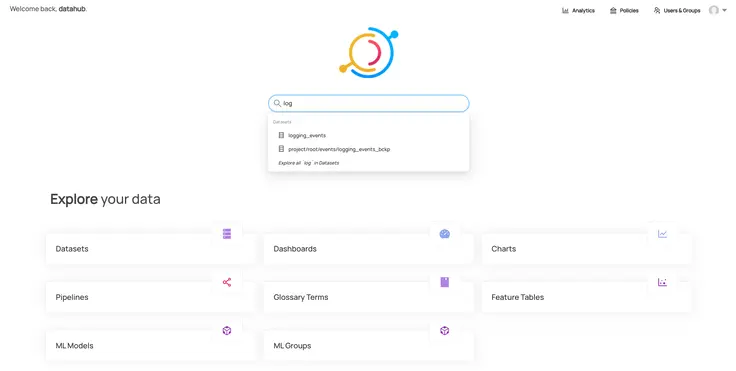
DataHub Homepage
Before we look at the metadata ingested from MySQL, let’s quickly review what the different sections for data exploration shown in the image above. DataHub is built on the idea that getting as much information about the data from as many sources as possible helps build a fuller picture of the data lineage and, of course, improves the metadata search and discovery experience for business users.
- Datasets — section consists of all the metadata ingested directly from your database and data warehouse sources. Currently, DataHub supports ingestion from Big Query, MongoDB, MS SQL Server, MySQL, PostgreSQL, MariaDB, Oracle, Snowflake, and Redshift. You can automate data ingestion by running a metadata ingestion pipeline using Airflow.
- Dashboards — section shows you the metadata ingested from your BI and visualization tools such as Looker, Redash, and Superset. More such sources will be supported in the future. Integrating BI tools directly with DataHub enable search and discovery of BI assets like reports, dashboards, and visualizations.
- Charts — section lets you search individual components of your BI dashboard based on the metadata fetched from your BI and visualization tools.
- Pipelines — section helps you navigate the Airflow metadata ingestion pipelines for any number of metadata sources.
- Glossary Terms — section helps you search through a Business Glossary, which is a refined and thought-through set of definitions of business terms and metrics.
- ML Models — section helps you navigate through your ML models, enabling you to search and discover model features and metrics. DataHub currently supports SageMaker, LookML, and Feast metadata sources for ML models.
- Feature Tables — section fetches feature tables from your ML models and lets you explore the structure and output of the feature engineering exercise for your ML models. The data for this section is derived from the same metadata sources as the ML Models sections.
Let’s now explore one of the sections in a bit more detail.
A closer kook at datasets
Permalink to “A closer kook at datasets”In the image below, notice how there are two sections of datasets — dev and prod. These denote the environments. By default, the sample data from DataHub is ingested into the prod environment. If you go back to our MySQL config YAML file for metadata ingestion, you’ll see that we’ve used dev to hint that our data is coming from a the dev environment of the application database or data warehouse.
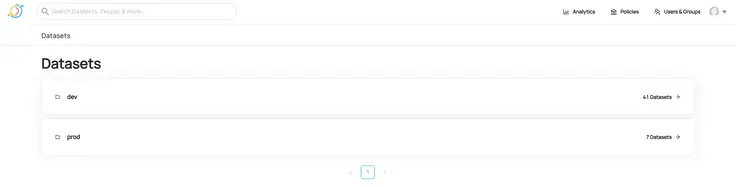
List of Environments for your Database and Data Warehouse metadata ingestion sources.
Now, if you go to the dev environment, you’ll see MySQL as a source. Navigate to MySQL and you’ll see the list of MySQL databases with metadata ingested into DataHub. You’ll see our MediaWiki database tables listed in the image below:
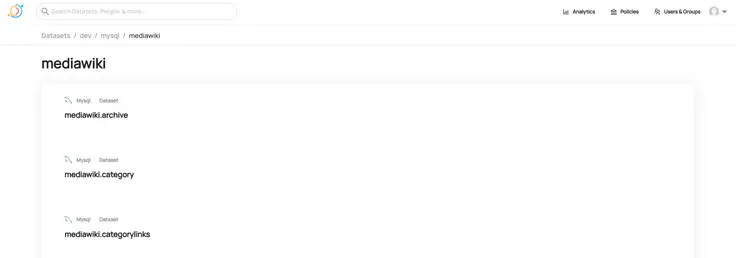
Navigating to metadata ingested from a MySQL metadata source.
DataHub set up: Next steps
Permalink to “DataHub set up: Next steps”Now that you’ve got your DataHub running with some sample metadata and metadata from a MySQL source, you can consider integrating other sources in your data architectures. In one of the next articles, we’ll see how you can automate the metadata ingestion pipeline for any given metadata source using Airflow.
In case you don’t want to go through this entire process and want to quickly browse through the DataHub experience, we’ve setup a sample demo environment for you, feel free to explore:
While you are evaluating open source metadata platforms for your team, you can always quickly check out and experience off-the-shelf tools like Atlan — A data discovery and data catalog solution built for the modern data teams.
Atlan Demo: Data Catalog for the Modern Data Stack
How organizations making the most out of their data using Atlan
Permalink to “How organizations making the most out of their data using Atlan”The recently published Forrester Wave report compared all the major enterprise data catalogs and positioned Atlan as the market leader ahead of all others. The comparison was based on 24 different aspects of cataloging, broadly across the following three criteria:
- Automatic cataloging of the entire technology, data, and AI ecosystem
- Enabling the data ecosystem AI and automation first
- Prioritizing data democratization and self-service
These criteria made Atlan the ideal choice for a major audio content platform, where the data ecosystem was centered around Snowflake. The platform sought a “one-stop shop for governance and discovery,” and Atlan played a crucial role in ensuring their data was “understandable, reliable, high-quality, and discoverable.”
For another organization, Aliaxis, which also uses Snowflake as their core data platform, Atlan served as “a bridge” between various tools and technologies across the data ecosystem. With its organization-wide business glossary, Atlan became the go-to platform for finding, accessing, and using data. It also significantly reduced the time spent by data engineers and analysts on pipeline debugging and troubleshooting.
A key goal of Atlan is to help organizations maximize the use of their data for AI use cases. As generative AI capabilities have advanced in recent years, organizations can now do more with both structured and unstructured data—provided it is discoverable and trustworthy, or in other words, AI-ready.
Tide’s Story of GDPR Compliance: Embedding Privacy into Automated Processes
Permalink to “Tide’s Story of GDPR Compliance: Embedding Privacy into Automated Processes”- Tide, a UK-based digital bank with nearly 500,000 small business customers, sought to improve their compliance with GDPR’s Right to Erasure, commonly known as the “Right to be forgotten”.
- After adopting Atlan as their metadata platform, Tide’s data and legal teams collaborated to define personally identifiable information in order to propagate those definitions and tags across their data estate.
- Tide used Atlan Playbooks (rule-based bulk automations) to automatically identify, tag, and secure personal data, turning a 50-day manual process into mere hours of work.
Book your personalized demo today to find out how Atlan can help your organization in establishing and scaling data governance programs.
FAQs about How to Install DataHub
Permalink to “FAQs about How to Install DataHub”1. What are the system requirements for installing DataHub?
Permalink to “1. What are the system requirements for installing DataHub?”To install DataHub, you need Docker and Docker Compose, along with a machine that has at least 2 CPUs, 8GB RAM, and 2GB of swap space. Additionally, ensure you have Python 3.6 or higher and other dependencies like MySQL and Elasticsearch.
2. How do I install DataHub using Docker?
Permalink to “2. How do I install DataHub using Docker?”To install DataHub using Docker, first ensure Docker and Docker Compose are installed. Then, use the command `datahub docker quickstart` after installing the Acryl DataHub CLI. This command will set up DataHub on your instance.
3. Can I install DataHub on Windows, macOS, and Linux?
Permalink to “3. Can I install DataHub on Windows, macOS, and Linux?”Yes, DataHub can be installed on Windows, macOS, and Linux. The installation steps may vary slightly based on the operating system, but the overall process remains similar, primarily using Docker.
4. How can I troubleshoot common installation issues with DataHub?
Permalink to “4. How can I troubleshoot common installation issues with DataHub?”Common installation issues can often be resolved by checking system requirements, ensuring Docker is running correctly, and verifying that all dependencies are installed. Consult the DataHub documentation for specific troubleshooting tips.
5. Is DataHub free to use?
Permalink to “5. Is DataHub free to use?”Yes, DataHub is an open-source project, which means it is free to use. However, you may incur costs related to the infrastructure needed to run it, such as cloud services or local server resources.
6. How do I verify that DataHub has been installed correctly?
Permalink to “6. How do I verify that DataHub has been installed correctly?”After installation, you can verify DataHub by logging into the UI using the default credentials. You should also check the logs for any errors during the installation process.
Resources to get started on LinkedIn DataHub:
Permalink to “Resources to get started on LinkedIn DataHub:”- A gentle introduction to DataHub: LinkedIn’s open-source tool to tackle data discovery challenges.
- Explore LinkedIn DataHub: A hosted demo environment with pre-populated sample data
- Amundsen vs DataHub: What is the difference? Which data discovery tool should you choose?
