How to Set Up OIDC for Amundsen Using Auth0

Share this article
Setting up OIDC for Amundsen using Auth0 #
Amundsen natively supports setting up OIDC-based authentication. Using a few modifications to the Amundsen frontend service, you can enable OIDC using an identity provider. This article will take you through setting up OIDC for Amundsen using Auth0.
Is Open Source really free? Estimate the cost of deploying an open-source data catalog 👉 Download Free Calculator
Five steps to setup OIDC for Amundsen using Auth0 #
- Setup Amundsen
- Create a Single-Page Application on Auth0
- Configure Amundsen to use Auth0
- Rebuild the frontend to integrate FlaskOIDC and deploy
- Log into Amundsen using Auth0
Step 1: Install Amundsen #
Clone the GitHub repository #
You can use the following command to clone Amundsen’s GitHub repository:
$ git clone --recursive https://github.com/amundsen-io/amundsen.git
Create a new branch where you’ll make the changes:
$ git checkout -b feature/add-auth0-oidc
Install Docker Engine and Docker Compose #
If you don’t already have it installed, you need to install the Docker Engine and Docker Compose on your machine.
After completing the installation, use the docker-amundsen-atlas.yml file to deploy Amundsen using Docker:
$ docker-compose -f docker-amundsen-local.yml up
Read more: Detailed overview of the Amundsen installation process
Step 2: Create a Single-Page Application on Auth0 #
Create an application #
Sign up and log into your Auth0 account. To enable authentication redirection from Amundsen to Auth0, you need to create an application. Go to the left panel on your Auth0 home page and click on Application. Now, use the Create Application button on the upper right corner of the page to create a single-page web application, as shown in the image below:
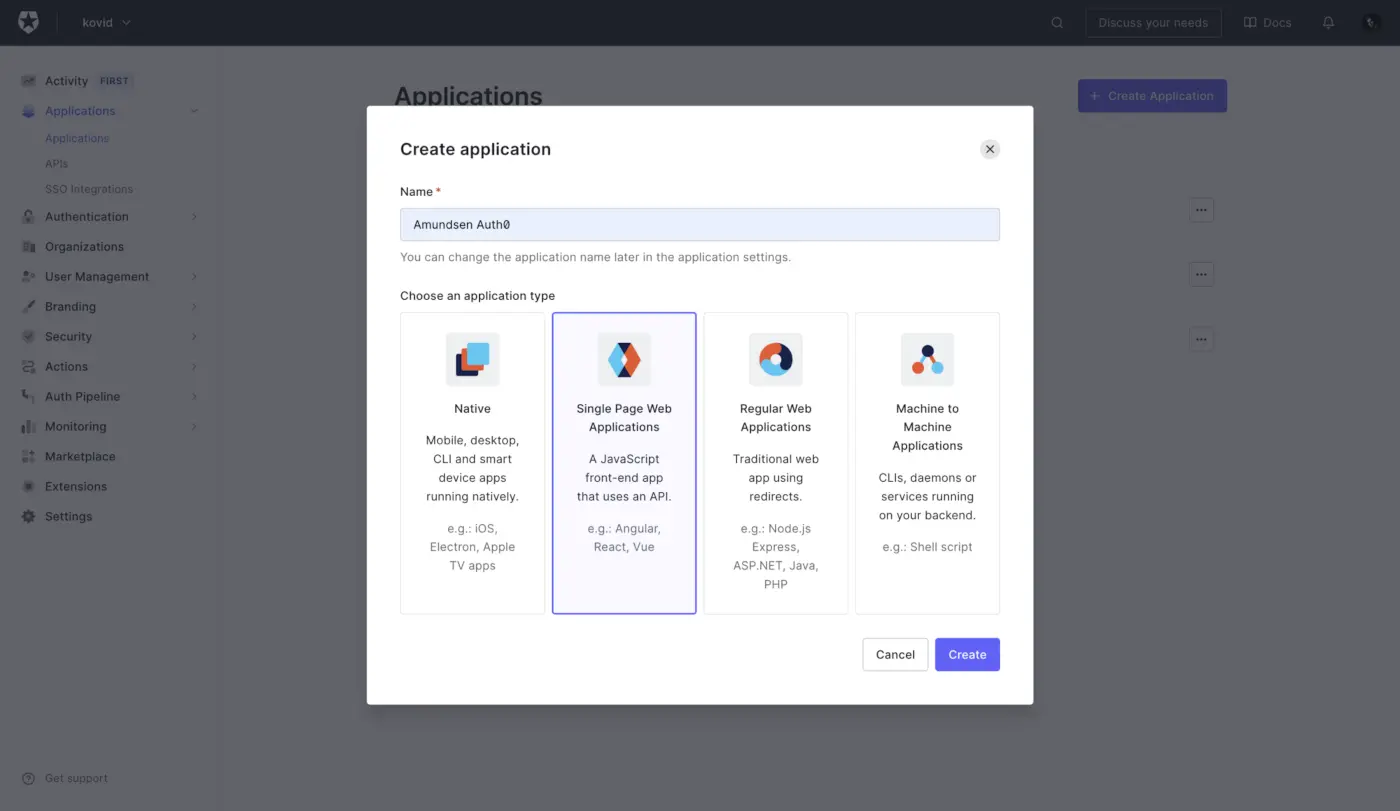
Create a new application in Auth0
This single-page application will be able to receive and respond to requests that are required to complete the authentication.
Client ID and Client Secret #
You’ll land upon the Quick Start page as soon as you create the application. As you’re using Amundsen, which already has the support for external authentication mechanisms, you can skip it and move straight to the Settings page, as shown below:
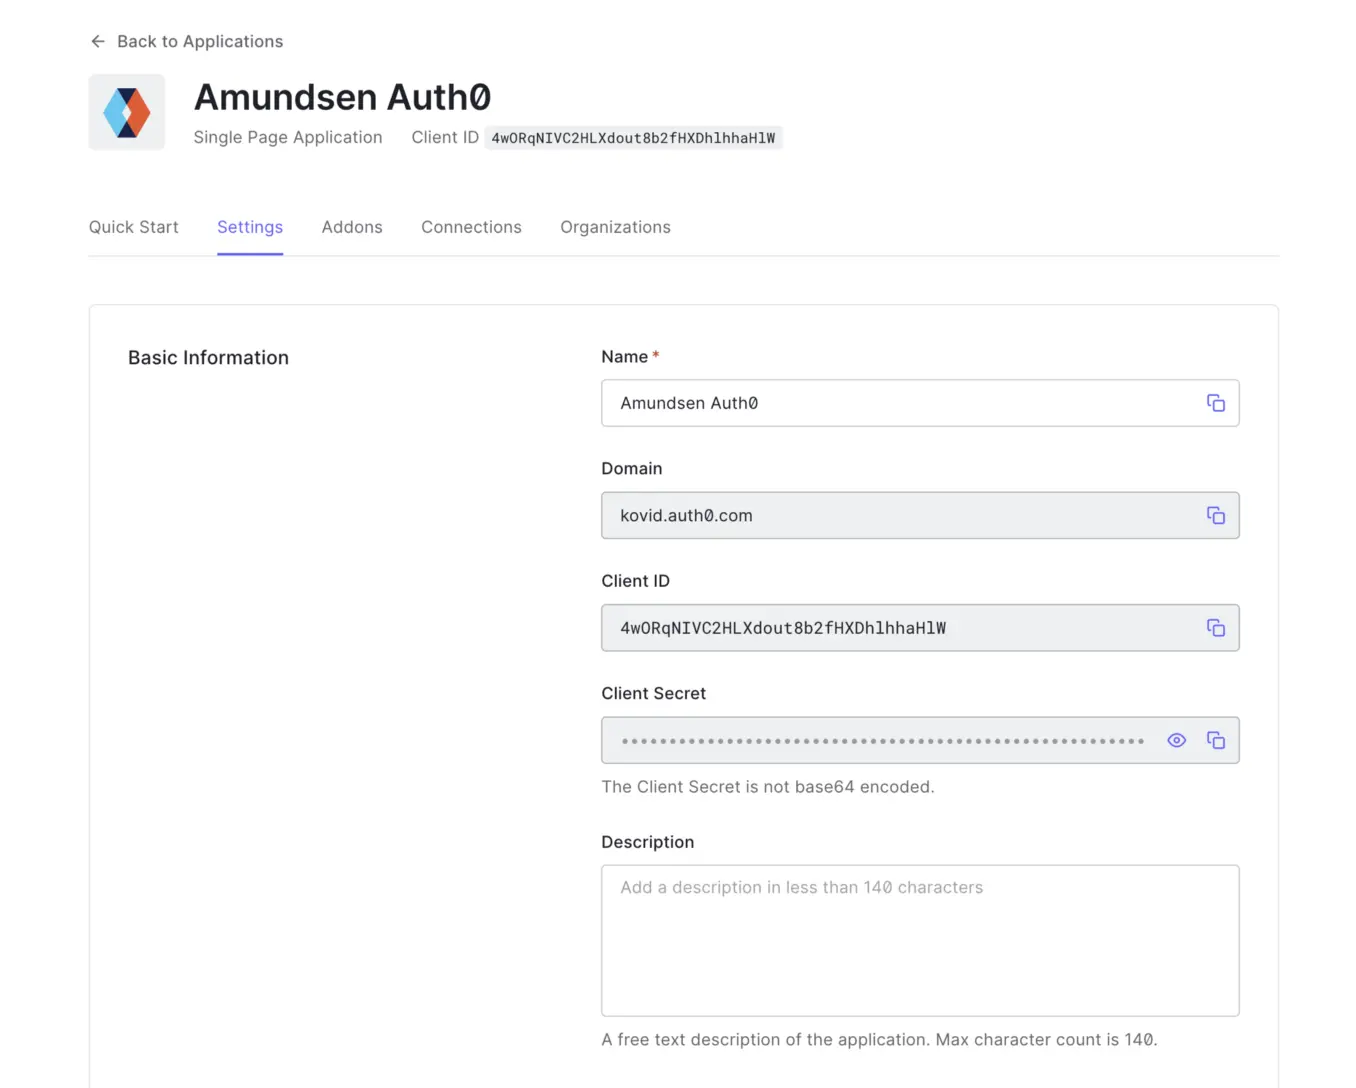
Create Client ID and Client Secret
For a basic setup, most of the defaults are good enough. You will need to copy the Client ID and the Client Secret and provide these as environment variables or a config file to Amundsen so that Amundsen is authorized to make authentication requests.
Set Application URIs #
To enable Auth0 to direct a user to the Amundsen application both for authentication and redirection after a user gets authenticated, you will need to provide the following three URIs:
Application Login URI— to enable Auth0 to direct you to Amundsen’s login page.Allowed Callback URLs— to enable Auth0 to direct you to your application after the authentication completes successfully.Allowed Logout URLs— to enable Auth0 to log you out of Amundsen.
In the following image, you can see that Amundsen is locally hosted on 192.168.1.2 and port 5000, with the URIs as mentioned earlier, populated accordingly:
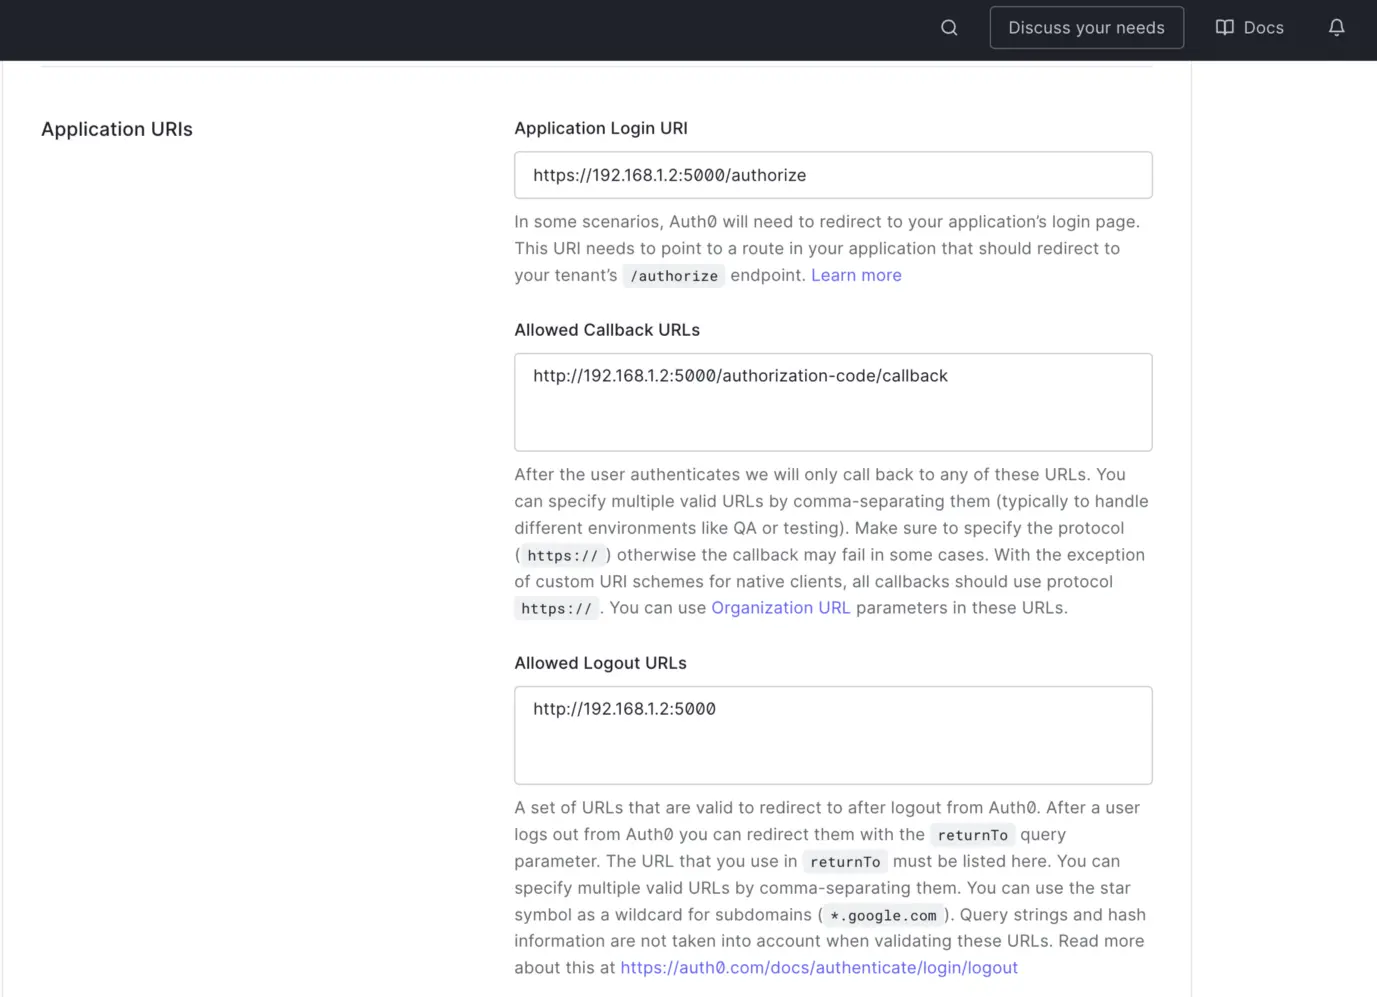
Set Application login URI
Please note that your Amundsen application must be up and running when you add and save these URIs; otherwise, Auth0 won’t be able to verify them. You can learn about application settings by visiting Auth0’s official documentation.
Google OAuth 2.0 #
Auth0 comes with a default Google OAuth and Username-Password-based authentication method. The Google OAuth connection is great if your organization uses Google Workspace.
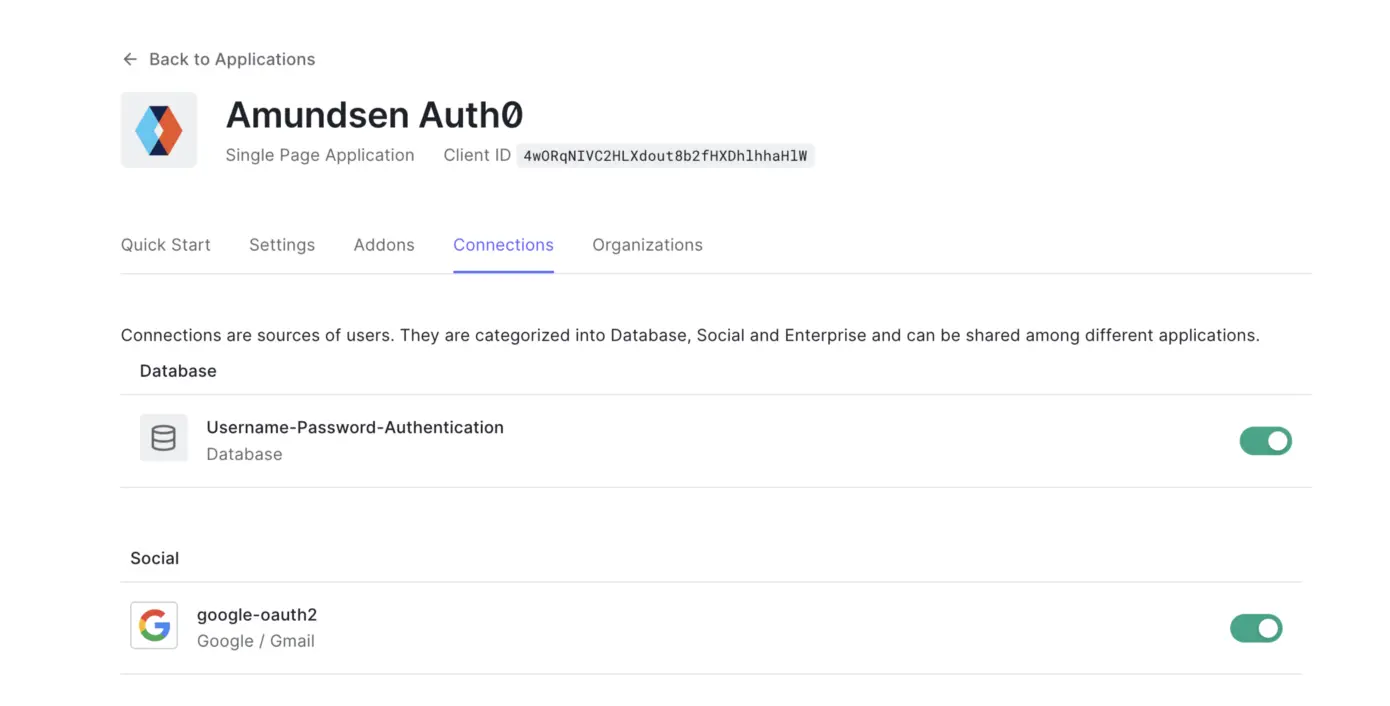
Enable Google OAuth
Step 3: Configure Amundsen to use Auth0 #
Install FlaskOIDC #
Amundsen frontend already supports FlaskOIDC out-of-the-box, so configuring it is pretty straightforward. You can either install FlaskOIDC manually by running the following command or add it to the one of the requirements*.txt files:
$ pip3 install flaskoidc
As you have already set up the single-page application in the previous setup, you must now have the following information stored in a .env file so that you can source it and the values are available as environment variables:
export FLASK_APP_MODULE_NAME=flaskoidc
export FLASK_APP_CLASS_NAME=FlaskOIDC

##setup FRONTEND_SVC_CONFIG_MODULE_CLASS to invoke OidcConfig module ./amundsen_application/wsgi.py
export FRONTEND_SVC_CONFIG_MODULE_CLASS='amundsen_application.oidc_config.OidcConfig'

##setup flaskoidc for ./amundsen_application/__init__.py
export APP_WRAPPER=flaskoidc
export APP_WRAPPER_CLASS=FlaskOIDC

export SQLALCHEMY_DATABASE_URI='sqlite:///sessions.db'

export SESSION_TYPE='sqlalchemy'

export FLASK_OIDC_SECRET_KEY='base-flask-oidc-secret-key'

export FLASK_OIDC_WHITELISTED_ENDPOINTS="status,healthcheck,health"
export FLASK_OIDC_LOG_DATE_FORMAT='%Y-%m-%dT%H:%M:%S%z'
export FLASK_OIDC_LOG_LEVEL='INFO'

export OIDC_CLIENT_SECRETS='./client_secrets.json'

export OVERWRITE_REDIRECT_URI='http://192.168.1.2:5000/authorization-code/callback'
export OIDC_CALLBACK_ROUTE='/authorization-code/callback'
export OIDC_DEBUG=True

export FLASK_OIDC_PROVIDER_NAME='auth0'
export FLASK_OIDC_CONFIG_URL='https://your-app.auth0.com/.well-known/openid-configuration'
export FLASK_OIDC_USER_ID_FIELD='email'
export FLASK_OIDC_CLIENT_ID='4wORqNIVC2HfXdout8b2fHXDwlhhaHlW'
export FLASK_OIDC_CLIENT_SECRET='NLFppVr-aJh19AEjsm0axsmPkBs-1VGbeQU0raENy2NjQ6FaMX3h1yh0YuXdKUaF'
export FLASK_OIDC_REDIRECT_URI='/authorization-code/callback'
Amundsen can also pick up some of these variables from a JSON file, the path to which you’ll have to mention in an environment variable — OIDC_CLIENT_SECRETS. You can get the following JSON file from the following URL [https://your-org.auth0.com/.well-known/openid-configuration](https://kovid.auth0.com/.well-known/openid-configuration):
{
  "issuer": "https://your-app.auth0.com/",
  "authorization_endpoint": "https://your-app.auth0.com/authorize",
  "token_endpoint": "https://your-app.auth0.com/oauth/token",
  "device_authorization_endpoint": "https://your-app.auth0.com/oauth/device/code",
  "userinfo_endpoint": "https://your-app.auth0.com/userinfo",
  "mfa_challenge_endpoint": "https://your-app.auth0.com/mfa/challenge",
  "jwks_uri": "https://your-app.auth0.com/.well-known/jwks.json",
  "registration_endpoint": "https://your-app.auth0.com/oidc/register",
  "revocation_endpoint": "https://your-app.auth0.com/oauth/revoke",
  "scopes_supported": [
    "openid",
    "profile",
    "offline_access",
    "name",
    "given_name",
    "family_name",
    "nickname",
    "email",
    "email_verified",
    "picture",
    "created_at",
    "identities",
    "phone",
    "address"
  ],
  "response_types_supported": [
    "code",
    "token",
    "id_token",
    "code token",
    "code id_token",
    "token id_token",
    "code token id_token"
  ],
  "code_challenge_methods_supported": ["S256", "plain"],
  "response_modes_supported": ["query", "fragment", "form_post"],
  "subject_types_supported": ["public"],
  "id_token_signing_alg_values_supported": ["HS256", "RS256"],
  "token_endpoint_auth_methods_supported": [
    "client_secret_basic",
    "client_secret_post"
  ],
  "claims_supported": [
    "aud",
    "auth_time",
    "created_at",
    "email",
    "email_verified",
    "exp",
    "family_name",
    "given_name",
    "iat",
    "identities",
    "iss",
    "name",
    "nickname",
    "phone_number",
    "picture",
    "sub"
  ],
  "request_uri_parameter_supported": false,
  "client_id": "4wORqNIVC2HLXdout8b2fDXDhlhhaHlW",
  "client_secret": "NLFKpVr-aJh19AFjsm0axSmPkBs-1VGbeQU0raENy2NjQ6FaMX3h1yh0YuXdKUaF"
}
Note that client_id and client_secret have been added later to this secrets file.
Step 4: Rebuild the frontend to integrate FlaskOIDC #
Build static content #
Once all the required environment variables and secrets are in place, you can build the static content used by Amundsen’s frontend service by running the following set of commands:
$ cd amundsen/frontend/amundsen_application/static
$ npm install
$ npm run build
$ cd ../../
Build the Flask app #
As mentioned earlier, you can either install FlaskOIDC manually or add it to the list of dependencies. Once you do that, you can run the following commands to complete the frontend build that allows Auth0 to interact with Amundsen using FlaskOIDC:
$ python3 -m venv venv
$ source venv/bin/activate
$ pip3 install -e ".[all]" .
Start Amundsen frontend in standalone mode #
To make sure that all your configurations are correct, rather than building all of Amundsen’s services, you can start the Amundsen frontend service in standalone mode using the following command:
$ python3 amundsen_application/wsgi.py
Before you run the command, you need to stop the currently deployed Docker containers. After stopping the Docker container, if you see that the frontend service is running on a different local IP address and port than you previously specified in the environment variables and the Auth0 app, you’ll need to update them before expecting the authentication to work.
If everything’s in order, you can now build Amundsen using Docker.
Build and deploy Docker images after local changes #
Building static content and deploying the Flask app is one way to go, but you can also use the docker-amundsen-local.yml file to build and test local changes to your Amundsen application, using the following commands:
$ docker-compose -f docker-amundsen-local.yml build
$ docker-compose -f docker-amundsen-local.yml up -d
Step 5: Log into Amundsen using OIDC auth #
Once your Amundsen containers are up and running, you can log onto the local IP address; in this case, 192.168.1.2, and you can expect Amundsen to redirect you to the Auth0 authentication page, as shown in the image below:
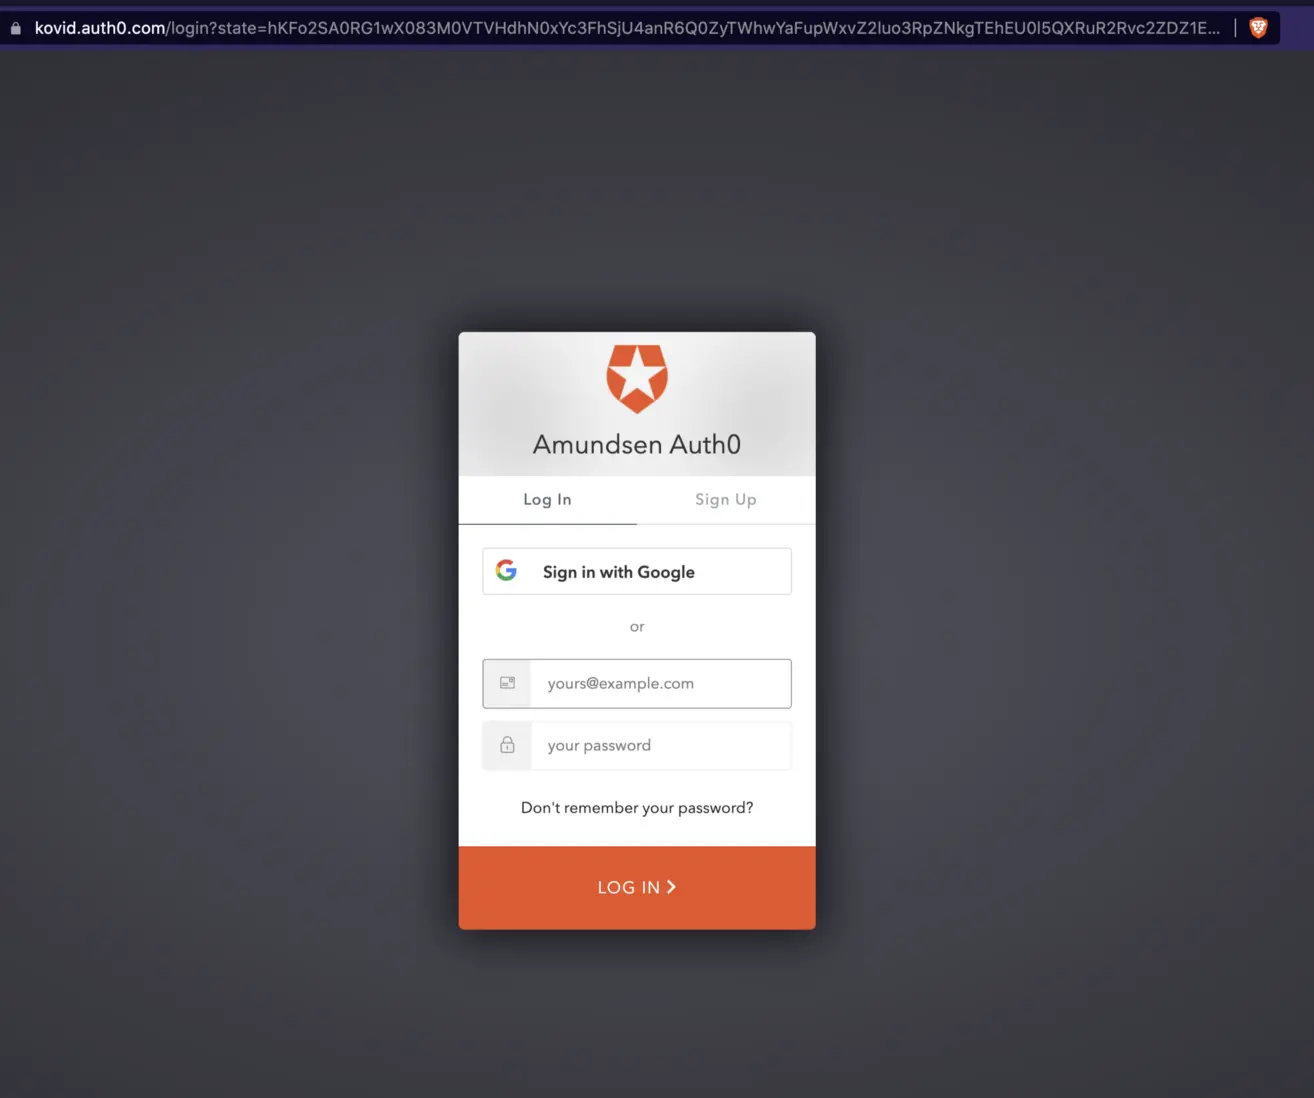
Log into Amundsen using OIDC auth
You can sign up and log in using a username and password or log in using Google. You can also check the logs in your terminal to understand the steps of the authentication more:
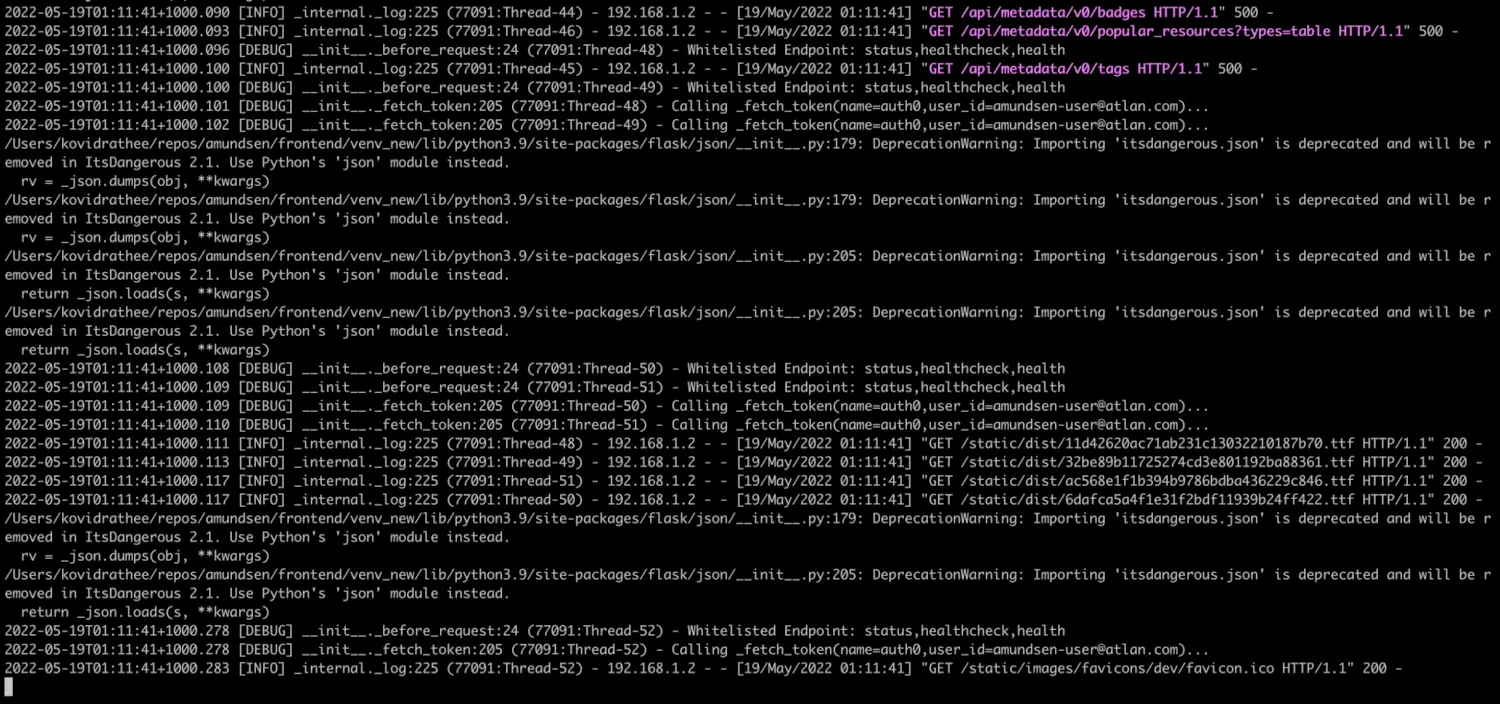
Check logs to understand the steps of authentication
You are now ready to use Amundsen more securely than before.
Troubleshooting #
Payload Validation Error with HTTP #
Amundsen’s default deployment uses HTTP and not HTTPS, but Auth0 requires the Application Login URI to be HTTPS; otherwise, you will see the following error saying that the initiate login URI must be HTTPS:
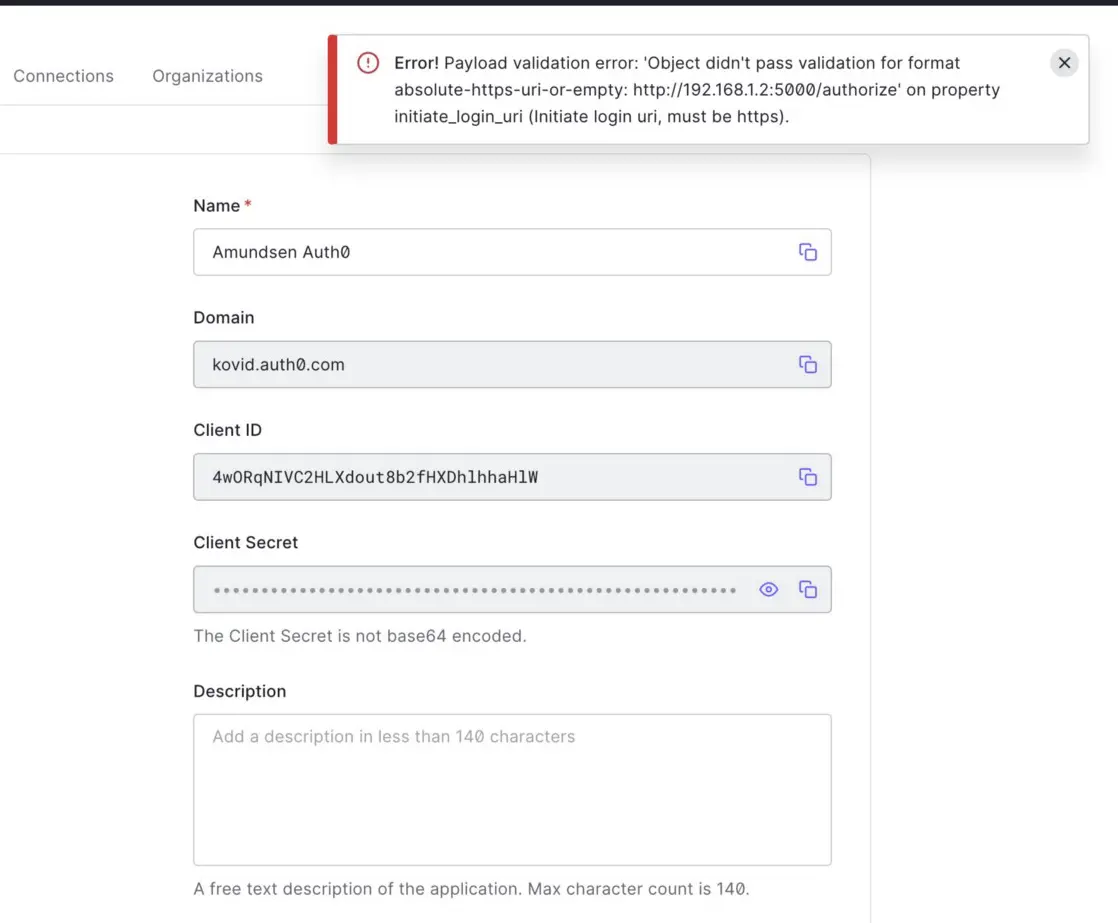
Payload Validation Error with HTTP
Fortunately, you don’t have to worry about Amundsen not using HTTPS; you can just change the URI from [http://192.168.1.2:5000/authorize](http://192.168.1.2:5000/authorize) to [https://192.168.1.2:5000/authorize](https://192.168.1.2:5000/authorize), and your browser will take care of the rest.
Callback URL Mismatch Error #
Another common error is when your callback URL doesn’t exactly match the local IP address where you’ve hosted your Amundsen. As mentioned above, the IP address of the Amundsen application in this example is 192.168.1.2, so rather than using localhost, you’ll need to use the actual local IP address, be it 127.0.0.1, 192.168.1.2, 10.1.2.3, and so on. If there’s a mismatch, you’ll see the error shown below:
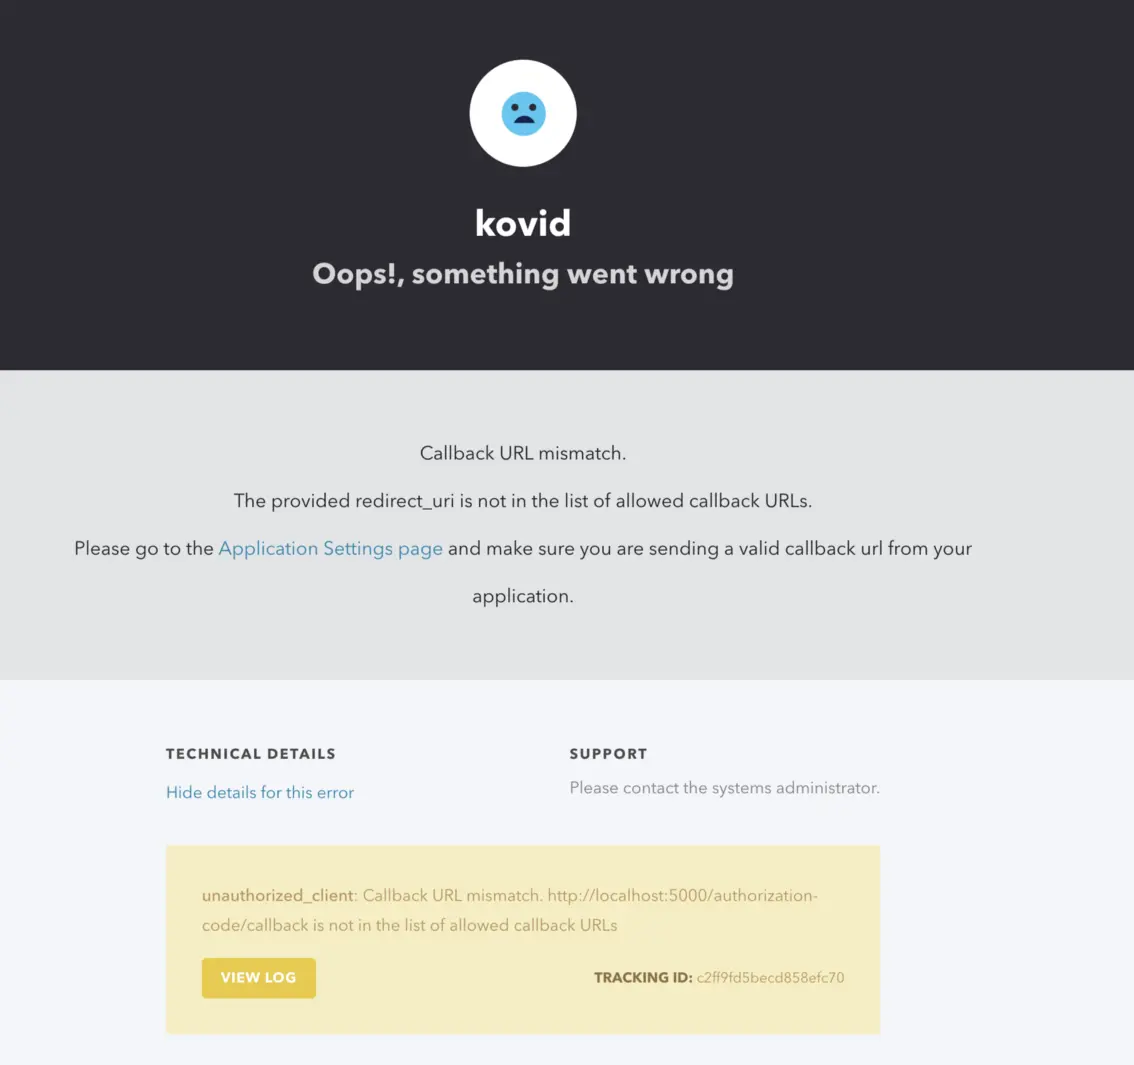
Callback URL Mismatch Error
You can also see more details about the error by viewing the application logs on the console, as shown in the image below:
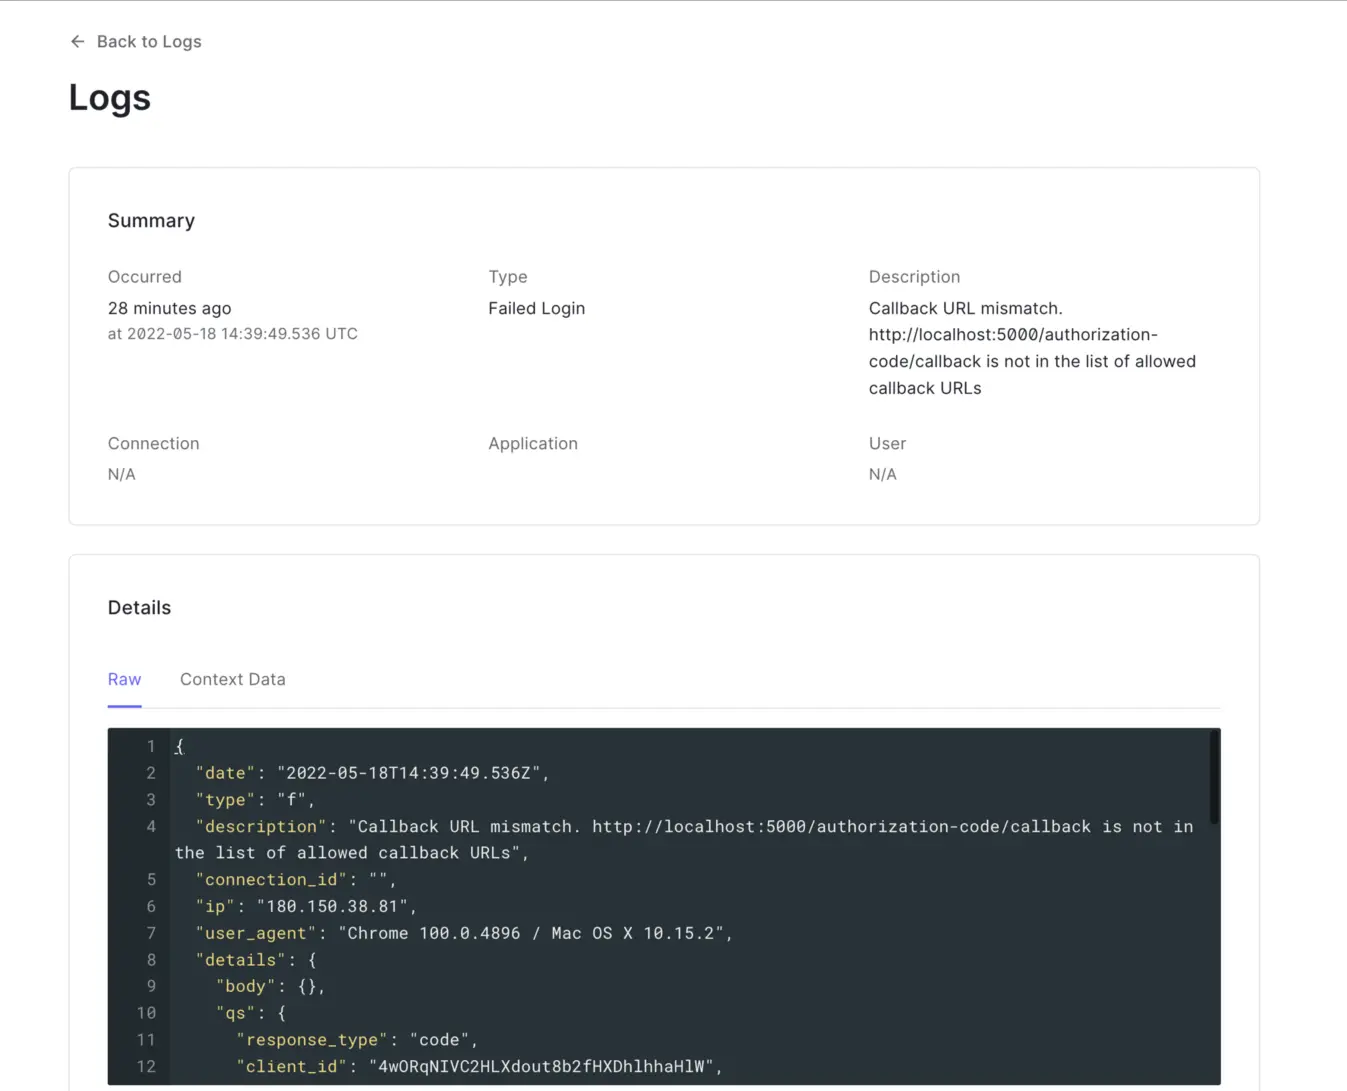
Check application logs for more details on the error
Auth0 documentation is straightforward to navigate. If you encounter any other issues, they won’t be hard to debug and fix.
Conclusion #
Amundsen comes with many out-of-the-box features that you need to configure yourself by making a few code changes. Making Amundsen use Auth0 doesn’t take a lot of code changes; it just requires you to install a library, add a few variables, and create an Auth0 account. You can use any OIDC-based identity provider, such as Okta, PingIdentity, etc., for securing your Amundsen deployment with just the steps mentioned in this guide.
Amundsen demo: Get hands-on #
This blog is part of a series of blogs where we are discussing steps to setup Amundsen as a data catalog for your team. In case you don’t want to go through this entire process and want to quickly browse through the Amundsen experience, we’ve set up a sample demo environment for you, feel free to explore:
If you are a data consumer or producer and are looking to champion your organization to optimally utilize the value of your modern data stack — while weighing your build vs buy option — it’s worth taking a look at off-the-shelf alternatives like Atlan — A data catalog and metadata management tool built for the modern data teams.
Related Amundsen setup guides #
- Amundsen set up tutorial: A step-by-step installation guide using Docker
- How to set up Okta OIDC authentication in Amundsen
- A guide to configure and set up Amundsen on Google Cloud Platform(GCP)
- A step-by-step guide to configure and set up Amundsen on AWS
Share this article


