Step-By-Step Guide to Configure and Set up Amundsen on AWS

Share this article
Amundsen is an open-source metadata catalog and data discovery engine. It can help you increase the productivity of your data and business teams by giving them the power to see what kind of data exists in the various systems used by your business, how it is structured, and how you can use it.
Is Open Source really free? Estimate the cost of deploying an open-source data catalog 👉 Download Free Calculator
Irrespective of the cloud platform you are working with, you can quickly start with Amundsen to see if it fits the bill. This step-by-step guide will take you through setting up Amundsen on AWS. You’ll be deploying Amundsen on Docker with the default neo4j backend database.
Set up Amundsen on AWS in 7 steps #
- Create an AWS EC2 instance
- Configure networking to enable public access to Amundsen
- Log in to the EC2 instance and install Git
- Install Docker, and Docker Compose
- Clone the Amundsen GitHub repository
- Deploy Amundsen using Docker Compose
- Load sample data using Databuilder
Step 1: Create an AWS EC2 instance #
If you don’t have an AWS account, create one and log into the account. Make sure you have all the necessary permissions to be able to create EC2 instances and configure networking for those instances. Use the search bar on the AWS console to find the EC2 service. Use the Launch Instance option to create a new EC2 instance, as shown in the image below:
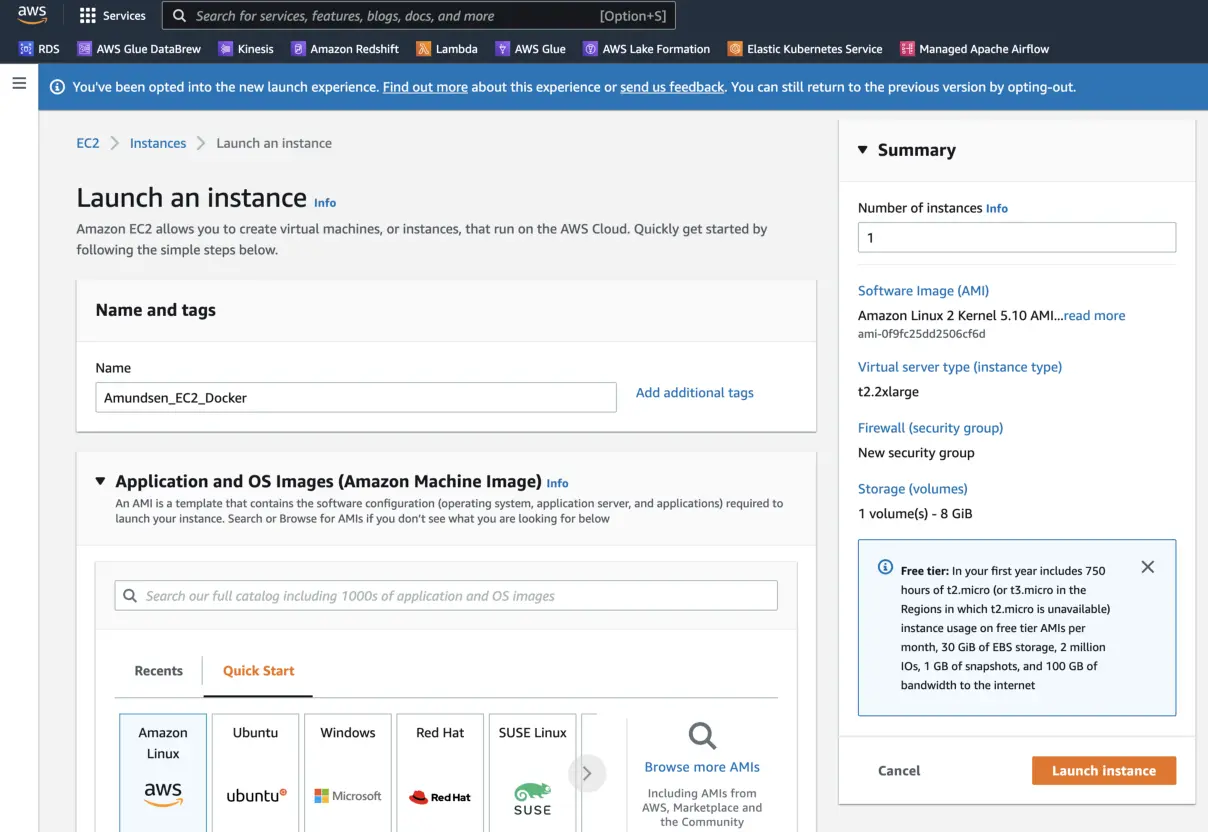
Launch an AWS EC2 instance
Once you configure the instance, you will be able to get the instance details by clicking on the Instance ID field from the console, as shown below:

Fetch instance details from Instance ID
You can see all the important details about your instance on the following page, including the public IP address and DNS, where you will be able to access Amundsen once you finish the installation process.
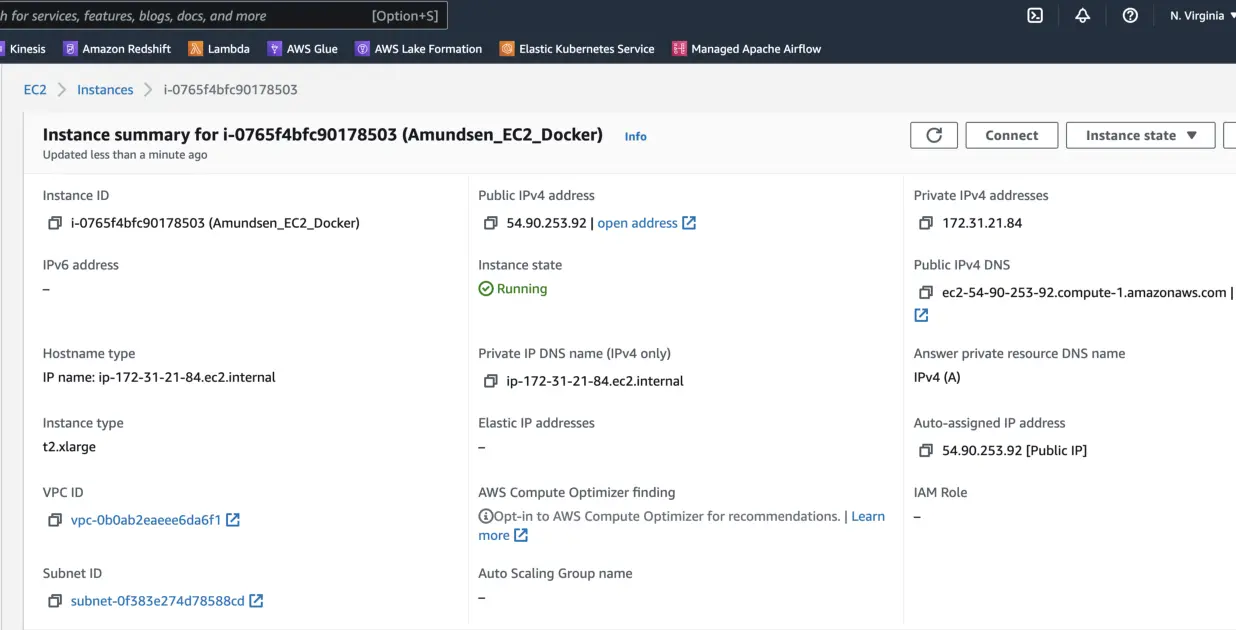
AWS EC2 instance summary
Now that your EC2 instance is up and running, the next step is to configure the networking rules to allow traffic from the internet to reach your instance.
Step 2: Configure networking to enable public access to Amundsen #
Set security group inbound & outbound rules #
For simplicity’s sake, you can use two simple rules to allow all inbound and all outbound traffic for the EC2 instance. You can do that by creating one entry each in the Inbound rules and the Outbound rules section of the security group, as shown below:
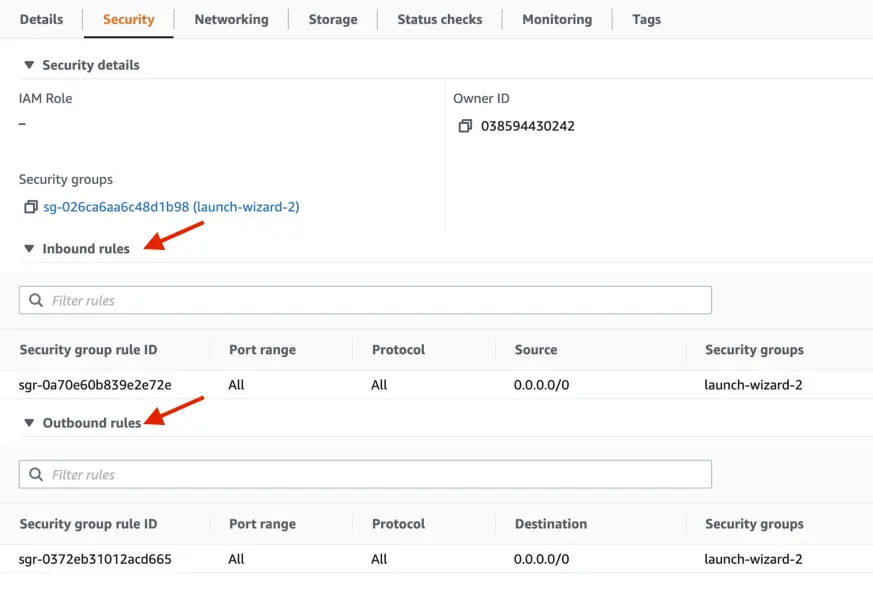
Set up inbound and outbound rules
You shouldn’t allow all inbound and outbound traffic for your EC2 instance in production. You should limit as much exposure as possible for the reasons of privacy and security.
Use Reachability Analyzer #
Suppose you are not comfortable allowing traffic on all ports and all protocols. In that case, you can allow traffic on HTTP/HTTPS for browsing, SSH logging into the EC2 console from a remote machine, and TCP on port 5000, as that’s the port used to communicate with Amundsen’s frontend. To ensure that you’ve done the networking right, you can use the VPC Reachability Analyzer tool, as shown in the image below:
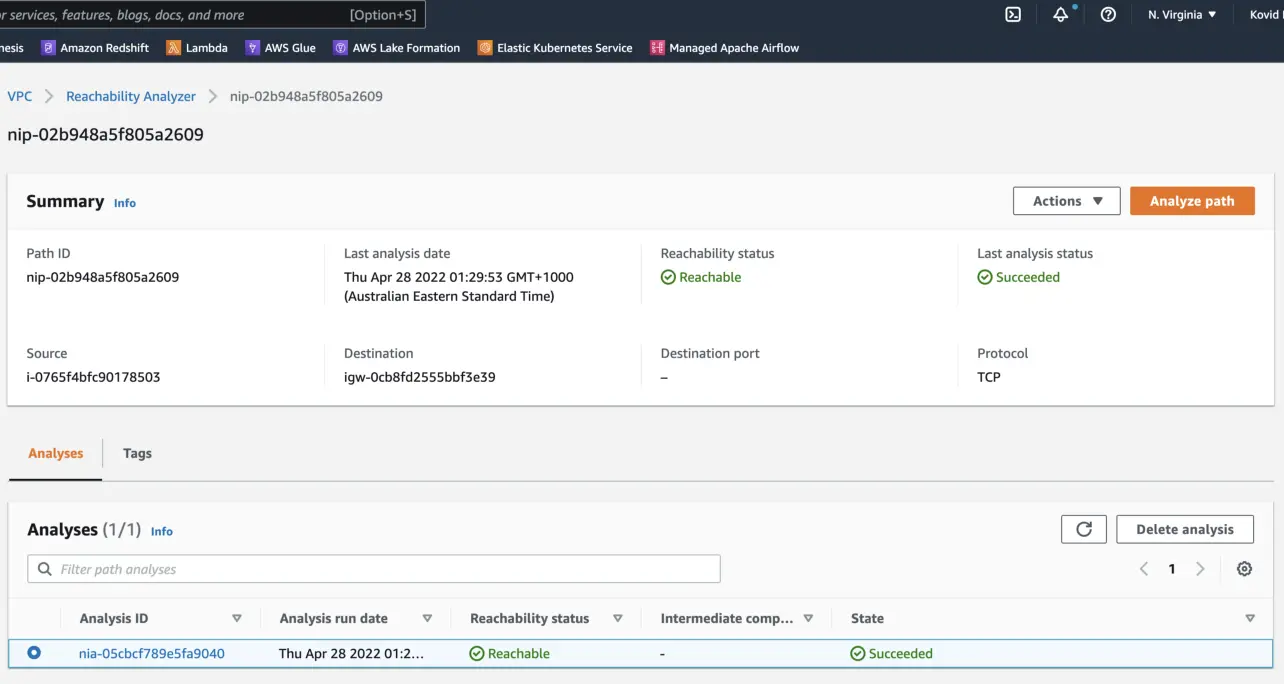
AWS reachability analyzer
Moreover, you can see the details of the reachability analysis that will tell you all the different services used to implement forwarding, reverse proxy rules, access control lists, firewalls, etc. You can see one such example in the screenshot below:
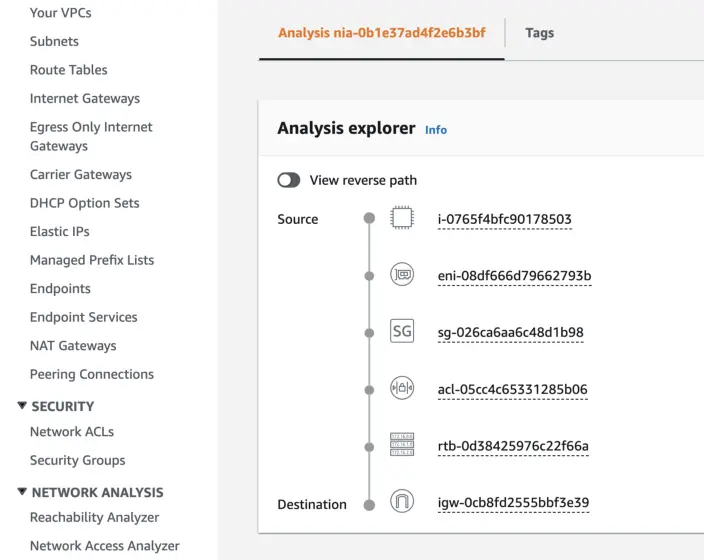
AWS reachability analysis
Step 3: Log in to the EC2 instance and install Git #
Connect to the EC2 instance #
There are many ways to connect to your EC2 instance, but you’ll use the option for the scope of this article. Using this option, you’ll be able to access the instance from your web browser. You don’t need to worry about passwords or SSH keys if you use this method to log into the instance.
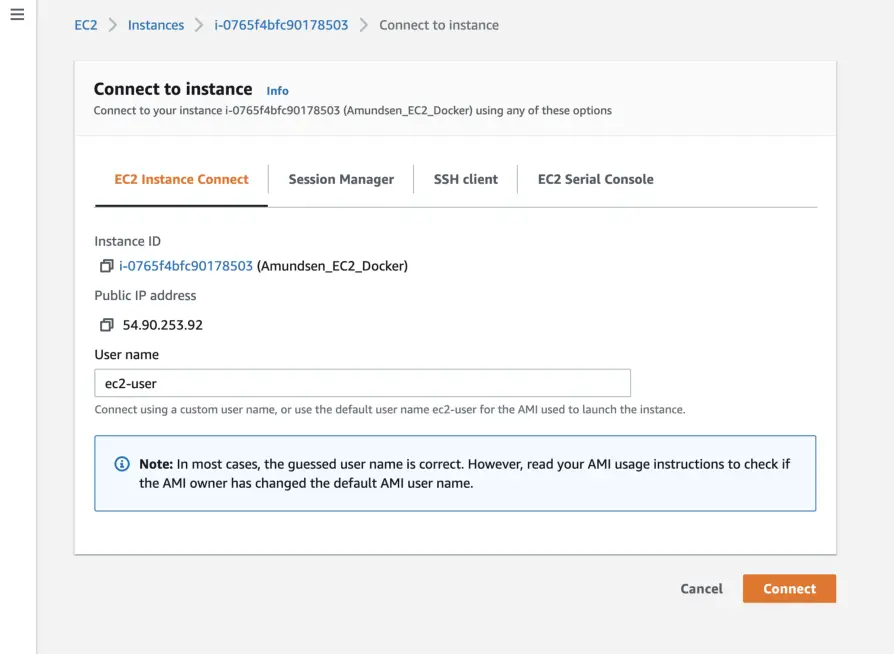
Connect to EC2 Instance
Once you press the Connect button, a new tab will open in your browser, and you’ll be able to see the following screen:

Amazon EC2 CLI
Install Git #
The first thing you need to do is install Git on your machine. Make sure that the yum package manager is up to date.
$ sudo yum update -y
$ sudo yum install git -y
$ git version
Verify if Git has been installed correctly by checking the installed version of Git.
Step 4. Install Docker Engine & Docker Compose on the VM #
Install Docker engine #
As you’re using Docker to deploy Amundsen, you’ll first need to install Docker Engine. To do that, again, make sure that your yum package manager is up to date. You can run the following commands to update yum and install Docker:
$ sudo yum update
$ sudo yum search docker
$ sudo yum install docker
Install Docker compose #
Amundsen runs different services that work together. These services are deployed in different containers to limit resource interdependencies. Docker Compose helps you deploy multi-container applications. It takes a YAML file where all your services are defined and deploys them all in one go. Use the following commands to install and configure Docker Compose:
$ wget https://[github.com](<http://github.com/>)/docker/compose/releases/latest/download/docker-compose-$(uname -s**)-$(uname** -m**)
$ sudo mv docker-compose-$(uname -s**)-$(uname** -m**)** **/usr/local/bin/**docker-compose
$ sudo chmod -v +x **/usr/local/bin/**docker-compose**
Enable & start Docker service #
Use the following commands to enable and start the Docker service so that you can deploy Amundsen on Docker:
$ sudo systemctl enable docker.service
$ sudo systemctl start docker.service
Check Docker service status #
$ sudo systemctl status docker.service
If everything goes alright, you’d be able to see the following image describing the status of the Docker service after you run the command mentioned above:
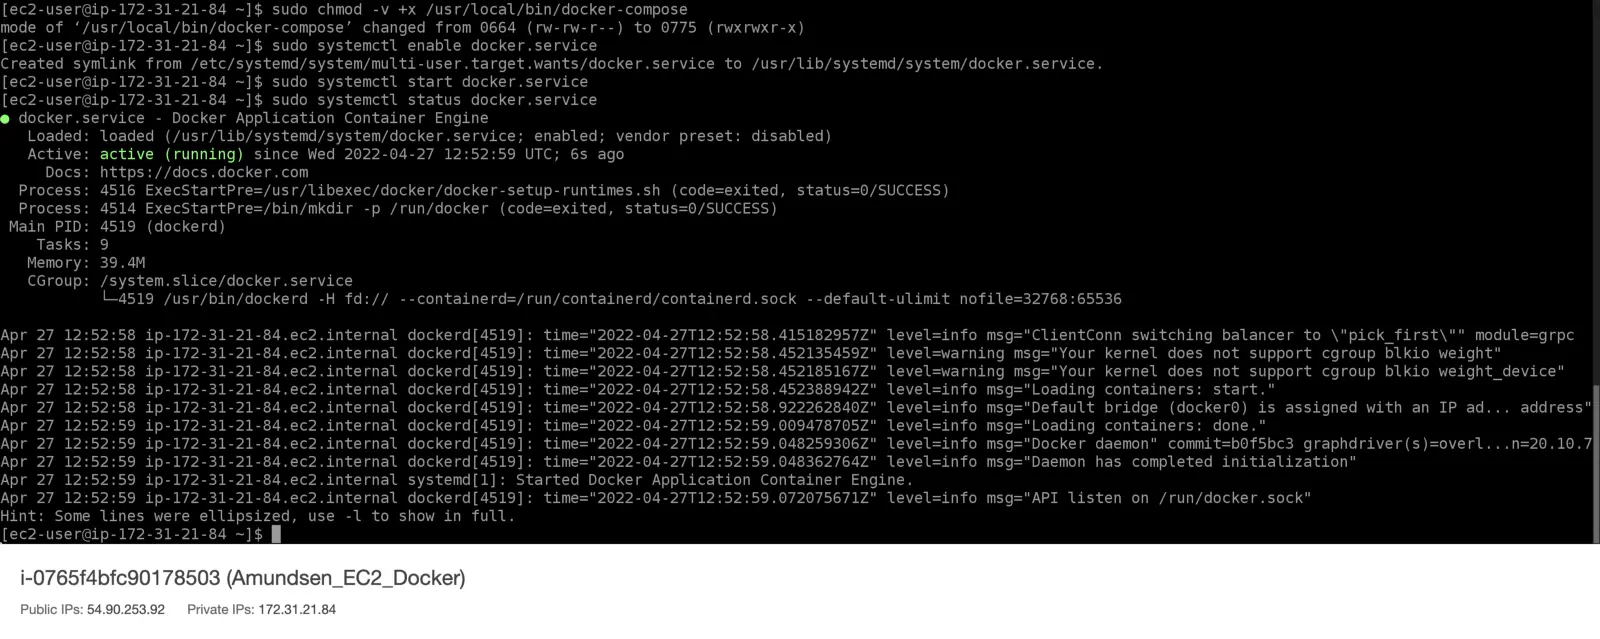
Docker service status
Step 5: Clone the Amundsen GitHub repository #
The next step is to clone the Amundsen GitHub repository on your EC2 instance. You can use the following command to do that:
$ git clone --recursive <https://github.com/amundsen-io/amundsen.git>
By default, you will end up checking out the main branch. You can deploy other branches that are in beta right now, but you should only do that to test out features you’re interested in that are not in the main branch yet.
Step 6: Deploy Amundsen using Docker compose #
And finally, use the following Docker Compose file to deploy Amundsen on your EC2 instance:
$ docker-compose -f docker-amundsen.yml up
Notice that the command uses the docker-amundsen.yml file. This file uses the default database backend, neo4j. Alternatively, you can deploy Amundsen with the Apache Atlas backend. If you want to do that, you’ll need to use the docker-amundsen-atlas.yml file. When all services are deployed, you’ll end up with an output that looks something like this:
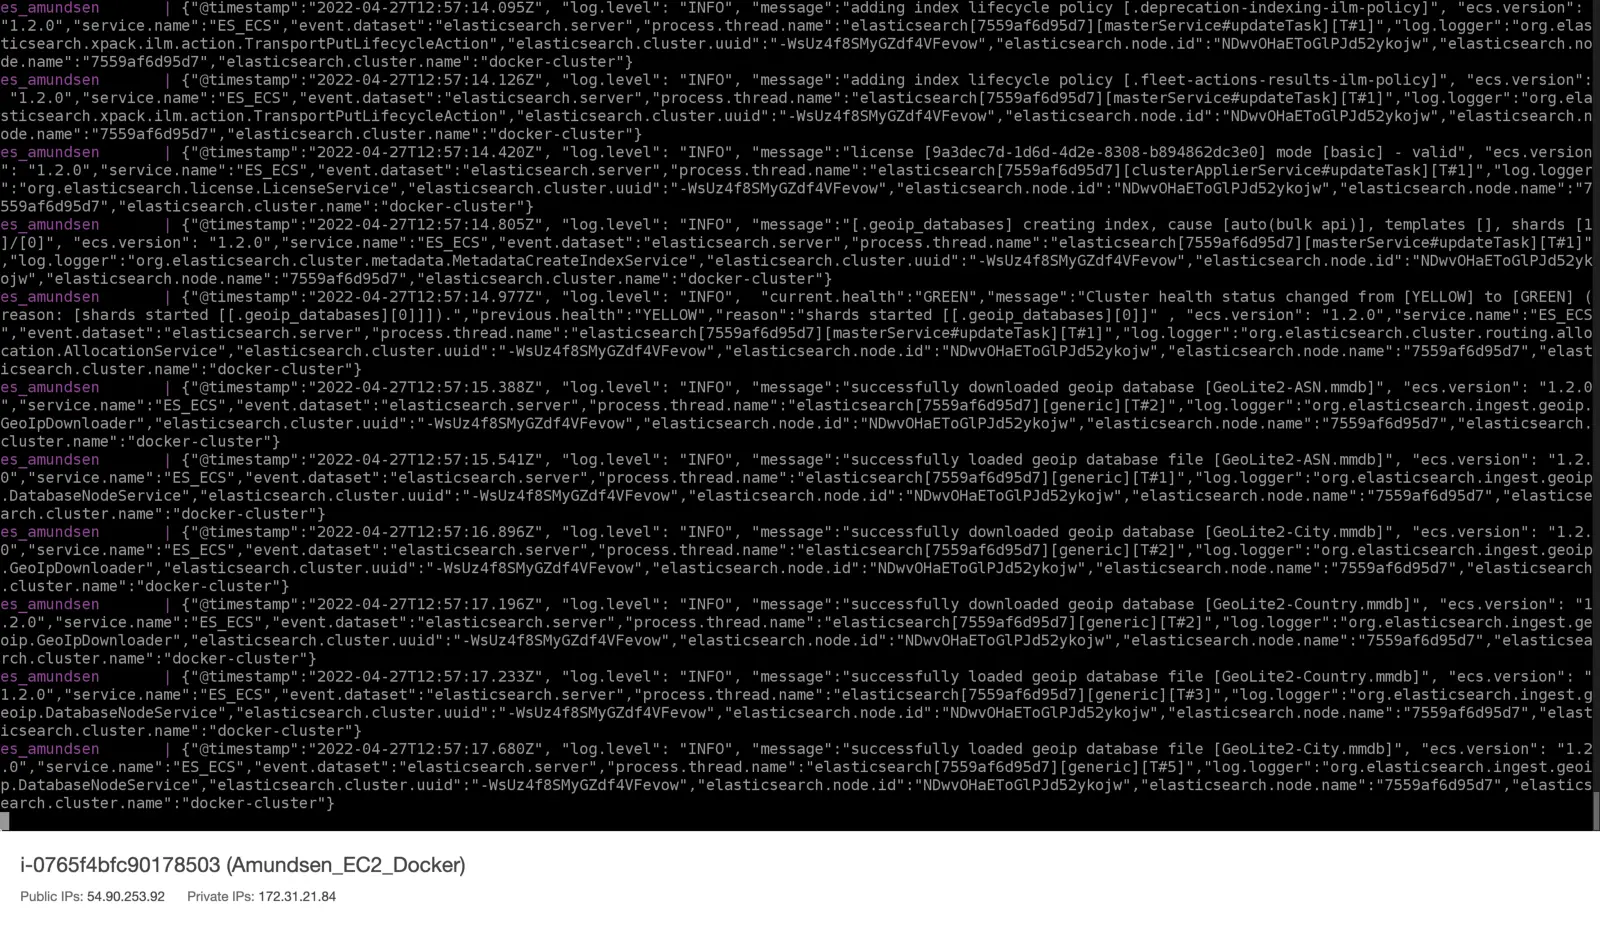
Deploy Amundsen using Docker Compose
Step 7: Load sample data using databuilder #
To be able to play around with Amundsen, you need to have some sample data loaded into it. If you want to get a feel of what Amundsen would look like in a real setting, you can try connecting it with real data sources. Alternatively, as mentioned before, you can load sample data into Amundsen using the following commands:
$ cd amundsen/databuilder
$ python3 -m venv venv
$ source venv/bin/activate
$ pip3 install --upgrade pip
$ pip3 install -r requirements.txt
$ python3 setup.py install
Based on the backend database you select, you’ll have separate commands to load data. For the neo4j backend, you’ll need to use the following command:
$ python3 example/scripts/sample_data_loader.py
For the Apache Atlas backend, you’ll need to use the following command:
$ python3 example/scripts/sample_data_loader_atlas.py
Working with Amundsen #
Log onto Amundsen #
Once you have completed loading the sample data, you’ll be ready to use Amundsen. You can use your EC2 instance public IP address or the public DNS with the port number 5000 to start using Amundsen. Note that Amundsen doesn’t come with any authentication mechanism out-of-the-box. You can undoubtedly integrate any OIDC-based identity providers to solve your authentication problems.
Use Amundsen search #
You’ll see the following screen first thing when you log onto Amundsen from your web browser:
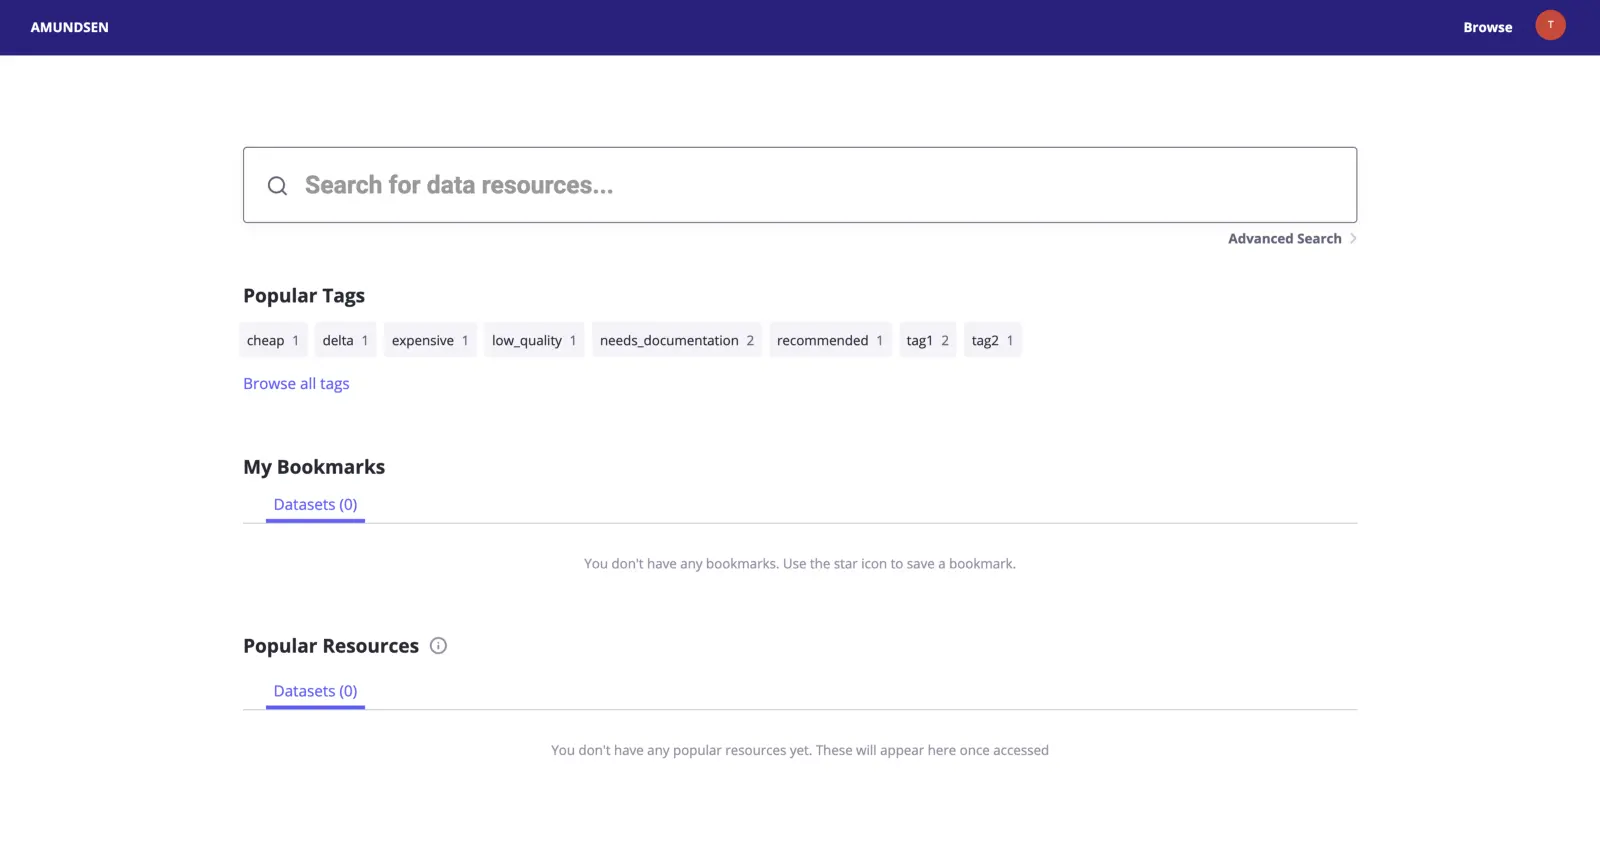
Amundsen metadata search
Notice that some tags already exist. This means that your sample data load was successful. You can now use the search bar to look for data resources. As you’ve only loaded sample data, most of the data contains the test keyword, so you can start by searching for text, and Amundsen will show you all the datasets that have test either in the name of the dataset or the description of it. Elasticsearch enables the full-text search capability for Amundsen.

Amundsen data catalog search
You can either navigate to one of the datasets shown above or navigate to the list of all the datasets that match your search query. In this case, you’ll press the See all 6 Datasets results and you’ll land upon the following page:
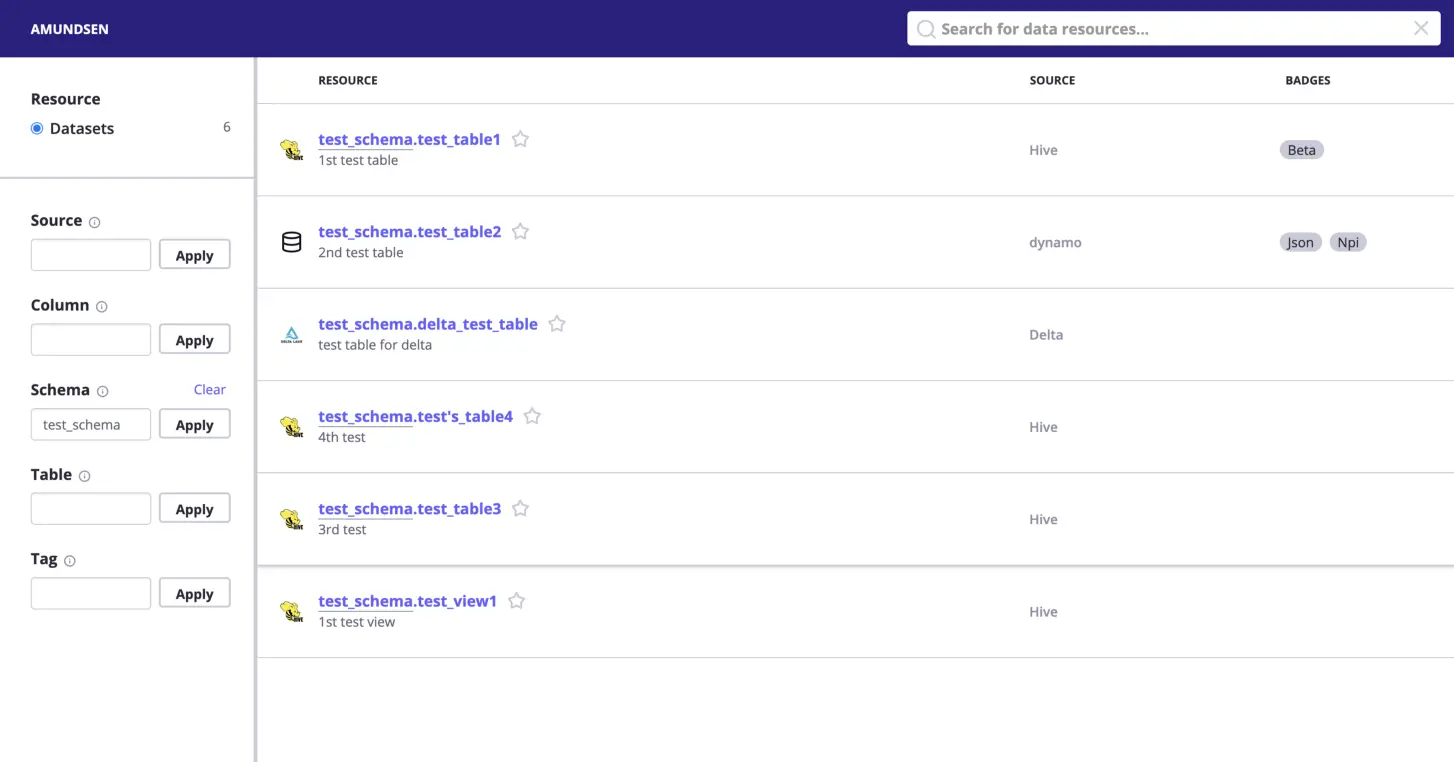
Amundsen data assets search results
If you have hundreds or thousands of datasets, you can use the filtering capabilities on this page to get to the dataset you are after.
Navigate to a dataset #
After searching for a dataset, you can navigate to one of them to look at the description, business context, structural metadata, ownership information, tags, and more, as shown in the image below:
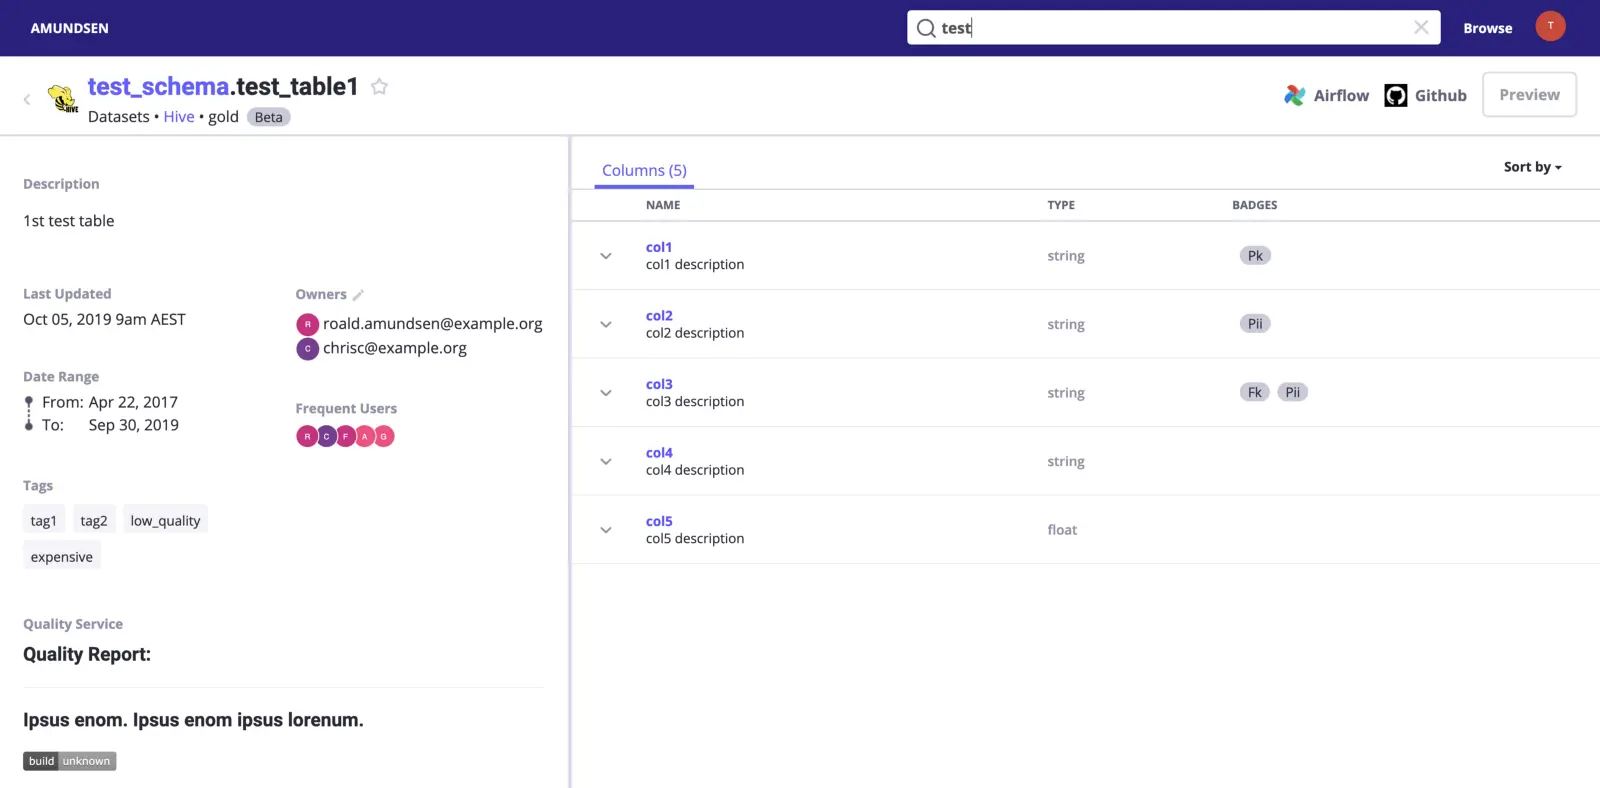
Explore data assets in detail
There are many other things you can explore on Amundsen. You can integrate one of your data sources and set up data lineage. You can also refine your search query results by adding better descriptions and relevant tags and making the right people owners for their respective datasets.
More ways of deploying Amundsen on AWS #
Although a vanilla installation of Amundsen on an EC2 instance is good to get started with Amundsen, you’d probably need a more scalable solution for production. There are many options you can choose from. For instance, you can deploy using AWS ECS and let it handle the containers instead of Docker. REA Group uses a similar setup where the Amundsen services run on ECS containers in conjunction with a managed Elasticsearch cluster and a neo4j backend on AWS EC2 with EFS as the storage layer.
Another well-architected way of deploying Amundsen is by using AWS Fargate’s serverless capabilities to host Amundsen’s services — databuilder, frontend, metadata, and search. You can use AWS Neptune as the backend to the metadata service and the managed Elasticsearch service to power the search engine. There are other more straightforward ways to go about it too. You can use a pre-built AMI from the AWS marketplace and pay a small premium on top of the compute resources for ease of deployment.
Conclusion #
If your existing data infrastructure resides on AWS, it will make the most sense to deploy Amundsen on AWS to keep it simple. This step-by-step tutorial took you through installing Amundsen on AWS from scratch. Although we wouldn’t recommend this deployment method for production, it is a great way to get started with Amundsen in no time.
If you are a data consumer or producer and are looking to champion your organization to optimally utilize the value of your modern data stack — while weighing your build vs buy options — it’s worth taking a look at off-the-shelf alternatives like Atlan — A data catalog and metadata management tool built for the modern data teams.
Amundsen related reads #
- Lyft Amundsen data catalog: Open source tool for data discovery, data lineage, and data governance.
- Amundsen demo: Explore and get a feel for Amundsen with a pre-configured sandbox environment.
- Amundsen set up tutorial: A step-by-step installation guide using docker
- Setting up Amundsen data catalog on Google Cloud Platform(GCP): A step-by-step installation guide using docker
- What Is a Data Catalog? & Do You Need One?
- AI Data Catalog: Exploring the Possibilities That Artificial Intelligence Brings to Your Metadata Applications & Data Interactions
- 8 Ways AI-Powered Data Catalogs Save Time Spent on Documentation, Tagging, Querying & More
- 15 Essential Data Catalog Features to Look For in 2023
Share this article


