OpenMetadata Ingestion Framework, Workflows, Connectors & More

Share this article
OpenMetadata is an open-source data discovery and cataloging tool which came out of the learnings from Uber’s Databook project. Built to solve metadata siloing and lack of metadata standards, OpenMetadata is built to support a wide variety of connectors in the modern data stack, and it is built on open-source tools and standards like Airflow, Elasticsearch, MySQL, JSONSchema, and Dropwizard.
A metadata catalog performs two core functions: it allows you to ingest metadata, and then it will enable you to consume the ingested metadata, in most cases, from a web UI. OpenMetadata was built with a focus on the problem of metadata ingestion and consumption, especially when deciding what needs to be push-based and what needs to be pull-based. As a result, OpenMetadata is designed to have pull-based ingestion. It supports both push and pull-based consumption.
In this article, you will learn in detail how ingestion works in OpenMetadata, how to ingest metadata, and the caveats around metadata ingestion.
Is Open Source really free? Estimate the cost of deploying an open-source data catalog 👉 Download Free Calculator
Table of contents #
- OpenMetadata Ingestion Framework
- OpenMetadata Workflows
- Using connectors for ingesting data into OpenMetadata
- Summary
OpenMetadata Ingestion Framework #
OpenMetadata is built on a solid foundation for ingestion using the ingestion framework that allows you to pull data from external data sources, such as databases, data warehouses, dashboard services, ML pipelines, orchestration engines, data quality tools, and more.
By default, the ingestion is handled using Airflow. You can use an existing Airflow installation or the metadata ingestion container loaded with Airflow plugins for your data sources. You can also use any external tool capable of running Python code, such as Dagster, Airbyte, or some of the popular ones are managed offerings of Airflow, such as AWS MWAA (Managed Workflows for Airflow) and Google Cloud Composer.
To understand more about the ingestion framework, let’s look at the high-level design, where the following components related to metadata ingestion are shown:
- Ingestion Framework – the core functionality comprising connectors and integrations with various data sources.
- Ingestion Pipelines – the custom component that lets you run ingestion pipelines using tools like Apache Airflow.
- API – the OpenMetadata backend server is the central communication hub for all other components.
- Entity Store – the MySQL backend database that has. The custom-built metadata model to conform data from all data sources within OpenMetadata.
- Search Engine – the Elasticsearch engine that powers the search functionality on the OpenMetdata UI.
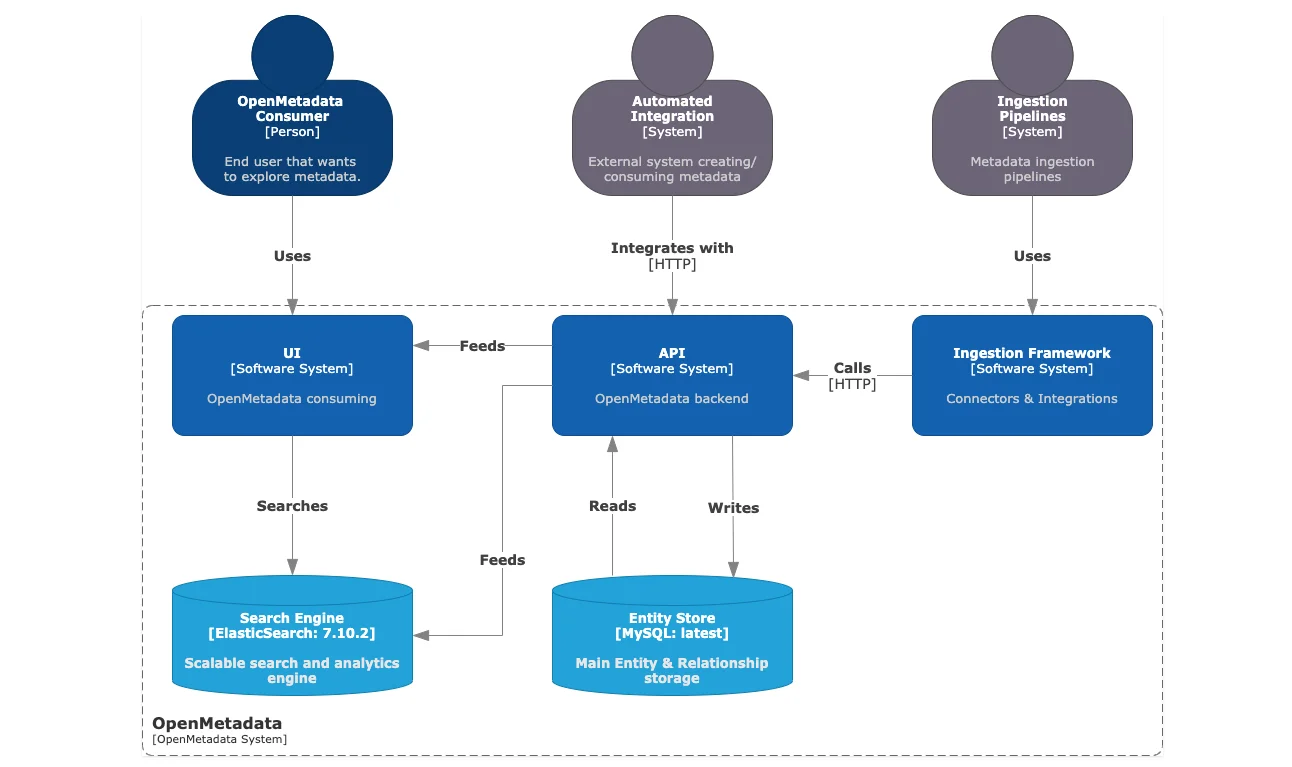
High-level architecture of OpenMetadata with MySQL as the backend database and Elasticsearch as the engine that powers search & discovery - Source: OpenMetadata.
This diagram tells you about the ingestion framework, connectors, and pipelines, but there’s more to it. Every data source maintains different types of metadata. OpenMetadata allows you to specify which type of metadata you want to extract and ingest into your system. Let’s talk about the concept of a workflow, which will enable you to get different types of metadata from your data source.
OpenMetadata Workflows #
OpenMetadata does a good job of separating the connection logic, the type of metadata, and the custom business logic of data extraction from data sources. While the ingestion framework provides the foundation for ingesting data into OpenMetadata, workflows allow you to ingest different types of metadata.
For instance, you might only want to ingest structural and usage metadata for a particular data source. Out of the six available workflows, you can use two to do that for you, namely, Metadata Ingestion Workflow and Usage Workflow. Here are the six workflows OpenMetadata currently offers.
Metadata Ingestion Workflow #
The metadata ingestion workflow is the most comprehensive workflow within OpenMetadata. It is also the simplest way to ingest data from a data source into OpenMetadata. This workflow is built into the OpenMetadata UI. If you’re self-hosting OpenMetadata, use the OpenMetadata ingestion container prepackaged with custom Airflow plugins. Alternatively, as mentioned in the ingestion framework section, you can also use other tools or cloud-based managed Airflow.
This workflow fetches the metadata from the typical information_schema type structural log of data assets within any database or warehouse. NoSQL databases also have similar constructs but differ in implementation. The good thing about using a connector-based approach is that all the implementation details are abstracted away so you can get right to your metadata ingestion work.
As of v1.1.1, there are over 50 connectors available that include relational databases like MySQL and PostgreSQL, data warehouse platforms like Databricks, Redshift, and Snowflake, messaging systems like Kafka, Redpanda, and Kinesis, pipeline services like Airflow and Dagster; and metadata catalogs like Amundsen and Apache Atlas.
Usage Workflow #
In addition to the core metadata, many databases and data warehouses collect additional metadata from connections, tests, profiles, query parsing, query execution, etc. First, see how OpenMetadata can leverage usage metadata from a data warehousing platform, say, Snowflake.
Snowflake collects all your query data in the snowflake.account_usage schema in the query_history table. You can use a query to fetch the relevant queries within a period. OpenMetadata calls this query filtering, which you can use for the usage and lineage workflow, as seen in one of the later sections.
SELECT query_type,
       query_text,
       user_name,
       database_name,
       schema_name,
       start_time,
       end_time,
       total_elapsed_time/1000 duration
  FROM snowflake.account_usage.query_history
  WHERE query_text NOT LIKE '/* {app": "OpenMetadata", %} */%'
  AND query_text NOT LIKE '/* {"app": "dbt", %} */%'
  AND start_time BETWEEN to_timestamp_ltz('<start_time>') AND to_timestamp_ltz('<end_time>')
  AND query_type NOT IN ('ROLLBACK','CREATE_USER', '<other_excepted_queries>')
  AND {<other query conditions>}
  LIMIT {result_limit}
To execute this query, you’ll need to grant the appropriate read permissions to the role used by the user connecting to OpenMetadata. Find more about the required permissions on the official documentation webpage.
Lineage Workflow #
The lineage workflow is quite similar to the usage workflow, using the same underlying tables from the data sources. Both usage and lineage workflows currently support only the following connectors: BigQuery, Snowflake, MSSQL, Redshift, ClickHouse, PostgreSQL, and Databricks. Supporting any other connectors or building custom connectors is easy if you have a query log in a prescribed format in a standard CSV file, as shown below:
- query_text: This field contains the literal query executed in the database. It is quite possible that your query has commas inside. Then, wrap each query in quotes “{query}” to not have any clashes with the comma as a separator.
- database_name (optional): Enter the database name on which the query was executed.
- schema_name (optional): Enter the schema name to which the query is associated.
If you’re using the native capabilities of a data source to get this data using one of the connectors, you can use the table that logs all the queries run on that data source, i.e., snowflake.account_usage.query_history if you’re talking about Snowflake. You can find other data sources on the documentation webpage for lineage filters.
Profiler Workflow #
The job of a profiler starts when the metadata ingestion workflow has been configured. OpenMetadata allows you to profile and inspect your data once the core metadata has been loaded. You can run a profile on your data on multiple levels - across the whole database, across a schema, on a table, etc.
Running a complete profile is equivalent to a full table scan in traditional database terms, so you probably need to avoid doing that. OpenMetadata allows you to specify a percentage or number of rows to be profiled. Based on the sample, profiling moves ahead.
Using the features mentioned above, you can also write custom SQL queries to sample data for a profile. Once you define the profile in the UI or use a YAML file, you can run it manually from the command line or using an Airflow DAG. The results of the profile runs will be visible in the UI.
Data Quality Workflow #
OpenMetadata has built-in data quality and reliability capabilities. In addition to having out-of-the-box tests, you can define your tests using an external data quality tool like Great Expectations, Deequ, dbt, etc. You can define your test using a YAML or JSON file. Here’s what a custom test definition would look like:
{
  "description": "<test_description>",
  "entityType": "<TABLE or COLUMN>",
  "name": "<test_name>",
  "testPlatforms": [
    "GreatExpectations"
  ],
  "parameterDefinition": [
    {
      "name": "<parameter_name>"
    }
  ]
}
One of the built-in tests to ensure that the table row count is equal to a given number, as shown in the YAML snippet below:
testDefinitionName: tableRowCountToEqual
parameterValues:
  -name: value
  value: 10000
Now, you can run these tests manually using the command line, as shown below:
metadata test -c /path/to/config.yaml
You can also schedule tests or test suites (collection of tests) to be run on a schedule using an Airflow DAG. This workflow can be imported and used in an Airflow DAG in the following manner:
from metadata.test_suite.api.workflow import TestSuiteWorkflow

config = """
<your YAML configuration>
"""

workflow_config = yaml.safe_load(config)
workflow = TestSuiteWorkflow.create(workflow_config)
workflow.execute()
dbt Workflow #
Because dbt is one of the most in-demand tools for executing the ELT pattern for a data pipeline, OpenMetadata created a separate workflow. OpenMetadata uses three dbt Artifacts for getting all the metadata it can get:
- catalog.json - this file contains the
information_schemaequivalent of a technical data catalog in dbt. It is generated when you run thedocs generatecommand. - manifest.json - this file contains all the models, seeds, snapshots, tests, macros, and metrics, i.e., all your Jinja2-templatized SQL queries in dbt.
- run_results.json - this file captures the results of dbt invocations.
There are other artifacts that OpenMetadata currently doesn’t use. This workflow supports ingesting queries, lineage, tags, owners, descriptions, and tests from dbt. For more, check out this in-depth guide to the dbt Workflow.
Using connectors for ingesting data into OpenMetadata #
Connectors are used with workflows that run on top of the ingestion framework. All the available connectors are part of the core OpenMetadata project, the code for which can be found in this GitHub repository. In this section, you’ll learn about the steps you need to take to ingest metadata for a data source.
Step 1. Install the Python package for the required connector #
Assuming you’re using the default orchestration method for OpenMetadata, to ingest data from a source connector, you’ll need to write a Python DAG. Say you need to ingest data from Databricks. You can start by installing the openmetadata-ingestion[databricks] Python package using the following command:
pip install openmetadata-ingestion[databricks]
You can find all the supported connectors, including Snowflake, Redshift, Glue, MySQL, PostgreSQL, AzureSQL, ClickHouse, and BigQuery, in the official documentation.
Step 2. Create and populate the configuration YAML file for the connector #
All the connectors in OpenMetadata are defined as JSON Schema configuration files. Following the structure of this file, you’ll need to create a YAML file with the values of the required variables.
source:
  type: databricks
  serviceName: local_databricks
  serviceConnection:
    config:
      type: Databricks
      catalog: hive_metastore
      databaseSchema: default
      token: <databricks token>
      hostPort: <databricks connection host & port>
      httpPath: <http path of databricks cluster>
      connectionTimeout: 120
This file will have all the information about the data source you want to extract metadata from, such as the hostPath, the catalog, the databaseSchema, and so on. Different connectors will have additional requirements for this YAML file, again defined in the JSON Schema specification.
This configuration file will then feed into the next step, where you’ll write an ingestion DAG for getting metadata from Databricks into OpenMetadata.
Step 3. Ingesting metadata into OpenMetadata with an Airflow DAG #
OpenMetadata uses different workflows for ingesting different types of metadata from the data source. You’ll have to specify the workflow in your DAG definition, load your YAML configuration file, and invoke the metadata_ingestion_workflow() as a python_callable in the DAG, also specifying other details like the description of the DAG, the run schedule, etc., as shown in the snippets below:
source:
  type: databricks
  serviceName: local_databricks
  serviceConnection:
    config:
      type: Databricks
      catalog: hive_metastore
      databaseSchema: default
      token: <databricks token>
      hostPort: <databricks connection host & port>
      httpPath: <http path of databricks cluster>
      connectionTimeout: 120
After running this DAG, you should have metadata ingested into your OpenMetadata data catalog.
Summary #
This article gave you a detailed overview of how OpenMetadata ingests data using the ingestion framework with the help of workflows powered by built-in data source connectors. Many of these workflows work together to provide comprehensive insight into your data assets in OpenMetadata. As a next step, you can dive deep into one of the workflows to understand the process in more detail.
Share this article

