Data Catalog for Power BI: How to Setup Guide

Share this article
Power BI fuels much of the business world’s analytics reporting. It also stores a lot of corporate data. By tracking that data in a data catalog, you can tag, classify, and inspect the flow of all of your data across your organization.
In this article, we’ll dive deep into how to connect your data catalog to a Microsoft Power BI tenant and crawl it for data and metadata.
So, we’ll look at the prerequisites you’ll need to set up, how to prepare Power BI for data catalog connectivity, and how to connect your data catalog to your Power BI tenant and set up a regularly scheduled crawler.
Table of contents #
- How to set up a data catalog for Microsoft Power BI: Prerequisites
- Determine the Power BI assets to be crawled
- Create Active Directory application registration
- Configure data catalog crawler for Power BI data
- Business outcomes for cataloging data from Power BI
- How to deploy Atlan for Power BI
- Related reads
How to set up a data catalog for Microsoft Power BI: Prerequisites #
You’ll need the following setup before you can connect Microsoft Power BI to your data catalog:
- Familiarity with data catalogs: If you need a refresher, read our primer on data catalogs.
- Power BI service: The instructions below assume you are using Power BI service and not the desktop application.
- Azure Active Directory administrator access. Power BI service is hosted inside of a Microsoft tenant, i.e., an instance of Azure Active Directory. To grant access to Power BI service, you’ll need to create an application registration inside of its associated Azure Active Directory.This will also require an active Azure subscription. (Creating an application registration is free and will not incur charges.)
- Data catalog permissions. You will need access to your data catalog as a user with the ability to create new data connector instances and tables.
- Connectivity. Your Power BI tenant needs to be reachable from your data catalog. If your data catalog is running in the cloud in a private virtual network, this may require creating a NAT server and outbound firewall rules to allow access to Power BI.
Determine the Power BI assets to be crawled #
Before starting, determine which elements from Power BI you want to crawl from your data catalog. What you can crawl may differ depending on which data catalog you use.
For instance, Atlan’s data catalog supports crawling the following data objects:
- Workspaces
- Dashboards
- Data sources
- Datasets
- Dataflows
- Reports
- Pages
- Tiles
- Tables
- Columns
- Measures
Read more → What does Atlan crawl from Microsoft Power BI?
Create Active Directory application registration #
Your data catalog will create an application registration to authenticate to Power BI. The app registration serves as the identity to which Power BI grants permission to access objects such as workspaces and dashboards. (You may also see the app registration referred to as a service principal.)
To create an application registration, you must:
- Set up a new registration
- Grant API permissions
- Create a client secret
- Copy the tenant and app ID
- Create a security group
- Enable API settings in Power BI admin
- Add your group as a workspace viewer
So, let’s get started.
1. Set up a new registration #
Firstly, navigate to the Azure Portal in the same tenant as your Power BI instance. In the search bar, search for Azure Active Directory, and then select Azure Active Directory.
In the directory’s left-hand menu, under Manage, select App registrations. Then, select New registration.
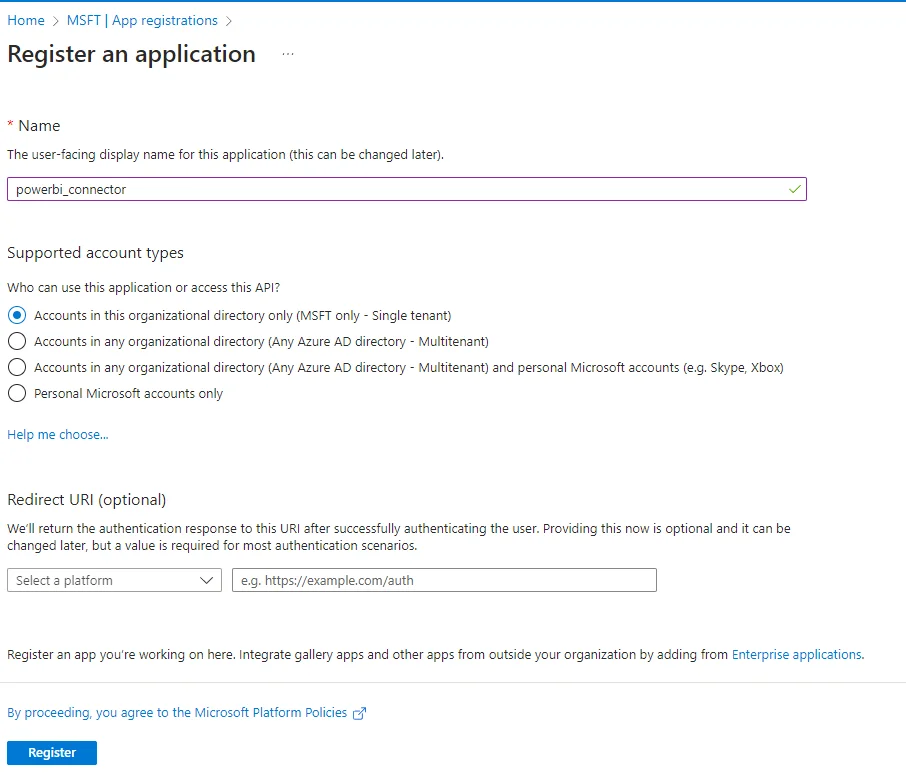
Registering an application in Azure - Image by Atlan.
In Name, enter an easy-to-remember name. In Supported account types, select Accounts in this organizational directory only (MSFT only - Single tenant). Then, select Register.
2. Grant API permissions #
Next, you need to grant your app registration permission to access Power BI. To do this, in the left-hand menu for your app registration, under Manage, select API permissions. Then, select Add a permission, and scroll down and select Power BI service.
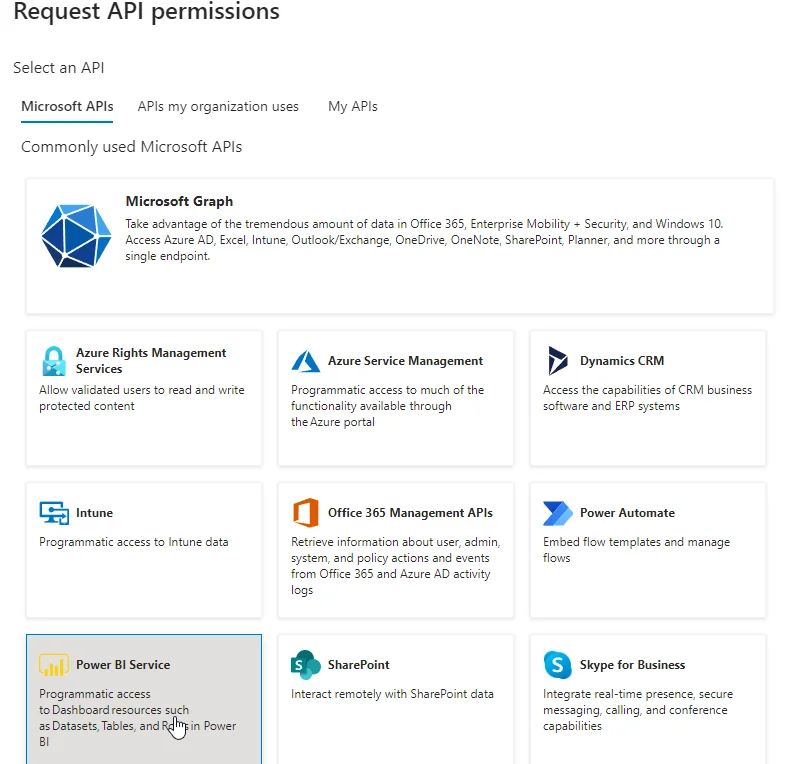
Requesting an API permission for Power BI - Image by Atlan.
In the Request API permissions panel, select Delegated permissions and then grant all of the following read permissions:
- App.Read.All
- Capacity.Read.All
- Dashboard.Read.All
- Dataflow.Read.All
- Dataset.Read.All
- Gateway.Read.All
- Pipeline.Read.All
- Report.Read.All
- StorageAccount.Read.All
- Tenant.Read.All
- Workspace.Read.All
This grant applies the principal of least permission to your data catalog connection. The data catalog only needs read permissions on Power BI data, therefore there is no reason to assign it write access.
Finally, select the Grant admin consent button. (Note: If this button only says Add permissions, you are not currently logged in as an Azure Active Directory administrator. Log out and log back in with an account with administrator rights.)
3. Create a client secret #
To authenticate to Power BI, your data catalog will need two pieces of information: the application ID (app ID), also called the client id, and a client secret. The client secret is a unique cryptographic string that acts like a password.
To create a client secret, on your app registration page, select Certificates & secrets. Then, select New client secret.
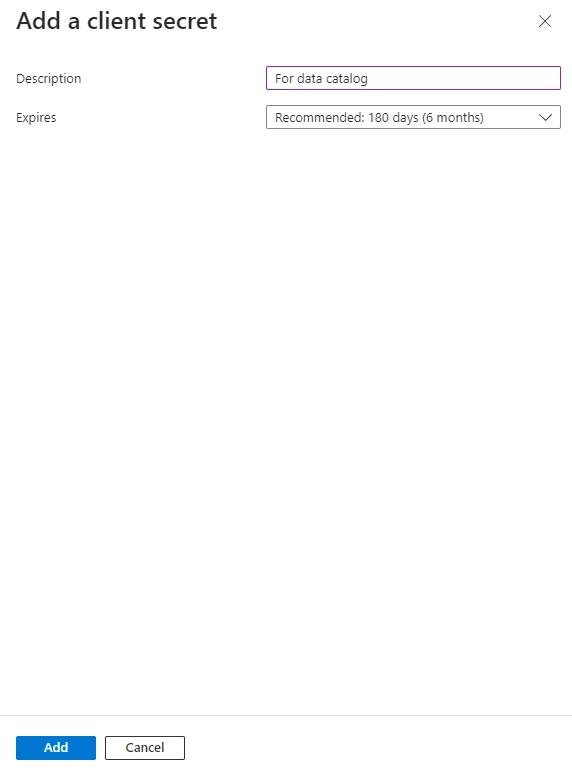
Creating a client secret - Image by Atlan.
In Description, enter text that describes the purpose of this client secret.
In Expires, select how long you want this client secret to remain valid until you need to create a new one. It’s recommended that you change, or rotate, the client secret at least every six months to reduce the risk of security breaches caused by leaked credentials.
If you set this field to anything except Never, you will need to ensure that you rotate the client secret before the specified time period expires. Otherwise, your data catalog will lose connectivity to Power BI and the data it tracks will go out of date.
When ready, click Add. Make sure to copy the client secret to a text window on your computer for use in a subsequent step, as you won’t be able to copy it again after this. If you lose your client secret, delete it and create a new one.
4. Copy the tenant and app ID #
Finally, when you configure your data catalog connection to Power BI, you’ll need both the tenant ID as well as the app ID.
To retrieve both, on your app registration, select Overview. Then, copy the values for Application (client) ID and Directory (tenant) ID.
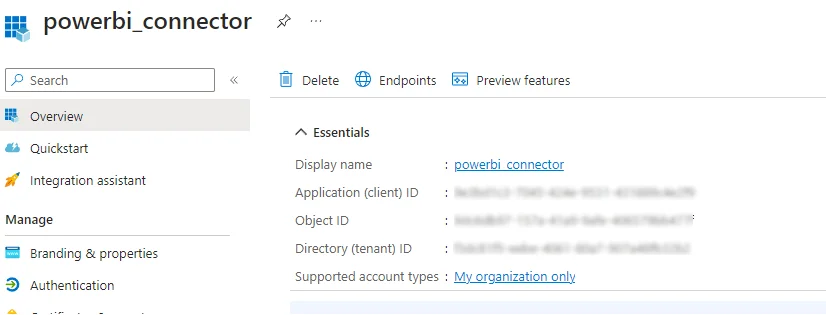
Setting up the Power BI connector - Image by Atlan.
Save this information.
5. Create a security group #
Next, you’ll need to create a security group containing your app registration. You’ll specify this later in Power BI to indicate which Azure app registrations should be granted Power BI access.
Navigate back to Azure Active Directory by placing your cursor in the search bar and selecting Azure Active Directory. Then, under Manage, select Groups, and then select New group.
Enter a Group name and a Group description. Then, under Members, select No members selected. In the Add members dialog, search for and select your app registration, and then select Select.
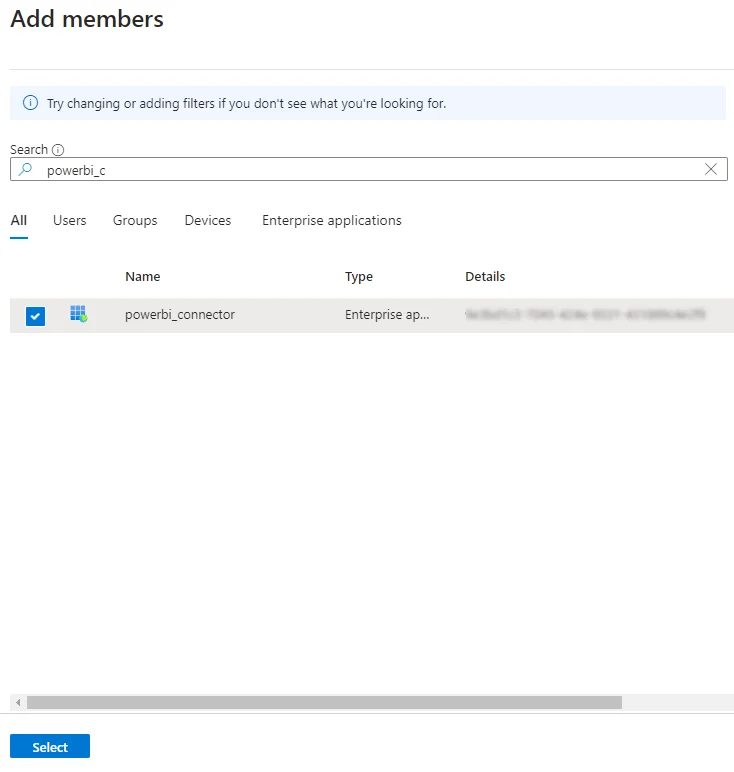
Creating a security group - Image by Atlan.
When done, select Create.
6. Enable API settings in Power BI Admin #
Next, you’ll need to enable additional API settings within Power BI Admin itself.
To perform this step, log in to the Power BI Admin Portal as an account with Power BI administrator rights. In Admin portal → Tenant settings, change the following properties:
Developer settings: Allow service principals to use Power BI APIs
Expand this and select Enabled. In Apply to, select Specific security groups and enter the name of the Azure security group you created above. Then, select Apply.
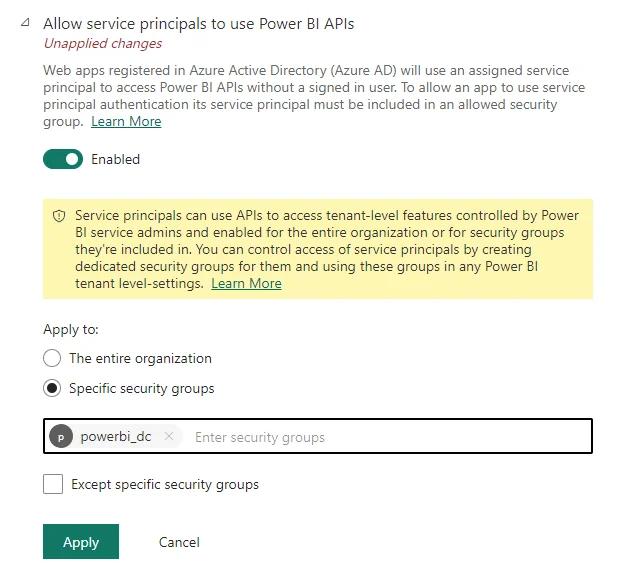
Enabling API settings in Power BI - Image by Atlan.
Admin API settings: Allow service principals to use read-only admin APIs
Expand this and select Enabled. In Apply to, select Specific security groups and enter the name of the Azure security group you created above. Then, select Apply.
Admin API settings: Enhance admin APIs responses with DAX and mashup expressions
Expand this and select Enabled. In Apply to, select Specific security groups and enter the name of the Azure security group you created above. Then, select Apply.
7. Add your group as a workspace viewer #
Finally, to access a workspace, you’ll need to add the app registration as a workspace user. You do this by adding the Azure security group you created above to the workspace with Viewer permissions.
To access the workspace, go to the Power BI portal and, from the left-hand menu, select Workspaces. Select the Access button above the table.
In the resulting dialog box, in the Enter email addresses field, enter the name of the security group you created above. Change the dropdown next to it to Viewer and then select Add.
Note: You can also automate this procedure using the Add-PowerBIWorkspaceUser cmdlet with a -PrincipalType of Group. This is useful if you have a large number of workspaces to which you need to add data catalog crawler access.
Configure data catalog crawler for Power BI data #
With all of that configured, we can now set up our crawler in our data catalog. This procedure will differ depending on which data catalog you use. In the text that follows, we’ll show how this works in Atlan.
In Atlan, you create a new Workflow that uses the Power BI Assets package. This is a package created and maintained by Atlan for crawling Power BI data.
In the Atlan Power BI assets package, for Authentication, select Service Principal. (Remember, as we discussed above, an Azure app registration is just another name for a service principal.)
Then, paste in the Tenant ID, Client ID (App ID), and Client Secret information that you copied earlier.
Once entered, select Test authentication to verify that the connection works. (If it fails, you may need to generate a new client secret for your app registration and try again.)
Once done, click Next and then give your connection a name, such as Development or Production. You can also configure Connection Admins to control who in Atlan has access to modifying the Power BI connection.
Configure the crawler #
Once you’ve set up your Power BI connection, you can further configure the crawler by specifying included and excluded workspaces.
Your data catalog may also have specialized behavior surrounding certified datasets. Certified Power BI datasets are datasets that someone in your organization has verified are complete and accurate.
Atlan also supports the concept of certification and will, by default, automatically mark anything certified in Power BI as Verified in Atlan. To change this behavior, change the Attach endorsements in Power BI option in your crawler to Send a request. This will generate a request for manual approval of certification status of the dataset in Atlan.
Finally, once you’ve configured the crawler, you can either run it once or set it to run on a schedule. You can schedule the crawler to run hourly, daily, weekly, or monthly.
Business outcomes for cataloging data from Power BI #
Tracking data in a data catalog provides numerous benefits by providing a single location where you can discover, tag, classify, and govern all of an organization’s data.
Cataloging Power BI specifically can play a key role in democratizing data within a company. Power BI is one of the most popular self-service tools used today for analytics reporting. However, its self-service nature can lead to data silos full of outdated or inaccurate data.
Adding Power BI workspaces to your data catalog provides a balance between autonomy and data governance. Users can continue to generate reports to fit their needs, while the organization retains visibility and oversight via the data catalog.
How to deploy Atlan for Power BI #
We’ve covered most of the information you’d need to deploy Atlan for Power BI above. For more details, consult our detailed documentation:
- How to set up Microsoft Power BI
- Create an Azure Active Directory Application
- Add permissions
- Create a client secret
- Retrieve the tenant and client IDs
- Create a security group
- Enable extra admin API settings
- Add service principal as a workspace viewer
- How to crawl Microsoft Power BI
- Select the source
- Provide credentials
- Configure the connection
- Configure the crawler
- Run the crawler
- What does Atlan crawl from Microsoft Power BI?
- Troubleshoot Microsoft Power BI connectivity
- Preflight checks for Microsoft Power BI
Data Catalog for Power BI: Related reads #
- What Is a Data Catalog? & Do You Need One?
- AI Data Catalog: Exploring the Possibilities That Artificial Intelligence Brings to Your Metadata Applications & Data Interactions
- 8 Ways AI-Powered Data Catalogs Save Time Spent on Documentation, Tagging, Querying & More
- Data Catalog Market: Current State and Top Trends in 2023
- 15 Essential Data Catalog Features to Look For in 2023
- What is Active Metadata? — Definition, Characteristics, Example & Use Cases
- Data catalog benefits: 5 key reasons why you need one
- Open Source Data Catalog Software: 5 Popular Tools to Consider in 2023
- Data Catalog Platform: The Key To Future-Proofing Your Data Stack
- Top Data Catalog Use Cases Intrinsic to Data-Led Enterprises
- Business Data Catalog: Users, Differentiating Features, Evolution & More
Share this article


