Guide to Setting up OpenLineage

Share this article
OpenLineage was created out of the need for an open standard to work with an open-source data catalog called Marquez. The team at WeWork, therefore, made Marquez the first reference implementation of OpenLineage. It’s important to note that the core idea of OpenLineage is to provide a solid data lineage collection framework for different data catalogs and data discovery tools, which is why you’ll see a lot of tools like Egeria, Airflow, Atlan, Marquez, etc., support lineage metadata consumption from OpenLineage.
Modern data problems require modern solutions - Try Atlan, the data catalog of choice for forward-looking data teams! 👉 Book your demo today
In this article, you’ll look at spinning up an essential OpenLineage ecosystem using Docker and Docker Compose. This basic setup will also spin up a Marquez HTTP backend and a Marquez frontend application. Both of these application components will be able to collect and consume events from OpenLineage. You’ll be using a Docker Compose YAML file hosted in the official GitHub repository of the Marquez project.
To set up OpenLineage, you’ll need to go through the following steps:
- Step 1: Understanding the prerequisites for installing OpenLineage
- Step 2: Understanding core OpenLineage concepts
- Step 3: Cloning the Marquez Project GitHub repository
- Step 4: Installing Marquez & OpenLineage using Docker Compose
- Step 5: Load Sample Data using Marquez API
- Step 6: Browsing the Marquez UI
Let’s start by understanding the prerequisites.
Table of contents #
- Step 1. Prerequisites
- Step 2. Understanding Core OpenLineage Concepts
- Step 3. Cloning the Marquez Project GitHub Repository
- Step 4. Installing Marquez & OpenLineage using Docker Compose
- Step 5. Load Sample Data using Marquez API
- Step 6. Browsing the OpenLineage GUI
- Conclusion
- Setting up OpenLineage: Related reads
Step 1. Prerequisites #
OpenLineage, like many other open-source data catalogs, provides a way to get started quickly using a Docker-based deployment on your local machine. For that, you need to have the following things working on your machine:
- Docker Engine ≥ 17.05
- Docker Compose
The YAML file that Docker Compose will pick up from the repository will deploy the Marquez backend and UI, so there’s nothing additional that you need to do for that. Let’s understand a bit of the terminology and the architecture of OpenLineage now.
Step 2. Understanding Core OpenLineage Concepts #
As OpenLineage is an open standard for metadata collection, storage, and retrieval, it provides a base data model to do that. This means that irrespective of your source of lineage metadata, all lineage metadata collected will be reshaped and conformed to a standard model.
The core entities this model is built upon (jobs, runs, and data sets) have facets, which are user-defined chunks of metadata that help you enrich the data lineage you’ve already extracted from any given source.
Step 3. Cloning the Marquez Project GitHub Repository #
Clone the Marquez Project GitHub repository to your local machine using the following git clone command:
git clone https://github.com/MarquezProject/marquez.git
This repository gives you access to Marquez, too, but deploying a full-fledged Marquez is out of the scope of this article. However, we’ve got you covered if you want to learn more about it.
Step 4. Installing Marquez & OpenLineage using Docker Compose #
Now, let’s use the up.sh shell script in the docker subfolder to point grab the docker-compose.yml file and deploy three docker containers, namely, marquez-web, marquez-api, and marquez-db. You won’t see a separate container for OpenLineage; it is only the data model specification and not a service that communicates with other components.
cd marquez
./docker/up.sh
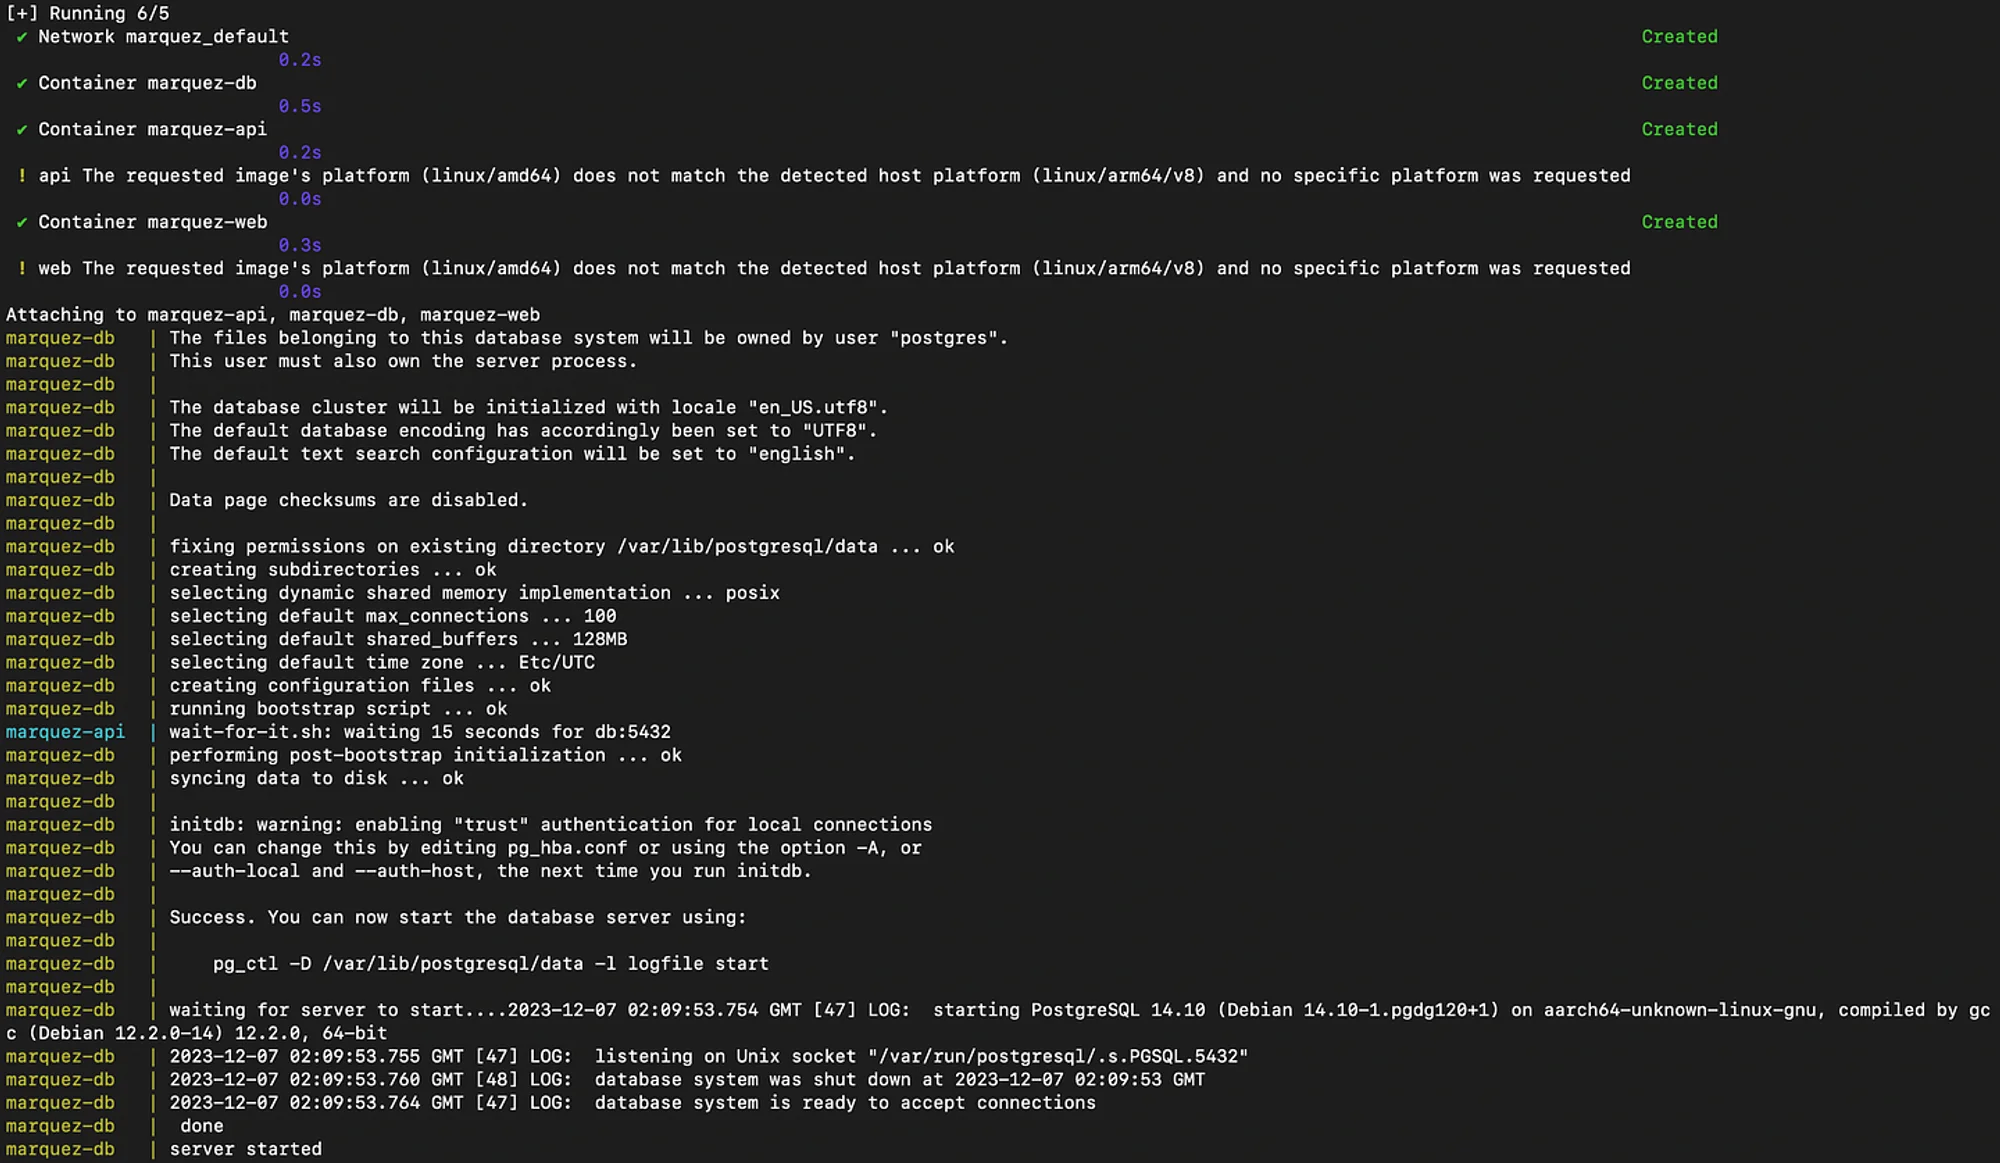
Once you execute this command, you should end up with a terminal screen that looks something like the following:

Spinning up marquez-db Docker container - Image by Atlan.
The above screen shows marquez-db being started. To ensure that your deployment doesn’t fail at this step, you need to ensure that you don’t have an existing PostgreSQL server or any other application using port 5432. Just after marquez-db is up, marquez-web will also start listening on port 3000, meaning you can log onto Marquez UI at http://localhost:5000.

Spinning up the marquez-web and marquez-api containers on port 3000 and 5000 - Image by Atlan.
What you’ve seen is the happy flow. If you’re using a Mac with Apple Silicon, deploying OpenLineage might not be as straightforward. You’ll need to ensure the correct file-sharing implementation with virtualization enabled and selected in the Docker settings.
- VirtioFS has virtualization enabled by default — this DID NOT work.
- gRPC FUSE needs you to enable virtualization manually — this worked.
Although VirtioFS is considered to be faster than gRPC FUSE and is a newer file-sharing implementation, it doesn’t work for this deployment, so what you need to do is to have the configuration shown in the image below to have a successful OpenLineage deployment on your Apple Silicon Mac:
![]()
Changing Docker file-sharing virtualization settings to support OpenLineage + Marquez installation on Apple Silicon - Image by Atlan.
Once you make these changes, restart Docker and start your containers again. You should be good to go.
Step 5. Load Sample Data using Marquez API #
The OpenLineage documentation provides two sample API calls to the marquez-api server listening on port 5000 to load a sample job with inputs and outputs to make some data available when you open the Marquez UI on your browser. Use the following POST call to store a job START event for a job called my-job in the namespace my-namespace with input named my-input, as shown in the image below:

A sample event to create a START type event for a job - Image by Atlan.
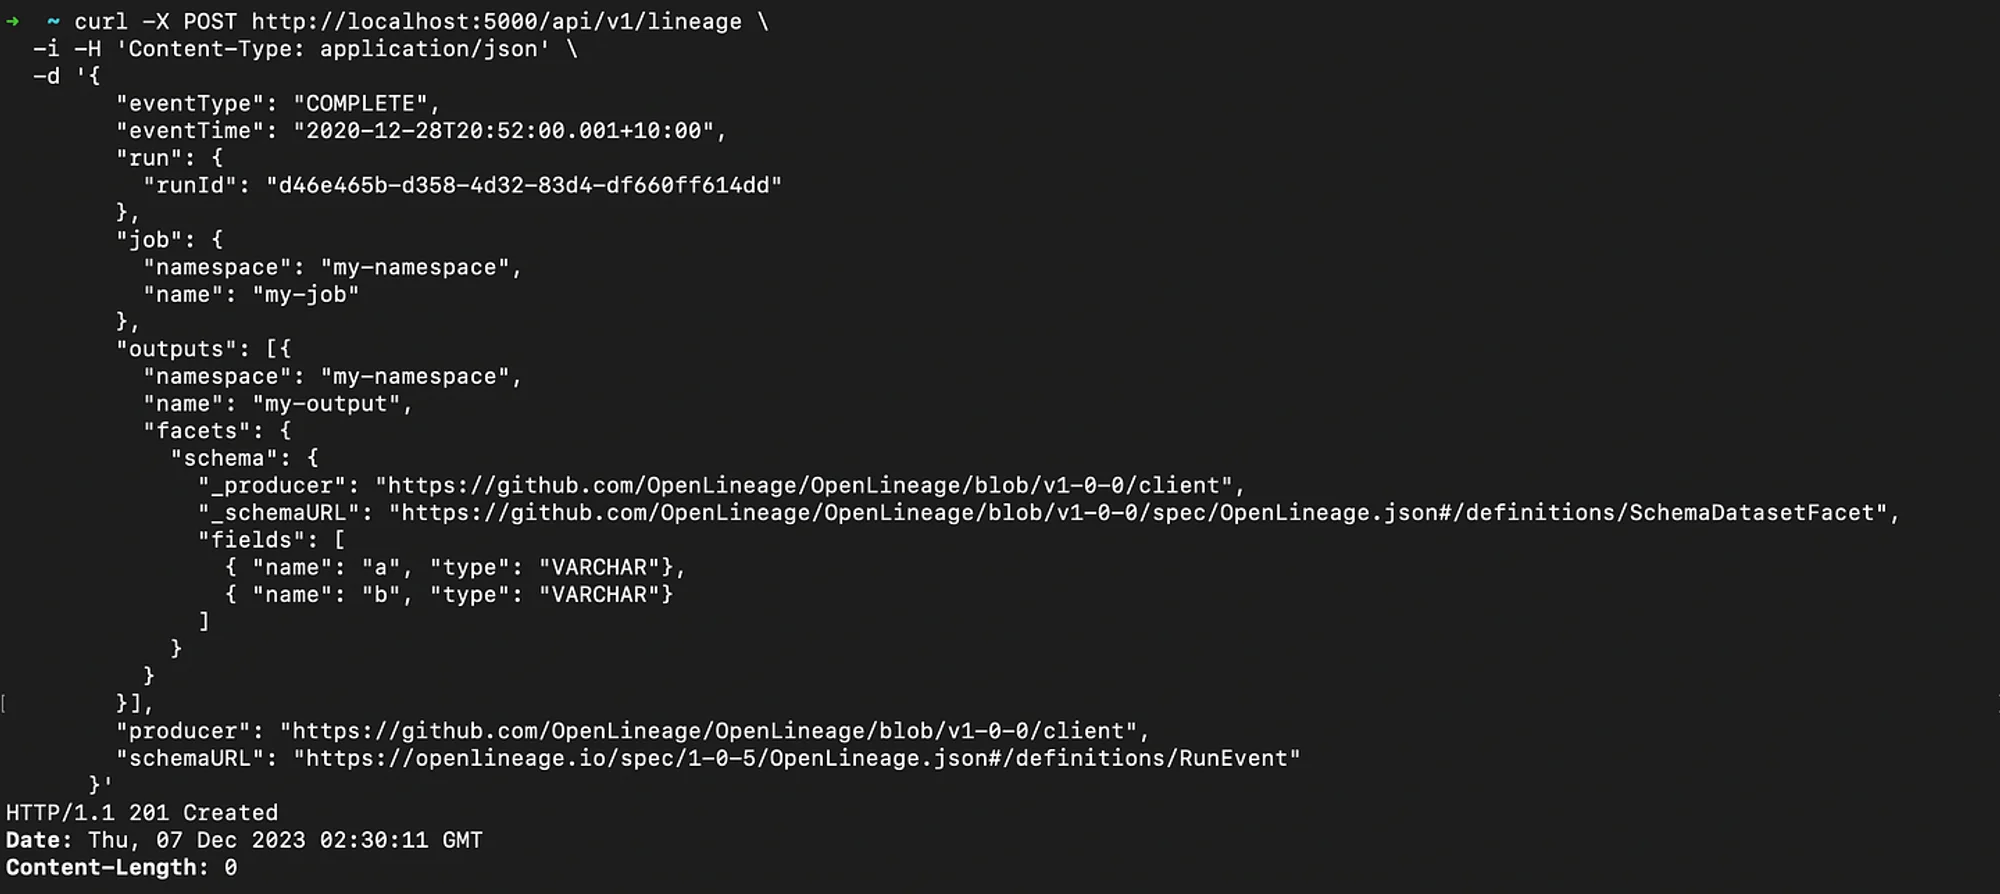
The second call is another POST call for marking the job COMPLETE with the output named my-output and a facet containing the schema of the data produced by the job, as shown in the image below:

A sample event to create a COMPLETE type event for the same job - Image by Atlan.
Once both of these POST calls have been executed successfully, they should be visible in the Marquez console when exploring linage metadata. Let’s go and have a look.
Step 6. Browsing the OpenLineage GUI #
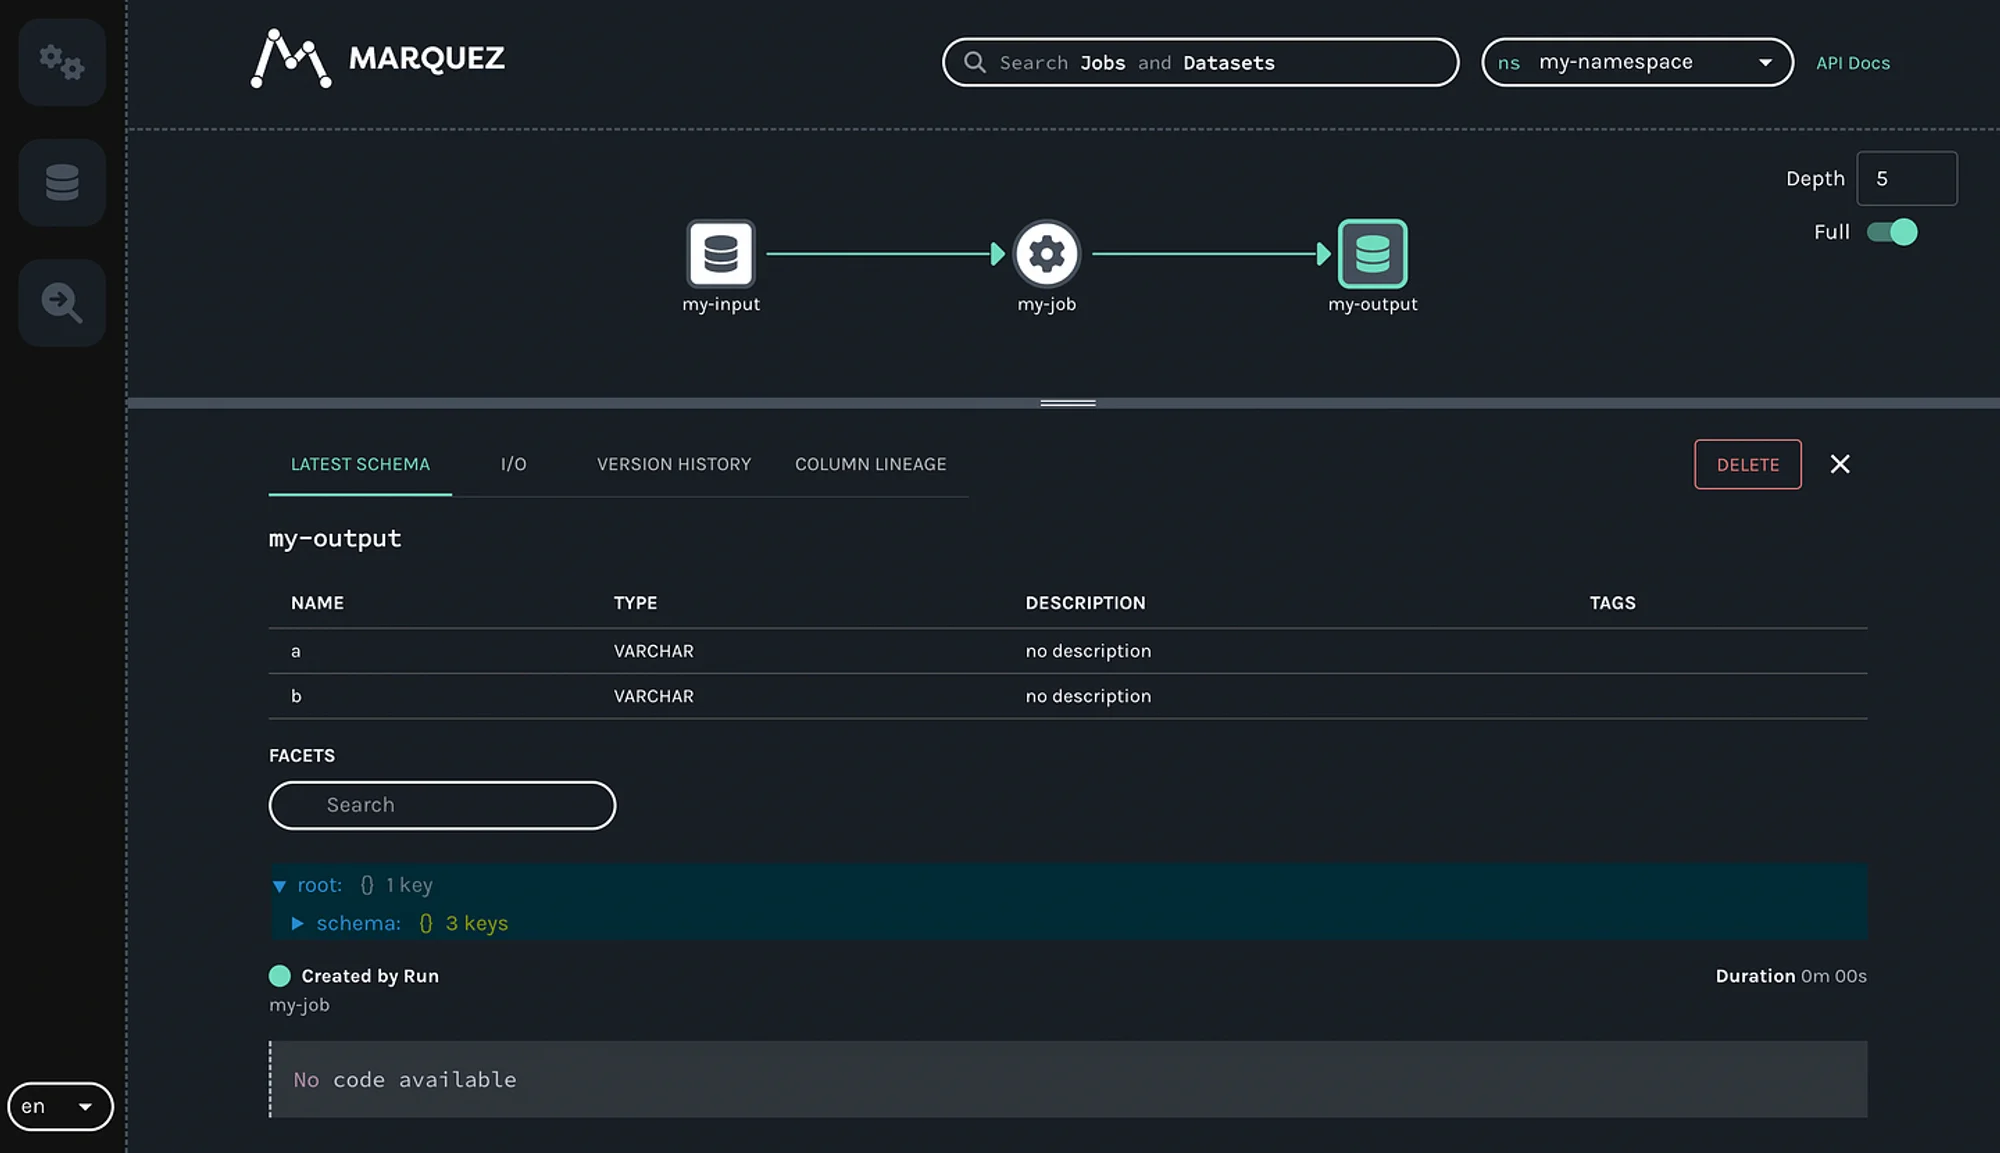
You can finally log onto http://localhost:3000 and explore the Marquez UI that uses the OpenLineage specification to collect, store, and retrieve data. For the sake of clarity, the two events that you pushed into Marquez can be seen in the Marquez UI, as shown in the image below:

The Marquez UI showing the sample data loaded using the OpenLineage specification - Image by Atlan.
You can send more such events from a wide range of supported sources and send your own custom events using the OpenLineage Open API.
Conclusion #
This article walked you through an OpenLineage-based setup to give you a sense of the OpenLineage specification and the ease of use it brings. As mentioned earlier in the article, OpenLineage already integrates with many open-source and proprietary tools as their sole lineage metadata collection framework or as a lineage metadata aggregator. This makes it an exciting tool to learn about. In the official documentation, you can learn more about OpenLineage and its related project, Marquez.
Setting up OpenLineage: Related reads #
- OpenLineage documentation
- OpenLineage GitHub repository
- OpenLineage: Understanding the Origins, Architecture, Features, Integrations & More
- OpenMetadata vs. OpenLineage: Primary Capabilities, Architecture & More
- How to integrate Airflow/OpenLineage
- Marquez Made Easy: The Ultimate Guide for You!
- Best Open Source Data Lineage Tools
Share this article


