


Snowflake data lineage at a glance
Permalink to “Snowflake data lineage at a glance”| Aspect | Details |
|---|---|
| What It Is | Snowflake data lineage is a native governance capability within Snowflake Horizon that automatically records how data flows between objects and tracks dependencies across your Snowflake environment. |
| How It Works | When a query executes, Snowflake parses the SQL, identifies the upstream and downstream objects involved, and writes those relationships into its metadata layer (i.e., Snowflake Horizon). |
| What It Tracks | Object lineage (tables, views, materialized views, dynamic tables, external tables, Iceberg tables, stages), column-level lineage, process lineage (stored procedures, tasks), and ML lineage (Datasets, Feature Views, Models). |
| What It Doesn’t Track | External lineage from tools like dbt, Airflow, or Fivetran without additional configuration; column-level lineage for externally ingested pipelines; temporary tables; objects in shared databases; and data movement resulting from disjointed, multi-step queries. |
| Retention Period | Lineage data is retained for 1 year. |
| Delay | ACCOUNT_USAGE views have a data latency of 45 minutes to 3 hours. The Snowsight lineage UI and GET_LINEAGE function reflect changes in near real-time. |
How does Snowflake enable data lineage?
Permalink to “How does Snowflake enable data lineage?”Lineage lets an agent trace its answer back to source — turning model output into auditable, trustworthy intelligence. In Snowflake, that trace starts with how the platform captures lineage natively across your warehouse. Snowflake enables data lineage through its native Snowflake Horizon governance framework, which automatically captures and manages lineage as part of its core services.
Snowflake data lineage captures how data flows from source to target objects and lets you see where the data in an object came from or where it goes. Lineage captures two types of relationships:
-
Data movement: When data is copied or materialized from one object to another via
CTAS,INSERT, orMERGEoperations -
Object dependencies: When an object references a base object but does not materialize or copy data, such as when a view references a table.
Beyond these two core relationship types, Snowflake also captures:
-
Column lineage: Traces how individual columns flow from source objects into downstream targets, including tracking distance — how many hops away a column is in the lineage graph.
-
Process lineage: Stored procedures and tasks that mediate data movement between objects.
Note: External lineage and ML lineage aren’t captured out of the box and require additional configuration. We’ll explore these topics in the sections below.
The Ultimate Guide to Evaluating Data Lineage for AI-Native Governance
Download the GuideWhat are the prerequisites for setting up data lineage in Snowflake?
Permalink to “What are the prerequisites for setting up data lineage in Snowflake?”Before lineage starts flowing in Snowflake, a few prerequisites need to be in place.
Edition requirement
Permalink to “Edition requirement”Most core lineage features require Enterprise Edition or higher. This includes:
-
Snowsight lineage UI
-
Column-level lineage via
ACCESS_HISTORY -
The
GET_LINEAGEfunction -
Object tagging with automatic propagation
-
ML lineage
Basic features like OBJECT_DEPENDENCIES and QUERY_HISTORY are available across all editions.
Privileges
Permalink to “Privileges”Three privileges govern lineage access in Snowflake:
-
VIEW LINEAGE: Required to view lineage for any object. Granted to thePUBLICrole by default — revoke this and reassign it to custom roles to control visibility. -
RESOLVE ALL: Allows full lineage graph traversal, including objects the role doesn’t otherwise have privileges on. Restrict this to data stewards and governance tooling only. -
INGEST LINEAGE: Required for writing external lineage into Snowflake via the API. Grant only to trusted service accounts or pipeline orchestrators.
For access to ACCOUNT_USAGE views like OBJECT_DEPENDENCIES and ACCESS_HISTORY, grant the GOVERNANCE_VIEWER or USAGE_VIEWER database roles.
System catalog
Permalink to “System catalog”Enable the system catalog and access schema at the account level to make lineage metadata queryable via ACCOUNT_USAGE. This can be done by the account admin via SQL or from the Snowsight UI.
For external lineage integration
Permalink to “For external lineage integration”External lineage includes information from external ETL tools and source databases to create a unified view of how data moves through your data pipeline.

External data lineage in Snowflake. Source: Snowflake Docs
Any data tool with an OpenLineage integration can be configured to send lineage data to Snowflake. That’s why external lineage ingestion requires an OpenLineage-compatible connector or direct use of the Snowflake REST API.
The steps involved are:
-
Grant the
INGEST LINEAGEprivilege to the service user authenticating to the external lineage endpoint. -
Configure your data tool to send OpenLineage events to the Snowflake REST endpoint at
/api/v2/lineage/external-lineage. -
Choose an authentication method. Snowflake supports multiple auth methods for REST endpoints, including key-pair JWT.
-
Run your data tool as usual. OpenLineage events are sent to Snowflake automatically and appear in the native Snowsight lineage graph.
Note that external lineage is currently in Preview.
For ML lineage tracing
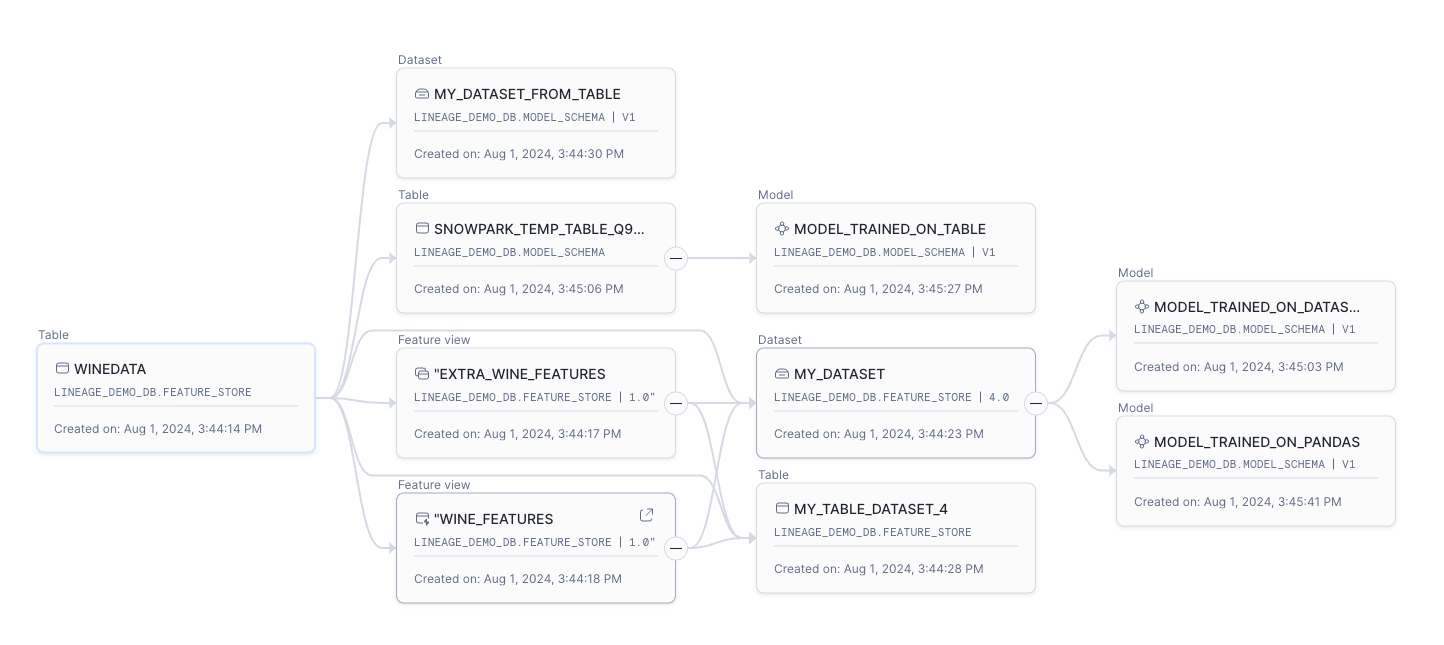
Permalink to “For ML lineage tracing”ML Lineage tracks data as it flows through your ML pipelines, tracing lineage between source tables, views, stages, feature views, datasets, registered models, and deployed model services.

How ML lineage works. Source: Snowflake Docs
Lineage for models is captured when the model is logged to the Model Registry. Training a model using Snowpark ML automatically generates lineage records, if the model is trained from a Snowpark DataFrame.
Other scenarios, such as training from a Pandas DataFrame or outside of Snowflake entirely, need extra effort. You can capture lineage by passing a Snowpark DataFrame backed by the source data object (sample_input_data) to the Model Registry’s log_model method.
ML lineage can be queried in three ways:
-
Snowsight UI: Every artifact’s landing page has a Lineage tab showing upstream and downstream objects.
-
Snowpark ML
.lineage()method: Available onFeatureView,ModelVersion, andDatasetobjects, acceptingdirection(UPSTREAMorDOWNSTREAM) anddomain_filterarguments. -
SNOWFLAKE.CORE.GET_LINEAGESQL function: For programmatic traversal via SQL.

An example of ML lineage on Snowsight. Source: Snowflake Docs
Current limitations of ML lineage on Snowflake
-
Tables and views created from model predictions don’t capture the lineage relationship back to the model. So, if you look at an output table’s lineage, you won’t see the model as an upstream dependency.
-
Lineage information is not replicated. So, your replicated environment will have the data and models, but not the lineage graph.
Note that ML Lineage is available in the snowflake-ml-python package version 1.6.0 and later. Like other features listed earlier, ML lineage also requires Snowflake Enterprise Edition or higher.
How to set up Snowflake data lineage in 8 steps
Permalink to “How to set up Snowflake data lineage in 8 steps”Setting up data lineage in Snowflake doesn’t require additional infrastructure. Here’s a step-by-step walkthrough.
Step 1: Check your Snowflake edition and review the prerequisites
Permalink to “Step 1: Check your Snowflake edition and review the prerequisites”Before proceeding, make sure you’ve covered the foundational requirements, such as Snowflake edition, required privileges, and system catalog configuration, outlined in the prerequisites section above.
Step 2: Create a dedicated role for lineage
Permalink to “Step 2: Create a dedicated role for lineage”Snowflake’s access control layer works with users and roles. Whatever permissions you have to grant, you grant them to a role and after that, you assign a role to a user. You can also assign roles to other roles, making role hierarchies.
In this case, you’ll create a new role called data_lineage_role, using the following command:
CREATE OR REPLACE ROLE data_lineage_role;
Step 3: Create a dedicated user
Permalink to “Step 3: Create a dedicated user”If you already have a data_catalog_user (as prescribed in this tutorial), use the same user; otherwise, create a new one.
In addition to the data_catalog_role, we’ll also assign the data_lineage_role to the same user.
Here are the commands you can use to create a database user in Snowflake:
-- Method 1: With password
CREATE USER data_lineage_user PASSWORD='<password>' DEFAULT_ROLE=data_lineage_role DEFAULT_WAREHOUSE='<warehouse_name>' DISPLAY_NAME='<display_name>';
-- Method 2: With public key
CREATE USER data_lineage_user RSA_PUBLIC_KEY='<rsa_public_key>' DEFAULT_ROLE=data_lineage DEFAULT_WAREHOUSE='<warehouse_name>' DISPLAY_NAME='<display_name>';
Step 4: Identify tables and views you’ll be using for inferring data lineage from Snowflake
Permalink to “Step 4: Identify tables and views you’ll be using for inferring data lineage from Snowflake”To find out what permissions you need to grant to the data_lineage_role, you need to understand the different methods of fetching lineage metadata from Snowflake.
Here’s a basic comparison of the function and level of detail of three different data sources for lineage metadata in Snowflake:
| SCHEMA.OBJECT | FUNCTION | LEVEL OF DETAIL |
|---|---|---|
| INFORMATION_SCHEMA.OBJECT_DEPENDENCIES | Captures how different Snowflake objects are dependent on one another. | Low |
| ACCOUNT_USAGE.ACCESS_HISTORY | Contains queries for DML operations. Helps with column-level lineage. | High |
| ACCOUNT_USAGE.QUERY_HISTORY | Logs every query in the last 365 days. | High |
Step 5: Grant the required privileges
Permalink to “Step 5: Grant the required privileges”The VIEW LINEAGE privilege controls whether a user can view data lineage for their objects. By default, the PUBLIC role has this privilege. To narrow down who can view lineage, revoke it from PUBLIC and grant it to custom roles instead.
Assign all appropriate privileges based on your use case:
For viewing lineage
REVOKE GRANT OPTION FOR PRIVILEGE VIEW LINEAGE ON ACCOUNT FROM ROLE PUBLIC;
GRANT VIEW LINEAGE ON ACCOUNT TO ROLE data_lineage_role;
For full graph traversal across all objects
GRANT RESOLVE ALL ON ACCOUNT TO ROLE data_lineage_role;
For accessing ACCOUNT_USAGE lineage views
GRANT DATABASE ROLE SNOWFLAKE.GOVERNANCE_VIEWER TO ROLE data_lineage_role;
GRANT DATABASE ROLE SNOWFLAKE.USAGE_VIEWER TO ROLE data_lineage_role;
For ingesting external lineage (service accounts only)
GRANT INGEST LINEAGE ON ACCOUNT TO ROLE data_lineage_role;
In addition to this, the INFORMATION_SCHEMA has a lot of other objects that make Snowflake’s internal data dictionary, such as TABLES, COLUMNS, etc. You can also use the metadata from those objects to make more sense of data lineage.
Step 6: Assign the database role to a database user
Permalink to “Step 6: Assign the database role to a database user”Once you’re done assigning all the relevant permissions to the role, you’ll need to assign the role to the data_lineage_user using the following GRANT statement:
GRANT ROLE data_lineage_role TO USER data_lineage_user;
You should now be ready to connect to your Snowflake account from your data catalog or lineage tool.
Step 7: Configure the Snowflake connector and start crawling lineage metadata
Permalink to “Step 7: Configure the Snowflake connector and start crawling lineage metadata”To configure the Snowflake connector, log into your data catalog or lineage tool and find the Snowflake connector. Enter the database user credentials into that connector, and you should be all set.
If you cannot connect to your Snowflake warehouse, you should check if you missed any networking or security steps. You can use the SnowCD (Snowflake Connectivity Diagnostic) tool to evaluate your network connectivity.
Once you resolve any connectivity issues, you can start crawling lineage metadata.
Most data catalog or lineage tools provide you with an option to run the crawler in three different ways:
-
Ad-hoc crawl (manual crawl using a CLI command or the data catalog console)
-
Scheduled crawl (E.g., based on a cron expression)
-
Event-based crawl (E.g., crawl triggered from an event that the data catalog can listen to)
Step 8: Enable the system catalog
Permalink to “Step 8: Enable the system catalog”Enable the system catalog and access schema at the account level to make ACCOUNT_USAGE lineage views queryable. This can be done by the account admin via SQL or from the Snowsight UI under Admin > Accounts.
Step 9: Verify lineage is flowing
Permalink to “Step 9: Verify lineage is flowing”To start using data lineage in Snowsight:
-
Sign in with the necessary privileges.
-
Navigate to Catalog > Database Explorer.
-
Select a supported object such as a table or view.
-
Select the Lineage tab.

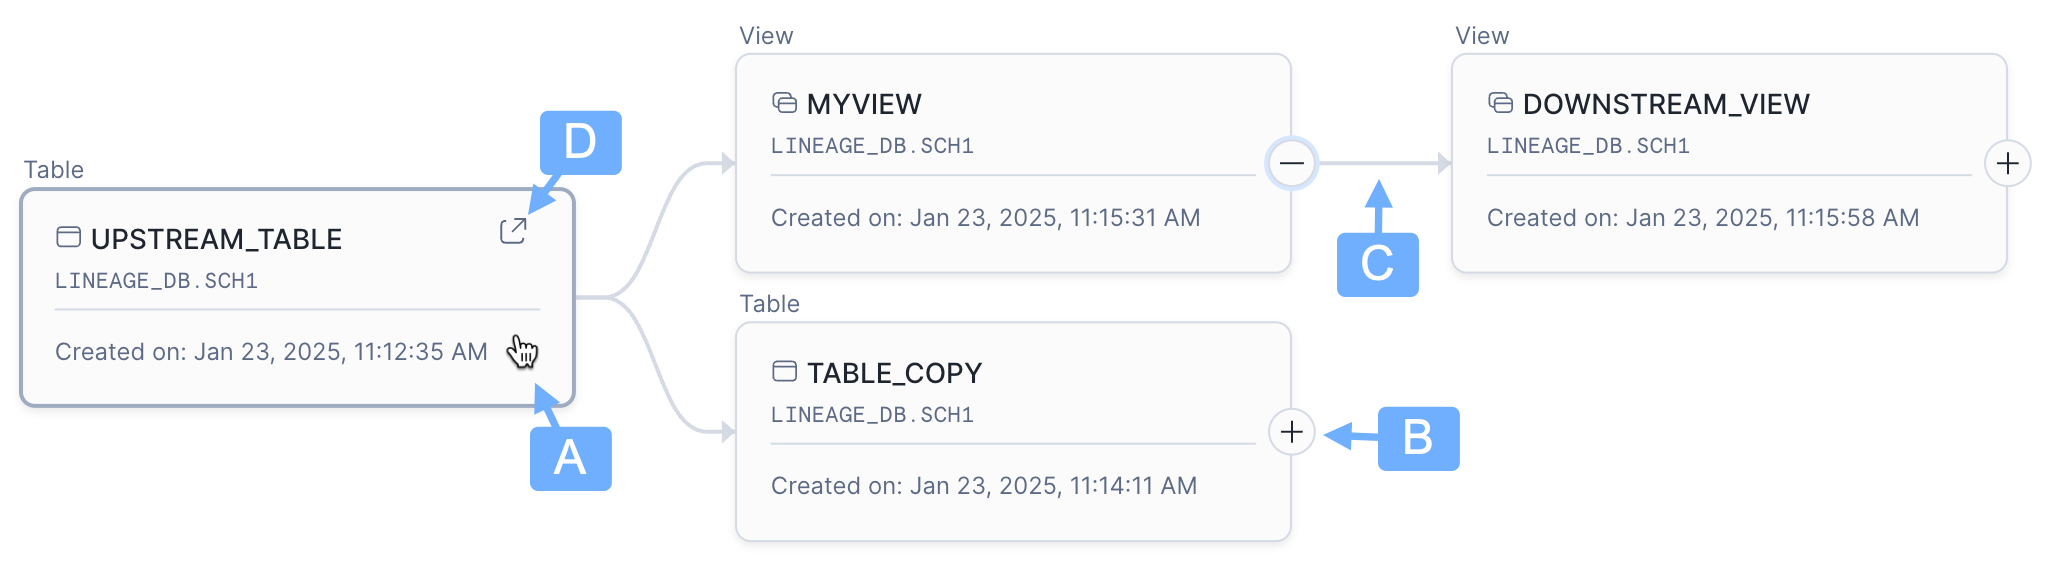
Snowflake data lineage. Source: Snowflake Docs
Basic lineage actions available in Snowflake (refer to the image provided above) include:
-
A: Select an object to show additional details (columns, tags, etc.)
-
B: Select +/- to show or hide upstream/downstream objects.
-
C: Select the arrow connecting two objects to see information on how the downstream object was created. This depends on your access control privileges.
-
D: Opens a new lineage diagram that shows the lineage of the selected object.
Why should you consider setting up an external platform for data lineage tracking in Snowflake?
Permalink to “Why should you consider setting up an external platform for data lineage tracking in Snowflake?”When you put your Snowflake lineage metadata into your data catalog or lineage tool, you can identify other data sources and connect them with your data catalog to get a fuller picture of the flow of data and its lineage in your data platform.
Here’s how an external platform can extend Snowflake data lineage for your entire data and AI ecosystem:
-
Cross-system column-level lineage: In Snowflake, external lineage — from dbt, Airflow, Fivetran, Spark, and BI tools — is limited to table-level only. A dedicated lineage platform can auto-stitch column-level lineage across your entire stack, not just within Snowflake. So, you can build a single, complete lineage graph from source to dashboard without manual stitching.
-
A library of connectors: Snowflake’s external lineage feature supports OpenLineage-compatible tools, but coverage is limited to what you configure yourself. An external platform can offer a broad library of pre-built connectors across data warehouses, transformation tools, orchestrators, BI platforms, and AI systems.
-
Bidirectional tag sync: Snowflake’s tag propagation works within the platform, but tags don’t travel to or from external tools automatically. An external platform with bidirectional tag sync ensures that classifications applied in your catalog reflect in Snowflake, and tags applied in Snowflake reflect back in the catalog. This keeps governance consistent across systems.
-
Active, actionable lineage: Snowflake’s lineage graph is informational. An external platform can make lineage active: automatically propagating metadata along lineage paths, surfacing downstream impact analysis directly in developer workflows, and triggering governance actions when quality issues are detected.
-
AI access via MCP: AI agents can access lineage context through an MCP Server, enabling safer and smarter automation — from automated root cause analysis to dependency-aware transformations to proactive checks before deployments.
-
AI and ML lineage beyond Snowflake: Snowflake’s ML lineage is strong within its ecosystem, but models trained on data from multiple platforms, or deployed to external serving infrastructure, fall outside its scope. A dedicated platform can provide end-to-end AI lineage from raw data through feature engineering, training datasets, model versions, and downstream applications across all platforms.
How does a metadata control plane enhance Snowflake data lineage?
Permalink to “How does a metadata control plane enhance Snowflake data lineage?”Atlan is an active metadata control plane that sits across your entire stack — not just Snowflake — stitching together lineage, propagating context, and making governance active and actionable across every tool your organization uses.
Atlan automatically extracts metadata from Snowflake’s ACCOUNT_USAGE and INFORMATION_SCHEMA, mines query history to build comprehensive lineage graphs, and tracks column-level relationships for impact analysis.
In addition, it gives you a rich interface to preview and query data from your Snowflake warehouses, making it a one-stop shop for all your data needs. This unified view provides deeper context about data flow, usage patterns, and asset relationships, making it easier to manage and govern your data estate.
Beyond what Snowflake captures natively, here’s what Atlan adds:
-
Automated cross-system column-level lineage. Atlan delivers automated, cross-system, column-level lineage — complete data journeys from ingestion through transformation to consumption — extending beyond Snowflake to show complete end-to-end visibility. Column-level relationships that cross platform boundaries are stitched automatically rather than hand-configured.
-
Bidirectional tag sync with Snowflake. Tags added in Atlan reflect in Snowflake and vice versa, keeping governance aligned across teams and platforms without manual duplication.
-
Active metadata propagation along lineage. Tags, glossary terms, and descriptions automatically travel across lineage and sync bidirectionally with Snowflake.
-
Data quality as a lineage trust signal. Atlan unifies quality checks, metadata, lineage, and governance into a single layer, allowing teams to define rules, surface trust signals, and bring quality signals from other tools into a central trust center.
-
A semantic layer for AI-ready lineage. Through Atlan’s MCP Server, AI agents and automations can access lineage context directly, enabling workflows like automated root cause analysis, dependency-aware transformations, and proactive checks before deployments.
Real stories from real customers
Permalink to “Real stories from real customers”
Massive Asset Cleanup: Mistertemp's Lineage-Driven Optimization to Deprecate Two-Thirds of Their Data Assets
"Using Atlan's automated lineage, started analyzing [data assets in] Snowflake and Fivetran. They could see every existing connection, what was actually used. We kept those, and for everything else, we would disconnect."
Data Team
Mistertemp
🎧 Listen to AI-generated podcast: Mistertemp's Lineage-Driven Optimization
Improved time-to-insight and reduced impact analysis time to under 30 minutes
"I've had at least two conversations where questions about downstream impact would have taken allocation of a lot of resources. Actually getting the work done would have taken at least four to six weeks, but I managed to sit alongside another architect and solve that within 30 minutes with Atlan."
Karthik Ramani, Global Head of Data Architecture
Dr. Martens
🎧 Listen to AI-generated podcast: Dr. Martens' Journey to Data Transparency
From Hours to Minutes: How Aliaxis Reduced Effort on Root Cause Analysis by almost 95%
"A data product owner told me it used to take at least an hour to find the source of a column or a problem, then find a fix for it, each time there was a change. With Atlan, it's a matter of minutes. They can go there and quickly get a report."
Data Governance Team
Aliaxis
🎧 Listen to AI-generated podcast: Aliaxis' Global Data Journey with Atlan
Moving forward with Snowflake data lineage
Permalink to “Moving forward with Snowflake data lineage”Snowflake data lineage provides essential visibility into data flows and relationships across your Snowflake ecosystem. Whether implemented through native features or enhanced by metadata platforms like Atlan, effective lineage tracking helps organizations maintain data quality, ensure compliance, and understand impact analysis.
By following the setup steps and best practices outlined above, data teams can implement comprehensive and accurate lineage tracking that scales with their data needs.
Learn more about automated, cross-system data lineage with Atlan
Book a DemoFAQs about Snowflake data lineage
Permalink to “FAQs about Snowflake data lineage”What is Snowflake data lineage?
Permalink to “What is Snowflake data lineage?”Snowflake data lineage refers to the process of tracking and visualizing how data moves and transforms within Snowflake. It helps teams understand the complete lifecycle of data—from its source to its final destination.
Why is data lineage important in Snowflake?
Permalink to “Why is data lineage important in Snowflake?”Snowflake data lineage is crucial because it provides transparency into data flows, enabling teams to ensure data quality, meet compliance requirements, and troubleshoot issues faster by understanding how data is used and transformed across Snowflake.
What types of relationships does Snowflake data lineage track?
Permalink to “What types of relationships does Snowflake data lineage track?”Snowflake tracks two main types of relationships: data movement (when data is copied between objects) and object dependencies (when objects reference each other without data copying, like views referencing tables).
How easy is it to set up Snowflake data lineage with Atlan?
Permalink to “How easy is it to set up Snowflake data lineage with Atlan?”Setting up data lineage with Atlan in Snowflake is simple. Atlan automatically captures and visualizes lineage across tables, columns, and queries in Snowflake, helping teams effortlessly manage their data environments without requiring extensive configuration.
Can Atlan display column-level lineage for Snowflake?
Permalink to “Can Atlan display column-level lineage for Snowflake?”Yes, Atlan provides column-level lineage for Snowflake, allowing users to track how data at the granular level is transformed and used across various datasets. This helps data teams ensure precision and accuracy in their data analysis.
How does Atlan handle changes in Snowflake’s data structure for lineage tracking?
Permalink to “How does Atlan handle changes in Snowflake’s data structure for lineage tracking?”Atlan continuously syncs with Snowflake, ensuring that changes in data pipelines, tables, or transformations are reflected in the data lineage views. This real-time tracking helps maintain an up-to-date lineage view without manual interventions.
What benefits does Snowflake data lineage offer to businesses using Atlan?
Permalink to “What benefits does Snowflake data lineage offer to businesses using Atlan?”By integrating Atlan with Snowflake, businesses can: gain a clear understanding of data transformations and workflows, improve compliance, enable active data and AI governance, ensure fit-for-purpose data with automated quality checks, and empower teams with contextual information for better decision-making and data utilization.
